|
Vector Shape Support: With Photoshop
6.0 you now have tools for creating and outputting crisp, editable vector
shapes and text. Using these tools, you can incorporate resolution-independent,
 vector-based
graphics and type along with pixel-based images to achieve a range of
design effects. This vector data can be saved in EPS, DCS, TIFF, and
PDF formats. The new shape tools: rectangle, rounded rectangle, ellipse,
polygon, vector-based
graphics and type along with pixel-based images to achieve a range of
design effects. This vector data can be saved in EPS, DCS, TIFF, and
PDF formats. The new shape tools: rectangle, rounded rectangle, ellipse,
polygon,  custom
shape, and line, let you create shapes in three forms: as work paths,
as shape layers, or as painted pixels. When you select a shape tool,
a context-sensitive tool options bar appears at the top of the workspace,
so you can select options. For example, for a custom
shape, and line, let you create shapes in three forms: as work paths,
as shape layers, or as painted pixels. When you select a shape tool,
a context-sensitive tool options bar appears at the top of the workspace,
so you can select options. For example, for a  rectangle,
you can set whether it's unconstrained, square, fixed size, proportional,
or drawn from the center (see image to the right for view of rectangle
options). Plus, you can select a layer style, blending mode, and opacity
setting for a shape layer before you start drawing. Photoshop 6.0 also
provides pathfinder operations for quickly combining basic shapes into
hard-to-draw shapes. These operations include: add, subtract, intersect,
and exclude (see image to right for examples). At any time, you can
edit the segments of any basic or combined shape by using the direct
selection, add anchor point, delete anchor point, and convert anchor
point tools. The image to the left shows two graphics: (1) a rectangle
cut out by an ellipse rectangle,
you can set whether it's unconstrained, square, fixed size, proportional,
or drawn from the center (see image to the right for view of rectangle
options). Plus, you can select a layer style, blending mode, and opacity
setting for a shape layer before you start drawing. Photoshop 6.0 also
provides pathfinder operations for quickly combining basic shapes into
hard-to-draw shapes. These operations include: add, subtract, intersect,
and exclude (see image to right for examples). At any time, you can
edit the segments of any basic or combined shape by using the direct
selection, add anchor point, delete anchor point, and convert anchor
point tools. The image to the left shows two graphics: (1) a rectangle
cut out by an ellipse 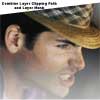 shape
using the subtract operation. As you can see, the anchor points are
still present so you can shape
using the subtract operation. As you can see, the anchor points are
still present so you can  edit
any part of the two shapes; and (2) the final custom shape. The custom
shapes you create can be saved in a shape library and used over and
over. And, since these libraries are portable, they can be shared among
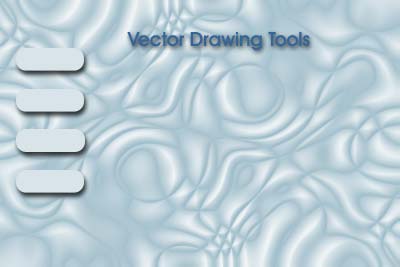
workgroups. Photoshop 6.0 also ships with a selection of custom shape
libraries. You can quickly create shapes for buttons using vector drawing
tools and layer styles. I created the buttons in the image to the left
with the rounded rectangular vector shape tool and then applied a layer
style for the drop shadow. The new vector drawing tools make it easy
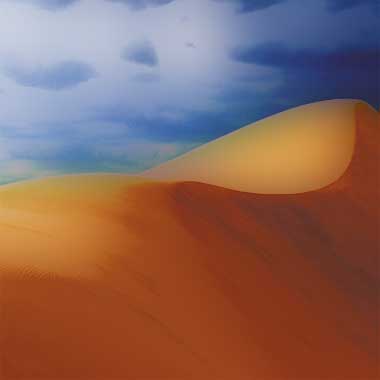
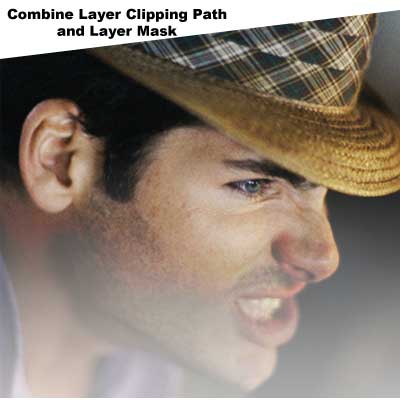
to clip out image areas using crisp-edged, editable shapes. You can
modify these layer clipping paths and even combine layer paths and layer
masks in the same image. For the graphic to the right, I used a clipping
path to delete the upper part of the picture and then used a layer mask
and a gradient so the image would fade out at the bottom but retain
crisp edges otherwise. edit
any part of the two shapes; and (2) the final custom shape. The custom
shapes you create can be saved in a shape library and used over and
over. And, since these libraries are portable, they can be shared among
workgroups. Photoshop 6.0 also ships with a selection of custom shape
libraries. You can quickly create shapes for buttons using vector drawing
tools and layer styles. I created the buttons in the image to the left
with the rounded rectangular vector shape tool and then applied a layer
style for the drop shadow. The new vector drawing tools make it easy
to clip out image areas using crisp-edged, editable shapes. You can
modify these layer clipping paths and even combine layer paths and layer
masks in the same image. For the graphic to the right, I used a clipping
path to delete the upper part of the picture and then used a layer mask
and a gradient so the image would fade out at the bottom but retain
crisp edges otherwise.
Vector Text Support:Vector support
in Photoshop 6.0 is not just limited to shapes. You can combine vector
text with pixel-based images for stunning results. Plus, there is now
direct text-editing in an image. You can enter text and modify style
directly in the image, without having to toggle back and forth from
a dialog box. If you rotate, scale, or skew your text in the image,
the text remains editable. Further, new type-warping features let you
distort type layers in the form of special shapes such as arcs and waves
(see image to right for view of special shapes). Extensive new options
for styling words and paragraphs now appear in Character and Paragraph
 palettes,
which operates similarly to the palettes in Adobe InDesign and Adobe
Illustrator. Here is an overview of the new character and paragraph palettes,
which operates similarly to the palettes in Adobe InDesign and Adobe
Illustrator. Here is an overview of the new character and paragraph
 options:
(1) Character--you can apply color on a per-character basis, scale characters
vertically and horizontally, set baseline shift, and prevent a range
of characters from breaking across a line, as well as specifying kerning,
leading, and tracking settings. Also Photoshop fully supports OpenType
fonts and their related features, such as all caps, small caps, superscript,
subscript, ligatures, and oldstyle figures. For non-OpenType fonts,
Photoshop produces faux versions of all of these features except for
ligatures and oldstyle; and (2) Paragraph--you can specify alignment,
space before and after, hanging punctuation, and left-, right-, and
first-line indents on a per-paragraph basis, plus justification controls
let you set minimum, maximum, and desired values for word spacing, letter
spacing, and glyph scaling, as well as autoleading. The image to the
left shows point text, first paragraph indenting, vertical text, small
caps, special tracking, and color applied per-character. options:
(1) Character--you can apply color on a per-character basis, scale characters
vertically and horizontally, set baseline shift, and prevent a range
of characters from breaking across a line, as well as specifying kerning,
leading, and tracking settings. Also Photoshop fully supports OpenType
fonts and their related features, such as all caps, small caps, superscript,
subscript, ligatures, and oldstyle figures. For non-OpenType fonts,
Photoshop produces faux versions of all of these features except for
ligatures and oldstyle; and (2) Paragraph--you can specify alignment,
space before and after, hanging punctuation, and left-, right-, and
first-line indents on a per-paragraph basis, plus justification controls
let you set minimum, maximum, and desired values for word spacing, letter
spacing, and glyph scaling, as well as autoleading. The image to the
left shows point text, first paragraph indenting, vertical text, small
caps, special tracking, and color applied per-character.
Content Layers: Photoshop 6.0 now
has two kinds of content layers: (1) adjustment layers, which have long
been an efficient way to apply editable color and tonal adjustments
to multiple layers, and (2) fill layers, which make it equally as quick
to apply editable gradients, patterns, and solid colors 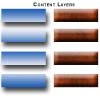 to
layers. These content layers are extremely flexible and allow you to
switch one type for another without having to delete the original layer
or layer mask and create a new one. For example, in the image to the
left I created a group of web buttons and then easily changed them using
a fill layer. The left column is the original set with a gradient, and
the right column is the second set with a pattern that was made with
just a few clicks of the mouse. Very easy and fun and a useful feature
for those designers who are indecisive and want to quickly view different
fills before they commit. to
layers. These content layers are extremely flexible and allow you to
switch one type for another without having to delete the original layer
or layer mask and create a new one. For example, in the image to the
left I created a group of web buttons and then easily changed them using
a fill layer. The left column is the original set with a gradient, and
the right column is the second set with a pattern that was made with
just a few clicks of the mouse. Very easy and fun and a useful feature
for those designers who are indecisive and want to quickly view different
fills before they commit.
Layer Styles: Layer effects were
first introduced in Photoshop 5.0 and offered you a fast way to apply
drop shadows, glows, bevels, embossing, and other effects to layers.
And once applied, these effects updated automatically when you changed
the content of the layer. Now, Photoshop 6.0  provides
you with an intuitive new layer effects interface, a new selection of
effect options, and new support for saving your layer effect designs
as layer styles. The new and enhanced features for layer effects include:
the provides
you with an intuitive new layer effects interface, a new selection of
effect options, and new support for saving your layer effect designs
as layer styles. The new and enhanced features for layer effects include:
the  new
stroke, overlay, and satin layer effects; a new contour option; advanced
blending and transparency options; and enhancements to the drop shadow,
inner shadow, glow, and bevel and emboss effects. The new Layer Styles
dialog box shows at a glance which effects are applied to the currently
selected layer (see image to the left for view of dialog box and image
to the right for view of styles in the Layers palette). To add effects,
you simply check each one you want in the list new
stroke, overlay, and satin layer effects; a new contour option; advanced
blending and transparency options; and enhancements to the drop shadow,
inner shadow, glow, and bevel and emboss effects. The new Layer Styles
dialog box shows at a glance which effects are applied to the currently
selected layer (see image to the left for view of dialog box and image
to the right for view of styles in the Layers palette). To add effects,
you simply check each one you want in the list  and
specify appropriate settings. Once you have designed a custom layer
style, you can then save it in the Styles palette for future use. Layer
styles work just like layer effects and update automatically when you
change layer contents. Styles can be applied to a variety of objects:
shapes, text, brush strokes, etc. The graphic on the right shows buttons
and text created using layer styles. and
specify appropriate settings. Once you have designed a custom layer
style, you can then save it in the Styles palette for future use. Layer
styles work just like layer effects and update automatically when you
change layer contents. Styles can be applied to a variety of objects:
shapes, text, brush strokes, etc. The graphic on the right shows buttons
and text created using layer styles.
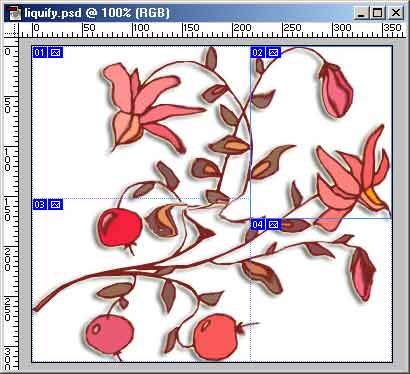
Liquify Command: The new Liquify
command lets you quickly distort or warp an image by interactively pushing,
pulling, rotating, enlarging, and shrinking different image areas. These
distortion  controls
are great for fine warping adjustments to small image areas as well
as for sweeping adjustments that wildly distort an image. You can display
a fine mesh over the image to help you achieve precise adjustments.
Also, to prevent unwanted changes, you can freeze certain parts of the
image and zero in on the areas you want to modify. To create the image
to the left, I used an EPS graphic, applied warping adjustments, and
then applied layer effects of outer glow, shadow, and color overlay. controls
are great for fine warping adjustments to small image areas as well
as for sweeping adjustments that wildly distort an image. You can display
a fine mesh over the image to help you achieve precise adjustments.
Also, to prevent unwanted changes, you can freeze certain parts of the
image and zero in on the areas you want to modify. To create the image
to the left, I used an EPS graphic, applied warping adjustments, and
then applied layer effects of outer glow, shadow, and color overlay.
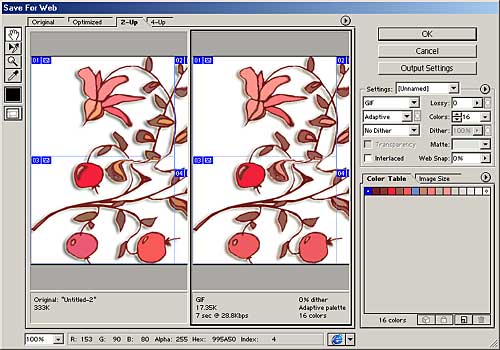
Slice Tools: With the new slice
tool and slice select tool, you can define and edit slices directly
in Photoshop 6.0. Before this version, slicing tools were only available
in ImageReady. User-defined slices are defined by dragging over different
image areas with the slice tool; Photoshop defines slices automatically
for the areas you don't define. Also, you can modify many attributes
of user-slices, including size, position, stacking order, and visibility.
The benefit of sliced images is that you have 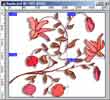 more
control over how optimization options are applied because you more
control over how optimization options are applied because you 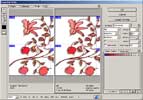 can
select separate slices and then apply appropriate settings. For instance,
an image that includes solid colors, text, and photographic images looks
best with different settings applied to different areas. You can also
assign a separate file name, URL link, Alt tag, and message to each
slice. Once you've sliced an image, it can be moved into ImageReady
so you can create rollovers or set up animations. Or, you can generate
HTML pages directly from Photoshop, including the HTML table code necessary
to reassemble the sliced image. The image on the right shows a graphic
with slices, and the image on the left shows the Save for Web dialog
box where you can align different optimization options to individual
slices. can
select separate slices and then apply appropriate settings. For instance,
an image that includes solid colors, text, and photographic images looks
best with different settings applied to different areas. You can also
assign a separate file name, URL link, Alt tag, and message to each
slice. Once you've sliced an image, it can be moved into ImageReady
so you can create rollovers or set up animations. Or, you can generate
HTML pages directly from Photoshop, including the HTML table code necessary
to reassemble the sliced image. The image on the right shows a graphic
with slices, and the image on the left shows the Save for Web dialog
box where you can align different optimization options to individual
slices.
Saved Slice Sets: ImageReady provides
all of the slicing controls that are available in Photoshop, plus there
are advanced controls for dividing, merging, duplicating, aligning,
and linking slices. With ImageReady 3.0, you can also save multiple
slices in named sets, so you can quickly select, optimize, output, and
even delete only those slices. Slice sets give you a more efficient
way to work with slices. For example, you could optimize and output
only the image slices that contain interactive Web buttons for use in
your Web pages.
Dynamic Layer-Based Slices: Photoshop
6.0 also provides a new way to slice images by setting up effects on
selected layers and then letting Photoshop or ImageReady generate layer-based
slices for you. When you slice images in this manner, each slice is bound to
the outermost pixels on each layer, so if you reposition or edit the
content of the layer, the slice adjusts dynamically to accommodate these
changes. This technique is very usefully for generating precise slices
for JavaScript rollovers. The image on the right shows a set of Web
buttons created as layer-based slices, and then the changes in the slices
when I changed the styles.
for you. When you slice images in this manner, each slice is bound to
the outermost pixels on each layer, so if you reposition or edit the
content of the layer, the slice adjusts dynamically to accommodate these
changes. This technique is very usefully for generating precise slices
for JavaScript rollovers. The image on the right shows a set of Web
buttons created as layer-based slices, and then the changes in the slices
when I changed the styles.
Tighter Integration with Adobe ImageReady
3.0: With Photoshop 6.0, you have a tighter integration with
ImageReady 3.0. You can quickly jump back and forth between Photoshop
and ImageReady because file-saving happens automatically in the background.
Like Photoshop 6.0, ImageReady 3.0 has been designed to be more intuitive.
For instance, when you select one of the new vector shape tools in the
ImageReady toolbox, all of the options that affect that tool's behavior
 appear in one accessible content-sensitive tool options bar. ImageReady
3.0 also includes the new layer management controls, liquify command,
and character and paragraph options offered in Photoshop 6.0. Thus,
you can lock layers to prevent accidental editing; have alignment, leading,
hyphenation, justification, and indent settings applied to any paragraph;
specify space before and after paragraphs; and produce typographically
correct hanging punctuation. It also includes the new every-line composer
for automatically setting optimal line breaks in a paragraph, and character-level
controls let you apply color to each character, specify that a range
of characters stay together. Text can even be warped in ImageReady 3.0
as freely as in Photoshop 6.0. Most importantly, ImageReady 3.0 offers
new creative options for animations and rollovers. Now you can animate
warped text in ImageReady and even use a warped-text animation as a
rollover. Plus, you can animate layer effects such as satins and gradients.
The image to the left is the Slice palette.
appear in one accessible content-sensitive tool options bar. ImageReady
3.0 also includes the new layer management controls, liquify command,
and character and paragraph options offered in Photoshop 6.0. Thus,
you can lock layers to prevent accidental editing; have alignment, leading,
hyphenation, justification, and indent settings applied to any paragraph;
specify space before and after paragraphs; and produce typographically
correct hanging punctuation. It also includes the new every-line composer
for automatically setting optimal line breaks in a paragraph, and character-level
controls let you apply color to each character, specify that a range
of characters stay together. Text can even be warped in ImageReady 3.0
as freely as in Photoshop 6.0. Most importantly, ImageReady 3.0 offers
new creative options for animations and rollovers. Now you can animate
warped text in ImageReady and even use a warped-text animation as a
rollover. Plus, you can animate layer effects such as satins and gradients.
The image to the left is the Slice palette.
Rollover Styles: With ImageReady,
you can design rollover effects without having to know how to write
JavaScript code. It supports two types of rollover interactivity. You
can design rollovers in which an image changes in a specific area when
a particular mouse action occurs there, or secondary rollovers where
a mouse action in one area causes something to happen in another area.
You can have a rollover display simple effects, such as making a button
glow; cause one image to swap out with another; and play back animations.
You have the option of using standard mouse  actions,
such as mouse-down, mouse-click, and mouse-over, to trigger a rollover,
or define custom actions to suit your Web design. With ImageReady actions,
such as mouse-down, mouse-click, and mouse-over, to trigger a rollover,
or define custom actions to suit your Web design. With ImageReady  3.0,
you have even more comprehensive rollover support: rollover states can
now share color palettes to avoid distracting color shifts. Dynamic
layer-based slicing and expanded image map controls enhance rollover
creation. Also, you can preview rollovers directly in ImageReady without
having to launch a browser. But most importantly, ImageReady 3.0 automates
rollover production with the introduction of rollover styles. When,
when you design a rollover state that you want to use over again, you
can save it as a rollover style in the Styles palette. All of the attributes
of the rollover, including its effects, slices, and states, are saved
in the style, thus you can apply the rollover style with a click of
your mouse. The graphic on the left shows the Rollover palette, and
the image on the right is a Web page created using ImageReady and rollovers. 3.0,
you have even more comprehensive rollover support: rollover states can
now share color palettes to avoid distracting color shifts. Dynamic
layer-based slicing and expanded image map controls enhance rollover
creation. Also, you can preview rollovers directly in ImageReady without
having to launch a browser. But most importantly, ImageReady 3.0 automates
rollover production with the introduction of rollover styles. When,
when you design a rollover state that you want to use over again, you
can save it as a rollover style in the Styles palette. All of the attributes
of the rollover, including its effects, slices, and states, are saved
in the style, thus you can apply the rollover style with a click of
your mouse. The graphic on the left shows the Rollover palette, and
the image on the right is a Web page created using ImageReady and rollovers.
Weighted Optimization: By choosing
the new weighted optimization controls in Photoshop 6.0, you can use
8-bit alpha channels to set image optimization on a per pixel basis
and smoothly vary  compression
settings across an image. In doing this, you can produce higher-quality
results in critical image areas without having to slice up an image
or handle the separate files that image slicing produces. Further, you
are no longer restricted to the rectangular areas produced by slicing,
but can optimize an image using the natural contours of different image
areas. Using channels, you can produce gradual variations in GIF dithering,
lossy GIF settings, and JPEG compression. Weighted optimization controls
also let you favor colors in selected image areas as you generate custom
color palettes. The image to the left shows the weighted optimization
options. compression
settings across an image. In doing this, you can produce higher-quality
results in critical image areas without having to slice up an image
or handle the separate files that image slicing produces. Further, you
are no longer restricted to the rectangular areas produced by slicing,
but can optimize an image using the natural contours of different image
areas. Using channels, you can produce gradual variations in GIF dithering,
lossy GIF settings, and JPEG compression. Weighted optimization controls
also let you favor colors in selected image areas as you generate custom
color palettes. The image to the left shows the weighted optimization
options.
Enhanced Image Maps: With ImageReady
3.0, you can create navigational image maps by using the new rectangle,
circle, and polygon image map tools to define hot spots and then associating
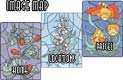 URLs with them. The image map tools produce rectangular, square, circular,
and freeform hot spots in images. You can also set up dynamic layer-based
image maps that adapt to changes in the layer content. Once you've set
up
URLs with them. The image map tools produce rectangular, square, circular,
and freeform hot spots in images. You can also set up dynamic layer-based
image maps that adapt to changes in the layer content. Once you've set
up these hot spots, the image map select tool is available for selecting
and modifying them. You can select a hot spot and then use the new Image
Map palette to specify different attributes, such as a URL link and
an Alt tag. The Image Map palette also lets you control the precise
size and location of your hot spots. Finally, you can use the slicing
controls and Animation and Rollover palettes to assign rollovers to
image map hot spots. The image to the left shows a Web page with an
image map that was created with ImageReady. The graphic to the right
is a view of the ImageMap palette.
these hot spots, the image map select tool is available for selecting
and modifying them. You can select a hot spot and then use the new Image
Map palette to specify different attributes, such as a URL link and
an Alt tag. The Image Map palette also lets you control the precise
size and location of your hot spots. Finally, you can use the slicing
controls and Animation and Rollover palettes to assign rollovers to
image map hot spots. The image to the left shows a Web page with an
image map that was created with ImageReady. The graphic to the right
is a view of the ImageMap palette.
Enhanced Contact Sheets: Photoshop
6.0 has a number of changes to make contact sheets more flexible. You can now define the font size for labels on a contact sheet,
choose among a variety of customizable templates with and without HTML
frames for the Web photo gallery, and select from predefined picture
package templates that support different page sizes. Further, the picture
package no longer adds borders around images, so the final image sizes
meet expectations. The image to the right shows a view of the Web photo
gallery options.
flexible. You can now define the font size for labels on a contact sheet,
choose among a variety of customizable templates with and without HTML
frames for the Web photo gallery, and select from predefined picture
package templates that support different page sizes. Further, the picture
package no longer adds borders around images, so the final image sizes
meet expectations. The image to the right shows a view of the Web photo
gallery options.
Streamlined Interface: With Photoshop
6.0, Adobe has introduced numerous features designed to make it easier
and more efficient to use the program. Now you can organize frequently
used palettes in a new palette well where they are tucked out of your
way but immediately accessible.  There
is a context-sensitive tool options bar that provides more direct and
intuitive access to all of the options that control what you do with
each tool. For instance, in previous versions of photoshop, brush options
appeared in two different palettes. Now, in Photoshop 6.0, these options
are all consolidated in one place--the context-sensitive tool options
bar. You can also edit brushes on the fly through a contenxt-sensitive
menu, adding them directly to the brushes library on the tool options
bar. Finally, the context-sensitive toolbar and the Preset Manager give
you one-click access to any brush libraries in the Brushes folder. On
the Windows platform, the Open dialog box simplifies image selection
with browsable thumbnails. Plus, you can find your most recently opened
files in a Open Recent submenu and can set the default for how many
files Photoshop lists there. Photoshop remembers where you last opened
or saved files, so you can more easily access them in default locations.
The global setting for your measurement system no longer prevents you
from switching systems on the fly to make discrete changes. The graphic
to the left shows the new interface. There
is a context-sensitive tool options bar that provides more direct and
intuitive access to all of the options that control what you do with
each tool. For instance, in previous versions of photoshop, brush options
appeared in two different palettes. Now, in Photoshop 6.0, these options
are all consolidated in one place--the context-sensitive tool options
bar. You can also edit brushes on the fly through a contenxt-sensitive
menu, adding them directly to the brushes library on the tool options
bar. Finally, the context-sensitive toolbar and the Preset Manager give
you one-click access to any brush libraries in the Brushes folder. On
the Windows platform, the Open dialog box simplifies image selection
with browsable thumbnails. Plus, you can find your most recently opened
files in a Open Recent submenu and can set the default for how many
files Photoshop lists there. Photoshop remembers where you last opened
or saved files, so you can more easily access them in default locations.
The global setting for your measurement system no longer prevents you
from switching systems on the fly to make discrete changes. The graphic
to the left shows the new interface.
Enhanced Layer Management: The
layer options in Photoshop 6.0 have been enhanced. Now you can create
hundreds of layers in any image, not just the 99 layers you were previously
limited to. Plus, you can organize those layers into sets to keep better
track of related parts. You can then toggle the visibility of layer
sets, hiding or showing them as you work; you can apply layer masks
 and
layer clipping paths to layer sets; and you can specify a layer set's
opacity. By color-coding layers in the Layers palette, you can quickly
identify layer relationships. Once you organize your layers, you can
lock them to prevent accidental edits to image data, transparency settings,
and layer position. Or, you can lock layers before sending them out
for others to review so you don't have to worry about unexpected changes.
The enhanced Layers palette also helps you handle layer effects more
easily. If you assign a layer effect to one layer and want to reuse
it on another, just drag and drop it in the Layers palette list. All
of the settings are preserved and instantly applied to the target layer.
And you can delete layer effects by simply dragging the effect to the
Layers palette trash bin. If you double-click on a layer effect in the
palette list, a new Layer Style dialog box appears where you can adjust
the settings. The image to the left shows the Layers palette with color
coded layers. and
layer clipping paths to layer sets; and you can specify a layer set's
opacity. By color-coding layers in the Layers palette, you can quickly
identify layer relationships. Once you organize your layers, you can
lock them to prevent accidental edits to image data, transparency settings,
and layer position. Or, you can lock layers before sending them out
for others to review so you don't have to worry about unexpected changes.
The enhanced Layers palette also helps you handle layer effects more
easily. If you assign a layer effect to one layer and want to reuse
it on another, just drag and drop it in the Layers palette list. All
of the settings are preserved and instantly applied to the target layer.
And you can delete layer effects by simply dragging the effect to the
Layers palette trash bin. If you double-click on a layer effect in the
palette list, a new Layer Style dialog box appears where you can adjust
the settings. The image to the left shows the Layers palette with color
coded layers.
Preset Manager: The new Preset
Manager in Photoshop 6.0 centralizes management of your custom brushes,
gradients, shapes, contours, patterns, and layer styles. It also offers
instant access to the extensive libraries of presets included with the
program. And when you create your own custom presets, you can easily
save them in library files using the Preset Manager. The Preset  Manager
is resizable, so you can easily scan the content you're loading. You
can choose how to view the content--in large or small thumbnails, enlarge
or small text lists with thumbnails, or as a text-only list. A useful
feature is the ability to assign a name to any brush, swatch, pattern,
or other preset. For example, you could build a set of swatches for
a Web project, and assign names that tell others where to use them--such
as "Background for log" or Main page nav bar." The names
will then appear in any text list. Once you open a library with the
Preset Manager, it's available for use in appropriate places, such as
the context-sensitive tool options bar, the Layer Style dialog box,
and the content layer dialog boxes. The picture on the left shows a
view of the Preset Manager. Manager
is resizable, so you can easily scan the content you're loading. You
can choose how to view the content--in large or small thumbnails, enlarge
or small text lists with thumbnails, or as a text-only list. A useful
feature is the ability to assign a name to any brush, swatch, pattern,
or other preset. For example, you could build a set of swatches for
a Web project, and assign names that tell others where to use them--such
as "Background for log" or Main page nav bar." The names
will then appear in any text list. Once you open a library with the
Preset Manager, it's available for use in appropriate places, such as
the context-sensitive tool options bar, the Layer Style dialog box,
and the content layer dialog boxes. The picture on the left shows a
view of the Preset Manager.
Annotation Tools: Photoshop 6.0
has new annotation tools that let you embed written design  notes
or recorded voice comments directly in your files. For example, you
can now append notes to clients or colleagues explaining how to review
a file or what led up to certain design decisions. You could also include
production notes if someone else is handling color correction and other
image-editing tasks. You can then send an annotated Photoshop (PSD)
or TIFF file to anyone who has Photoshop 6.0. Or you can save the file
as a PDF with annotations and layers preserved and send it out to be
reviewed in Adobe Acrobat or Acrobat Reader. The image on the right
shows a graphic with an annotation. notes
or recorded voice comments directly in your files. For example, you
can now append notes to clients or colleagues explaining how to review
a file or what led up to certain design decisions. You could also include
production notes if someone else is handling color correction and other
image-editing tasks. You can then send an annotated Photoshop (PSD)
or TIFF file to anyone who has Photoshop 6.0. Or you can save the file
as a PDF with annotations and layers preserved and send it out to be
reviewed in Adobe Acrobat or Acrobat Reader. The image on the right
shows a graphic with an annotation.
Updated Color Management: This
new version introduces less restrictive color-management controls which
streamline configuration of a device-independent, color-managed workflow.
All of the color management controls now appear in one dialog box for
easy access, plus they come  equipped
with detailed built-in Help. You can choose between advanced and standard
modes depending on how much control you want to exercise. There are
also preset workflows, so it's easy to switch among standard U.S., European,
and Japanese prepress settings. Or, you can set up your own custom workflow
and save the settings for later use. You can set color management policies
in advance or decide every time you open a new file whether to discard,
preserve, or convert a color profile. The image on the left is a view
of the color management options. equipped
with detailed built-in Help. You can choose between advanced and standard
modes depending on how much control you want to exercise. There are
also preset workflows, so it's easy to switch among standard U.S., European,
and Japanese prepress settings. Or, you can set up your own custom workflow
and save the settings for later use. You can set color management policies
in advance or decide every time you open a new file whether to discard,
preserve, or convert a color profile. The image on the left is a view
of the color management options.
Enhanced Crop Tool: The crop tool
has a new place in the toolbox. It now appears at the top level of the
toolbox instead of under the marquee selection tools. Also, the crop
tool offers 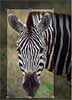 enhancements
that make it more intuitive to use. For example, when you define a crop
area, it now dims the area outside of the crop box, so you can visually
check the crop and make any quick adjustments before you complete the
action. You can also use the crop tool to transform the perspective
of a cropped area, so you can repair a poorly scanned image. To eliminate
perspective effects, you simply define a nonrectangular region. Photoshop
automatically calculates the final cropped rectangular area based on
the size and aspect ratio of the original picture. The photo to the
right shows the crop tool in use. enhancements
that make it more intuitive to use. For example, when you define a crop
area, it now dims the area outside of the crop box, so you can visually
check the crop and make any quick adjustments before you complete the
action. You can also use the crop tool to transform the perspective
of a cropped area, so you can repair a poorly scanned image. To eliminate
perspective effects, you simply define a nonrectangular region. Photoshop
automatically calculates the final cropped rectangular area based on
the size and aspect ratio of the original picture. The photo to the
right shows the crop tool in use.
Revised Extract Image Command:
The Extract Image was first introduced in Photoshop 5.5. The command
provides accessible tools for masking intricate, hard-to-define edges,
which  previously
required painstaking manual work to mask. Photoshop 6.0 now delivers
an enhanced version of this command with new smart-highlighting, mask
edge, and mask cleanup tools that can help you achieve refined results.
When you choose Image > Extract and select the Smart Highlighting
option, buildt-in edge detection technology in Photoshop helps you define
the image area you want to extract. After filling the area, you can
click Preview to check the extraction or click OK to see it directly
in Photoshop. In Preview mode, the mask edge and mask cleanup tools
are available for you to smooth edges as necessary, automatically filling
or erasing areas to produce the best results. For the image to the left,
I used the Extract tool to delete the background and then replaced it
with another. previously
required painstaking manual work to mask. Photoshop 6.0 now delivers
an enhanced version of this command with new smart-highlighting, mask
edge, and mask cleanup tools that can help you achieve refined results.
When you choose Image > Extract and select the Smart Highlighting
option, buildt-in edge detection technology in Photoshop helps you define
the image area you want to extract. After filling the area, you can
click Preview to check the extraction or click OK to see it directly
in Photoshop. In Preview mode, the mask edge and mask cleanup tools
are available for you to smooth edges as necessary, automatically filling
or erasing areas to produce the best results. For the image to the left,
I used the Extract tool to delete the background and then replaced it
with another.
|
 robustness
in a program, there are enough books, online tutorials and tips, learning
videos, and classes to aid advanced beginning and intermediate level computer
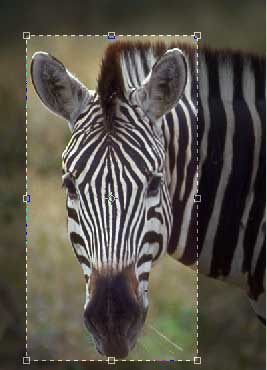
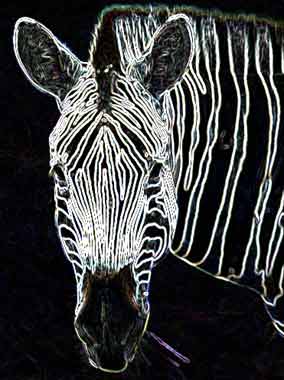
users. The image to the right shows how a beginner could impress her/his
friends by taking an ordinary graphic of a zebra and easily enhance it
by using the neon nights action. It is also the perfect tool for professionals
who need advanced features. Beginners might want to start with Photoshop
LE (Photoshop Limited Edition) which provides the features hobbyists and
small businesses need, but lacks the high level production elements graphics
professionals use.
robustness
in a program, there are enough books, online tutorials and tips, learning
videos, and classes to aid advanced beginning and intermediate level computer
users. The image to the right shows how a beginner could impress her/his
friends by taking an ordinary graphic of a zebra and easily enhance it
by using the neon nights action. It is also the perfect tool for professionals
who need advanced features. Beginners might want to start with Photoshop
LE (Photoshop Limited Edition) which provides the features hobbyists and
small businesses need, but lacks the high level production elements graphics
professionals use.