Adobe
InDesign 2.0
"Packed
With Creative and Powerful Features!"
![]()
Adobe has released InDesign 2.0 an update of their professional layout and design program. The first version was released in April 2000 and was hailed for its innovative typographic features. Version 1.5, which came out in December 2000, added more tools and text controls. Now, with Version 2, InDesign has once again broken new ground with transparency effects, drop shadows, feather effects and support for transparency in files imported from Photoshop and Illustrator. InDesign 2 has also added support for long document construction with its book coordination, table of contents, and indexing features.
Available for both PC and Macintosh. Price: $699; upgrade $149. See the Adobe Web site for further information on Adobe products: http://www.adobe.com.
![]()
Adobe InDesign 2.0--Some of the new and enhanced features in this version are:
- Versatile Transparency Controls--Apply drop shadow, feathering, and other editable transparency settings to text, graphics, and images in a few quick steps.
- Tables--Create and format tables in InDesign.
- New Preview Mode--Preview how a page will print by clicking the Preview mode icon to hide all nonprinting items.
- Expanded Support for OpenType Fonts--Quickly set true fractions, discretionary ligatures, swash glyphs, contextual alternates, tabular oldstyle, small caps, and other type elements in OpenType fonts.
- Dynamic Graphics Preview--Modify graphics quickly and accurately, because InDesign displays a live ghosted preview of an image, making it easier to see the exact adjustments you are making.
- Enhanced Printing Controls--Output your files more reliably using a streamlined new print interface that provides clear feedback about which print settings are enabled and how settings interact with each other.
- Flattener Styles--Reliably output transparency effects using transparency flattener styles.
- Long-Document Support--Group multiple documents into a book list to number pages sequentially and generate tables of contents and indexes.
- Faster Performance--Work more efficiently with the improved performance when opening, saving, and closing documents, placing high-resolution images, flowing long text documents, printing documents, and more.
- Enhanced Paragraph Composer--Produce great typography more easily with the Paragraph Composer (previously called the multi-line composer), which now examines a paragraph at a time, rather than multiple lines, to set optimal line breaks in text.
- Overprint Preview--Proof spot-color effects and overprint settings with Overprint Preview, which is enabled through the new transparency support in InDesign.
- Insert Glyph Palette--Easily browse, select, and insert any glyph contained in a font.
- Direct Export of Adobe PDF Files--Export Acrobat 4 (PDF 1.3) or Acrobat 5 (PDF 1.4) files directly for electronic reviews, Web distribution, and high-end printing.
- Adobe Core Technologies--Ensure consistent results with Adobe core technologies, for example produce more reliable color because InDesign uses the Adobe Color Engine (ACE) that's in Photoshop and Illustrator.
- Integration Between Japanese & Roman Versions--Open and edit Roman files in the Japanese version of InDesign, or Japanese files in any Roman version of InDesign, because they share a common file format (2.0 files only).
- Native Mac OS X Support--Add InDesign to your Mac OS X (version 10.1) desktop with complete confidence, because it's designed to work natively on this platform.
- Structure View and Tag Palette for XML--Use the Structure View and Tag palette to create XML to repurpose legacy documents, build templates to autoflow XML content, and browse through a document's hierarchy.
- Robust Metadata Support--Embed metadata tags describing a document's contents in InDesign files to make the document easier to track, manage, and retrieve through the built-in support for Adobe XMP (Extensible Metadata Platform).
- Export to Rich Content Formats--Export InDesign documents as well-formed XML, SVG (scalable vector graphics), or tagged Adobe PDF (eBook) files.
Transparency/
Opacity & Blend
Modes
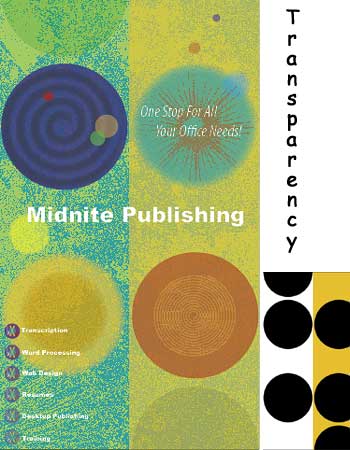
InDesign 2.0 delivers an array of transparency features to feed your imagination and enhance your creativity. Now you can create drop shadows, apply feathering, or create a wide range of other editable transparency effects as you lay out your pages. You can maintain soft edges when placing transparent Photoshop files--a first for desktop page layout applications. And it's possible to maintain transparency in imported Illustrator files, as well as Acrobat 5.0 PDF files. To produce the brochure to the left, I started with just a two-color background with black circles (seen in the right hand corner) and used transparency controls to enhance it.
Drop Shadows: It's easy to apply drop shadows to text, graphics and images. You can control how far the drop shadow is offset from the object, what color the drop shadow is, how its edges blur, its opacity, and how it blends with underlying objects. If you edit an object after applying a drop shadow, InDesign updates the drop shadow automatically.
Feathering: Apply feathering to objects to soften an object's edges, thus creating a more diffuse transition between foreground and background objects. Similar to drop shadows, you can apply it to text, graphics, and images. You can control the width of the feathering and whether it produces Sharp, Rounded, or Diffused corners. Feather settings update automatically if the object is edited later.
Opacity and Blend Modes: With InDesign 2.0 you can vary the transparency of any object or group of objects from 100% opacity (completely solid) to 0% opacity (completely transparent). The program also provides blending modes similar to the ones in Photoshop and Illustrator to help you control how the colors applied to a selected object or group interact or blend with the colors of underlying objects. These modes include: Multiply, Screen, Overlay, Soft Light, Hard Light, Color Dodge, Color Burn, Darken, Lighten, Difference, Exclusion, Hue, Saturation, Color, and Luminosity. Usually applying blending modes to a group affects the underlying artwork. In some instances, though, you may want to restrict the blending mode so that it only affects how objects in a group interact. You can do this by checking the Isolate Blending option on the Transparency palette. In addition, there is a Knockout Group option on the Transparency palette that affects how transparent objects in a group interact. If you check the option, the topmost object in a transparent group knocks out the other objects in the group, revealing the objects below the group. When the option is unchecked, all of the objects in a transparent group show through the topmost object--as well as any other objects positioned below the group.
Displaying Transparency On-Screen: If your page contains transparent objects, the correlating icon in the Pages palette displays a checkered transparency grid as a visual cue so you can quickly locate which pages have transparency in a multi-page document. InDesign 2.0 also helps you make tradeoffs between speed and quality in the display of transparent objects. You can set a global Display Performance preference to optimize for faster screen redraw and lower on-screen quality, or vice-versa.
Tables

Although tables are an efficient and effective way to communicate large amounts of information and can be found in any number of magazines, financial publications, annual reports, brochures, catalogs, etc, they have been difficult to handle in desktop publishing programs. Now with InDesign 2.0 it's easy to create your own tables or import tables from other applications.
Creating Tables: Creating tables in InDesign 2.0 is similar to creating them in familiar wordprocessing programs: Choose Table > Insert Table, specify the number of rows and columns, click ok, and start typing. It's that simple. Plus you can turn tab-delimited text files from a variety of sources, including Microsoft Word, Excel, and many databases, into tables in a single step by choosing the Covert Text to Table option. Then InDesign automatically begins new columns at tab characters and new rows at paragraph markers. And finally, the program can import styled Word and Excel tables directly so you don't have to start from scratch. It also imports XML and RTF tables easily.
Designing Tables: After you import or create a table in InDesign, then you can format it by inserting text, inline graphics, inline text frames and other tables. Tables can appear on their own in a text frame or they can act as inline objects in the flow of text. For formatting, you can:
- Specify row height and column width;
- Design how the border around the table looks, including its line weight, type, color, tint, and overprint setting;
- Control how the strokes between rows and columns appear;
- Apply color fills to alternating rows or columns with precise control over the pattern you set up;
- Add or delete rows and columns and merge and split cells;
- Rotate text in cells in 90-degree increments;
- Specify how far text is inset from the edges of the cells in a table;
- Set whether text aligns to the top, center, or bottom of table cells, or whether it's vertically justified;
- Insert tabs in cells; determine the spacing between paragraphs in table cells;
- Set keep options so that InDesign knows which rows should stay together when you lay out tables across linked text frames;
- Control how the content of cells is clipped;
- Format text in a table using high-end typographical controls in the Character or Paragraph palettes, or apply text styles;
- Set how much space appears before and after a table.
Using the new Preview Mode you can get a quick sense of how your page will look in its final published form while you work on it on-screen. In Preview Mode, all nonprinting items, such as grids, guides, and frame edges, are hidden. You can continue to edit your layout in this mode.
OpenType Fonts
There are many advantages when using OpenType fonts. These fonts, developed jointly by Adobe and Microsoft, offer complete cross-platform compatibility as the same font file works on both Macintosh and Windows computers. In addition, OpenType fonts can contain more than 65,000 glyphs, while Type 1 or TrueType fonts are limited to 256 glyphs. Expanded glyph support simplifies font management because you no longer need multiple "expert sets" to have access to old-style figures, true small capitals, fractions, swashes, discretionary ligatures, and other non-standard glyphs that are easily included in OpenType fonts. Plus, OpenType fonts provide better language support as it is based on Unicode, an international two-byte character encoding that covers most of the world's languages. Thus you have access to multiple language character sets in one font.
While InDesign 1.0 supported OpenType fonts, Version 2.0 expands this support with built-in options for instantly specifying a wider range of typographical settings. For instance, you can select an OpenType font and specify that InDesign automatically substitute alternate glyph types, if they are available in that font. Also InDesign 2.0 recognizes alternate glyphs as text characters, so you get the benefit of advanced typographical control, and the efficiency of being able to spell-check and hyphenate that text easily. InDesign ships with several high-quality OpenType fonts at no additional charge, including Adobe Garamond Pro, Adobe Caslon Pro, Caflisch Script Pro, Kozuka Mincho, and Kozuka Gothic.
Print Dialog

Print Summary
Trap Style Palette
Output Controls

Ink Manager

Markup
& Bleed
Print Controls
Certainly some of the most important enhancements in InDesign 2.0 are in the printing options.
Expanded Support for Printer Drivers: With InDesign 2.0, you no longer need an AdobePS printer driver. Now, you can use a range of printer drivers such as the Apple LaserWriter 8 driver. The creation of high-quality, driver-independent PostScript files has been streamlined as you can save files directly from the Print dialog box. And the same core options appear in the InDesign Print dialog box no matter what printer driver is selected, output device is targeted, or operating system is being used. In addition to achieving driver independence, you can specify whether these files are device-independent. Excluding driver and device information from your PostScript files allows you to produce the most flexible PostScript file for use in imposition, trapping, and other prepress applications.
More Intuitive Printing Interface: As stated in the previous paragraph, with InDesign 2.0, you can now specify all print settings through the Print dialog box. Some options are selecting page sizes and custom page sizes, as well as font downloading, PostScript level, and image data format. Also, the program provides more feedback to help you make the best possible choices for your output. For example, printing options that don't apply to the current driver or output type are dimmed, so you can't accidentally select them.
There is also an updated Thumbnail Preview that provides strong visual feedback about how your current print settings will interact with your selected media. This Thumbnail Preview is always visible no matter what list panel option is selected in the Print dialog box and offers three different views to provide more detailed feedback.
Some other enhancements that make printing documents more intuitive and less subject to error are: you can specify print settings and then save them as a printer style directly from the Print dialog box; a new Simulate Overprint option lets you preview overprint settings when printing design proofs to desktop postScript printers; and, finally, the program reports all of your print settings in a Summary panel in the Print dialog box so that you can review your print settings on-screen or save them to a separate text file for handoff to print production or for archiving with the files.
Consistent Cross-Platform Printing Experience: The new InDesign printing interface has been designed to handle most printing tasks directly, imposing a uniform approach across different printer drivers which means that the program presents printing options the same way on Mac OS 9.x, Mac OS X v. 10.1, Windows NT, Windows 2000, Windows XP, and so on, which reduces the training required to print effectively from both platforms.
Trap Styles Palette: With InDesign 2.0, you have support for built-in and Adobe In-RIP Trapping which are two automated trapping methods that create precise traps based on the neutral densities of inks. The program also supports trap styles thus streamlining the application of trap settings. Neither trapping support nor trap styles are new to InDesign, but this version offers a new level of control with the Trap Styles palette. Now you can assign trap styles to page ranges without opening the Print dialog box, which simplifies the decision at print time to choosing between the built-in trapping engine and Adobe In-RIP trapping.
Output Controls: New options in the Output panel of the Print dialog box expands your control over color output. You can choose to print files in Composite Grayscale to non-color or color printers or in Composite RGB to inkjet printers, film recorders, and other RGB devices. The Screening option controls the combination of screen ruling (lines per inch) and resolution (dots per inch) used to output color separations, and an expanded Inks list provides more information about the inks you are outputting.
Ink Manager: Service providers and other print professionals will appreciate the new Ink Manager which controls the number of separations produced by a designer's file without altering the file. This means that the Ink Manager enables print professionals to map or alias one spot color to another without touching the Swatches palette. Plus, print professionals can use the Ink manager to convert individual spot colors to process colors, rather than using the Swatches palette. These controls are helpful for printers to manage a longstanding problem with designers who use more spot colors than they intended in a file. Also, the Ink Manager makes it easy and efficient for print professionals to specify the trapping characteristics of inks, including their type (Normal, Transparent, Opaque, and Opaque Ignore), neutral density, and trapping sequence.
Additional Printing Controls: Some other important enhancements are that you can now print: master pages, making it easier to review, proof, and track master page designs independently of individual page layouts; visible guides and baseline grids, which is especially useful in template-based workflows, such as newspaper production, where editors and designers need to sketch out how an issue flows; and thumbnails for design review with specific control over how many thumbnails appear on each printer page. Plus you can: specify bleeds independently of each other on all four sides of a page; control how a page prints in relation to the media using the new Page Position option; better conserve continuous roll media using the new Auto Height and Auto Width options which automatically calculate the minimum paper size required to output a page with all marks and bleeds; control the orientation of the output page in 90-degree increments, which is useful for print services such as automatic hole punching and crimping; and use the new Auto Justified option for tiling, which adjusts the tile overlap to eliminate extra white space on the bottom and right hand side of printed tile sheets which makes it easier to put together oversized documents, saving time for designers and print professionals.
Transparency
Settings
Preset
Transparency
Styles

Along with the versatile transparency controls in InDesign 2.0, the program also enables you to output transparent effects reliably by giving you the printing control you need to achieve high-quality results. Today, most printing devices in use, do not process transparency natively and files with transparency applied must be flattened before you print them. With InDesign 2.0, you can use transparency flattener styles to apply appropriate flattener settings when printing or exporting files, while keeping transparency effects live in InDesign documents. You can apply transparency flattener styles to documents from the Print and Export dialog boxes, or to spreads from the Pages palette menu. When creating a customized transparency flattener style, you have control over the balance between raster and vector output, what resolution is applied to artwork and gradients, whether text and strokes are converted to outlines, and how complex regions are treated to avoid jagged areas where rasterized and vector artwork meet. Also, InDesign is designed to produce predictable quality in that it only flattens transparent areas for output and leaves other elements such as text that overprints transparent objects untouched. Spot colors don't get converted to process colors when transparency is applied to them, and duotones can interact with transparency without losing their spot channel information. InDesign also comes with three preset transparency flattener styles for low-, medium-, and high-resolution output. Each of these presets is optimized for a particular workflow. The High Resolution flattener style favors quality over output speed and is best suited for high-end production, while the Low Resolution style outputs faster and supports desktop proofing and online use.
Book
Palette
Options
Book
Page
Numbering Options

Synchronize
Options
At last, comprehensive support for longer documents is available in InDesign 2.0.
Book Palette: You can now create separate working files for each chapter or section of the document, and then collect them in a book file where you can perform global tasks with ease. When creating a book file, InDesign automatically opens a book palette and all of the documents that you group in the book file are listed in this palette. Documents can also be associated with more than one book. For example if you publish regional editions of a weekly magazine, you might want to set up separate documents for each section of the magazine and group them in book files with a separate book file for each regional edition. The shared content would be assigned to all of the book files while special advertising sections and other regional content would appear only in the appropriate book file. The Book palette lets you see at a glance whether documents have been opened or modified, are in use, or are missing. You can change the document order in your book by dragging documents from one position to another in the palette and pagination if automatic pagination is enabled. Double-clicking a document name in the palette list opens that file and dropping files or folders onto the Book palette list automatically adds them to the book.
Pagination: Automatic pagination is turned on automatically for book files so as you add documents to the book file, InDesign paginates the documents and displays the page ranges next to the document name in the book list. You have settings in the Numbering & Section Options dialog box or the Document Page Numbering Options dialog box which determine the style of page numbers used. If you modify the book list, page numbers change on the fly so they are always up to date. You can specify whether page numbering continues from the previous document or whether InDesign skips to the next even or odd page in subsequent documents.
Synchronize Styles and Swatches: InDesign 2.0 makes it fast and easy to synchronize paragraph styles, character styles, TOC styles, color swatches, and even trapping styles across all of the files in a book list or only some of them. You can also choose to synchronize some options but not others. For example, you could synchronize the paragraph, character, and TOC styles but not the color swatches and trapping styles.
Export to Adobe PDF: Book files save you time performing standard actions on multiple files, such as preparing them for handoff to your print provider as you can preflight and package, print, or export selected documents in a book list to Adobe PDF by selecting commands on the Book palette menu. If no documents are selected, then InDesign preflights, prints, or exports the entire book.
Table
of Contents
Options
Table
of Contents
Styles

With InDesign 2.0 you can generate one or more tables of contents (TOC) for any document or book file. For example, you could create a TOC that lists all of the chapters in a book, another listing all of the illustrations, and a third listing the graphs that appear. By default, TOC entries are formatted with the styles applied in the document; however, you can map those styles to TOC styles that specify different fonts, first line indents, tab leaders, and more. Plus character styles can be designed for formatting the space after entries and page numbers. You can specify TOC settings for each paragraph style that will be included in your TOC, such as:
- Whether page numbers appear before or after an entry, or don't appear at all;
- What types of characters are used between entries and page numbers, including em or en dashes, em or en spaces, flush spaces, hair spaces, and thing spaces;
- What the TOC level is from 1 to 10; whether to include text on hidden layers;
- Whether or not entries are sorted alphabetically.
You can even save standard TOC settings as styles, which you can load into other InDesign documents to streamline TOC production. These styles are saved in separate text files that can be shared with others.
Index Palette
Generate Index
The Index palette provides a flexible, interactive command center for indexing individual documents or complete book files. In InDesign, an index entry is comprised of the topic, which is the subject of the entry, and the reference, which is either to a page number or to another topic. The Index palette provides two modes that correlate to the two parts of an index entry. In Topic mode, the Index palette displays a list of topics that you've generated to ensure consistency when creating index entries. Those topics do not become part of a generated index unless you add page numbers or cross-references to turn them into working index entries. The Reference mode displays topics and their page numbers or cross-references. You have control over all aspects of your index. You can:
- Create nested indexes with up to four levels of information, or run-in indexes where all of the entries for a particular topic appear in a single paragraph;
- Add index entries efficiently because the New Page Reference dialog box lets you add multiple entries without closing the dialog box each time. Also add index entries using keyboard shortcuts;
- Control how index entries will be sorted in a generated index by entering text to provide the basis for sorting. For example, ensure that "St. Charles" appears in an index in front of "Santa Claus" by entering "Saint Charles" in the sort field;
- Set page ranges for index entries using nine automated options, including Current Page, To Next Style Change, To Next Use of Style, To End of Story, To End of Document, To End of Section, To Next # of Paragraphs, and To Next # of Pages. You can also choose to suppress page ranges;
- Set up cross-references using preset cross-references or specify custom cross-references. Add cross-references as efficiently as you add index entries without having to close the the dialog box each time. Also add cross-references using keyboard shortcuts;
- Automatically index every occurrence of a word in a document or book;
- Import index topic lists from another document or book to jumpstart work in your current document or book;
- Navigate to any index reference location using the Go To Marker button the the Index palette;
- View index markers;
- Clean up indexes by automatically deleting all topics with no associated entries;
- Globally change the capitalization of selected index entries to ensure consistency;
- Generate an index that is automatically formatted the way you want. You can use the preset index styles in InDesign, or create your own and assign them to each index entry level, cross-reference, and cross-referenced topic in an index. Even specify a character style for certain page numbers to make them easier to identify--for example, italicize page references for illustrations so they stand out.
Hyperlinks
The Hyperlinks palette makes it easy to turn selected text, text frames, and graphics frames into hyperlink sources--the hot spot that you click to jump from your current location to a new destination. The destination can be a text anchor, document page, or Web URL. When you set up hyperlink sources, you control their appearance:
- Position them in visible or invisible rectangles;
- Specify the color, line thickness, and line style for visible rectangles;
- Choose a highlight for the hyperlink source.
The text composition and database engines have been revamped in InDesign 2.0 which improves how images and other page items are cached. And there are revised text and graphics import filters for Photoshop and Microsoft Word files to optimize performance. The result is that InDesign 2.0 is significantly faster than InDesign 1.0, 1.5, and 1.5.2 when opening, closing, and saving documents; placing high-resolution images and large vector graphics from local hard disks or from servers; importing and autoflowing text; resizing and moving text frames; finding and changing text attributes; recomposing stories with text wraps; and performing screen redraw with standard display performance settings both for creating and importing tables.
Even with the first version of InDesign, there was a unique text composition engine called the multi-line composer. Now InDesign 2.0 improves on this typographical control, replacing the multi-line composer with the paragraph composer. Instead of analyzing several lines of text, the paragraph composer examines an entire paragraph at a time and applies weighted penalties to alternative line breaks to produce optimal results. For example, it favors evenness of letter and word spacing and avoids hyphenation whenever possible. When it evaluates an entire paragraph at once, it can optimize earlier lines to avoid unattractive breaks later in the paragraph.
Glyph Palette
The earlier versions of InDesign included the Insert Character command which gave you direct access to the hundreds of glyphs available in many fonts. These glyphs range from multiple versions of individual letters to typographically correct fractions, special ornaments, and more.
Now, with InDesign 2.0 you have a new Glyphs palette which offers a more accessible and interactive way to browse and insert glyphs from the fonts you have installed.
PDF
Export
Options
In the past, InDesign has shared core Adobe technologies with Illustrator, Photoshop, and Acrobat to ensure consistent font handling, graphics display, color management, and more across these applications. InDesign 2.0 enhances its color management support by adding the latest version of the Adobe Color Engine (ACE), which is also built into Photoshop 6.0, Illustrator 9.0/10, and Acrobat 5.0. Thus Adobe delivers the first off-the-shelf publishing solution to offer consistent color across raster, vector, and page design tools. And by providing a common experience across these leading publishing programs, color management is easier to implement and control to produce consistent color. There are even soft proofing controls that work similarly to Photoshop and Illustrator to help you accurately preview CMYK and RGB images on-screen on a desktop color printer.
ACE is designed to streamline how you configure a device-independent, color-managed workflow as all of the color management controls now appear in one dialog box for easy access. And they come equipped with built-in Help that provides immediate feedback on different settings. You can choose between advanced and standard moses depending on how much control you want to exert. There are a number os presets for color management, including standard U.S., European, and Japanese prepress settings, and even a Web graphics preset. These presets are saved in separate Color Settings files that are shared with Photoshop, Illustrator, and Acrobat. You can also specify custom settings and save those settings in a separate file for on-going use. You can set color management policies in advance or decide every time you open or paste a file to discard, preserve, or convert a color profile. You can choose to convert all files to the current working color space, or to preserve embedded profiles.
This new color management engine, with its integration with Photoshop, Illustrator, and Acrobat, is a significant enhancement. Since all three applications save their color management settings in a common location, settings used in one application can easily be loaded into another. Plus, all three programs can each detect when their color management settings vary from each other and prompt you to synchronize them to produce better color fidelity.
InDesign 2.0 now supports XML so you can import, create, edit, and export XML files easily. XML is an open standard for storing content, such as text, graphics, and tables, in a structured file format that enables you to redeploy that content more efficiently. In addition, InDesign 2.0 directly exports tagged Adobe PDF (eBook) and Scalable Vector Graphics (SVG) files, supports the WebDAV protocol for managing shared files across an Internet or intranet, and offers built-in support for Adobe's new eXtensible Metadata Platform (XMP). Two features are important for working with XML: Structure view and the Tags palette.
Structure View: The Structure view provides an alternative way of viewing the content of InDesign documents by revealing the hierarchical relationships between tagged content. With this view, you can view and browse structured documents, import and lay out the content of XML files, add structure to existing documents, create templates for autoflowing XML content, rearrange the hierarch of XML content, and more.
Tags Palette: The Tags palette enables you to create, import, and manage the tags you use in creating structured documents. This palette uses the classic Adobe palette interface so you can apply what you know to how to tag elements. If you are familiar with applying paragraph and character styles to text, you will quickly get up to speed on tagging content.
We give Adobe kudos for certainly listening to their users when they upgraded InDesign. It is packed full of asked for features as well as other innovative options. The most talked about feature, of course, is the support for transparency, which is a first in a page-layout application. This feature, alone, would be a primary reason for trading in your old version of InDesign, or even switch from a certain arch rival, QuarkXPress.
Earlier releases of InDesign were criticized for the lack of support for long documents. With this version, Adobe just didn't add a few long document options. They went all out and included a slew of robust standard tools such as book compilation, auto-pagination across chapters, table-of-contents generation, and indexing. Another much asked for feature was table support. And again, Adobe came through with strong table support. When I first heard that Adobe had included these two features, long document support and table support, I assumed that InDesign would include the basics for these features and then they would become more robust in newer versions. I think you can see from the descriptions above that you don't have to wait for future versions for robustness and full features for these two options.
One enhancement that I really appreciate is the tight integration between all the Adobe products. Since I work frequently in these products, this integration among InDesign, Illustrator, Photoshop, GoLive, and Acrobat ensures consistent and reliable output. This sharing of common commands, palettes, tools, shortcuts, and now color management settings, is a major plus.
InDesign 2.0 should increase the productivity of owners of previous versions and certainly enhance the creative urges for new users who want something a little bit above the ordinary in their layout and design application. Anyone one of these enhancements would be a reason for upgrading or switching from another layout program to InDesign 2.0. And when you look at all of the new features and enhancements together, it seems almost a crime if you don't upgrade or switch. It will change the way you look at design layout!
PC:
- Intel Pentium II, III or 4 processor;
- Microsoft Windows 98, Windows 98 Special Edition, Windows Millennium Edition, Windows NT 4.0 Workstation with Service Pack 6, Windows 2000 with Service Pack 2, or Windows XP;
- 128 MB of RAM;
- 145 MB of available hard disk space;
- Video card that supports 256 color at 1024x768 monitor resolution;
- For PostScript printers: Adobe PostScript level 2 or Adobe PostScript 3;
- CD-ROM drive.
Mac:
- Power PC processor G3 or G4 processor;
- Mac OS version 9.1, 9.2x or Mac OS X (version 10.0);
- 128 MB of RAM with virtual memory on;
- 220 MB of available hard disk space;
- 256 color at 1024x768 monitor resolution;
- For PostScript printers: Adobe PostScript level 2 or Adobe PostScript 3;
- CD-ROM drive.
Web Page Design: Macromedia Dreamweaver MX
| Educational | Books | Utilities | Web Tools | Legal | Articles