|
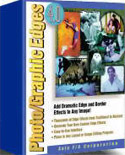
Auto F/X's Photo/Graphic Edges, a plug-in and a stand-alone application,
came into existence in 1994 when Cliff Weems, then an Art Director for
an ad agency, literally went out on the edge to dev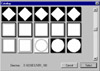 elop a concept
that went beyond square: edge effects that could be applied to digital
images and photographs. With Version 4.0 of Photo/Graphic Edges, Auto
F/X has combined its creative edge techniques with special effects such
as bevels, carves, sepia tones, grains, burned edges, shadows, lighting,
distortions, textured and colored mattes, and mezzotints. The edges
come in four volumes, with Volumes 1 thru 3, including over 300 unique
edges each, that are arranged by effect type. Each volume is available
separately or you can purchase them as a bundle containing all four
volumes. The User Guide has thumbnails of each edge and full color thumbnails
of textures, distortion tiles, and lighting tiles. There is also an
onscreen catalog of all of these elements. Price: $149 per volume: any
two volumes for $199; any three volumes for $299; all four volumes for
$399. elop a concept
that went beyond square: edge effects that could be applied to digital
images and photographs. With Version 4.0 of Photo/Graphic Edges, Auto
F/X has combined its creative edge techniques with special effects such
as bevels, carves, sepia tones, grains, burned edges, shadows, lighting,
distortions, textured and colored mattes, and mezzotints. The edges
come in four volumes, with Volumes 1 thru 3, including over 300 unique
edges each, that are arranged by effect type. Each volume is available
separately or you can purchase them as a bundle containing all four
volumes. The User Guide has thumbnails of each edge and full color thumbnails
of textures, distortion tiles, and lighting tiles. There is also an
onscreen catalog of all of these elements. Price: $149 per volume: any
two volumes for $199; any three volumes for $299; all four volumes for
$399.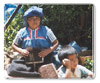
- Volume
1 contains traditional edge effects including deckled,
ripped, semi-transparent, film strips, film frames, emulsion transfers
and other traditional styled effects.

- Volume 2 includes geometric shapes, abstracts,
digital, and impressionistic edge effects.
- Volume 3 is a collection of hand painted
edge effects. These were created using numerous painted and mixed medium like watercolor fadeouts, brush strokes,
splattered paint, and etchings.
- Volume 4 covers darkroom mediums, brush
strokes, tones, and traditional darkroom techniques.
|
|
 The
program is easy to install and you have the choice of installing it
as a plug-in, as a stand-alone application, or as both. It worked well
in either mode. The interface is straight-forward and identical in each.
There is a large preview window that The
program is easy to install and you have the choice of installing it
as a plug-in, as a stand-alone application, or as both. It worked well
in either mode. The interface is straight-forward and identical in each.
There is a large preview window that 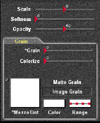 allows
you to see the effects on an image as you work. allows
you to see the effects on an image as you work.
Two bars at the bottom allow you to select effects by bringing up a tab dialog box that controls the options
for the effect. By utilizing the sliders on these tabs, you can apply effects and change key elements of the effect
without changing other effects. The various effect tabs are:
Select Edge Tab--You can select an inset
and outset edge effect; adjust the scale, softness, and opacity of their edges as well as the border width and
color. Edges may be flipped, rotated, and scaled in any direction.
Lighting
Tab--There are 200 lighting tiles included in each volume
of Photo/Gra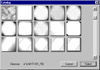 phic Edges. Lighting can be applied to just the image
or the background or to both. These tiles can be used to blur, sharpen,
lighten, darken, dampen, and smudge images. Adjustments can be made
with scale, opacity, and softness controls. phic Edges. Lighting can be applied to just the image
or the background or to both. These tiles can be used to blur, sharpen,
lighten, darken, dampen, and smudge images. Adjustments can be made
with scale, opacity, and softness controls.
Shadow Tab--After adding a shadow, users
can control the direction of the shadow, distort it, reverse it, offset the shadow distance, and adjust the scale,
softness, and opacity of the shadow.
Distort Tab--The appearance of edges can
be warped to create a rag effect. Photo/Graphic Edges has a variety of tiles to use, each with a distinct look.
You can distort the edges as well as the image with the vertical, horizontal and warp distort controls.
Bevel Tab--Inner and outer bevels can be
created. You can alter the width, depth, and smoothness of the bevel as well as the scale, opacity, and softness.
Bevel effects work well with textures, colors, grain, sepia, and lighting effects for one-of-a-kind results.
Carve Tab--The carve feature allows you
to sink an edged image into a background color or texture. You can control the illusion of depth by altering the
surface qualities, lighting, and shadow of the edge and image independently. Changes can be made to the direction
of the carve; you can reverse the effect and taper the edges.
Glow Tab--Glows are easy to add with this
feature. You can control the smoothness and color, as well as use a tile to distort the glow. A grainy appearance
can be applied and the double punch feature can be used to intensify the look.
Burn Tab--A singed effect can be created
with this feature. Burned edges can then be distorted, colored, scaled, and softened. The distance the burn is
merged into the image can be controlled and there is a double punch button where the burn is twice as intense.
Grain Tab--Tiles, grain, and color may
be applied to the image or to the matte. There are range controls to apply the grain to select tonal ranges of
the image.
Sepia Tab--Textured tiles can be fused
into the image for a wide variety of effects. You can adjust the hue and color of the sepia, dampen it, inverse
the pattern, and adjust the scale, softness, opacity, and range.
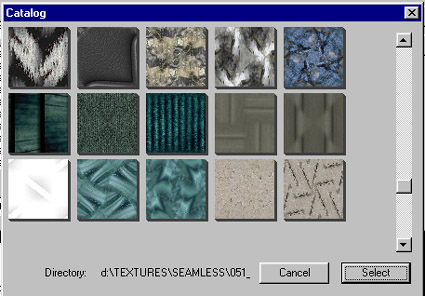
Matte Tab--You
can fuse textures around an edged image to form a textured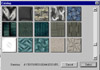 photo matte. Combining this feature with the carve
and bevel effects can give depth to an image. You have a diverse assortment
of textured images to choose from, such as paper, metal, fabric, stone,
and artistic surfaces. photo matte. Combining this feature with the carve
and bevel effects can give depth to an image. You have a diverse assortment
of textured images to choose from, such as paper, metal, fabric, stone,
and artistic surfaces.
Matte Color--You can select from a wide
variety of colors, including simulated Pantone spot colors, to use around your image. The colors can be adjusted
with noise effects, saturation and hue.
Effect Log--This log allows you to record
the steps you have taken. It indicates which effects are active and inactive and allows you to turn effects on
and off.
Below is a discussion of the various effects and what you can accomplish by combining them. I had recently taken
a trip to Chiapas, Mexico and had promised the other fellow travelers that I would put together some sort of book
to memorialize the event. The photographs I had to work with were limited, underexposed, overexposed, underdeveloped,
and boring. My background is not in artistic design and my photography ability, on a scale of 1 to 10, would be
about -1. But I thought this would be a unique way to accomplish two goals: a Web-based history of the trip and
a review of a product. After examining the innovations on Auto F/X's Web site, and again glancing at my photos,
though, I thought, maybe this was not such a good idea. It is easier to create impressive images when you start
with really great photos. It is harder when you start with poorer quality images, but then you get a better idea
of what you can really do with a program. And so the fun began.
I had not used the program before and was really unfamiliar with what
you could do with it. After scanning a photo of an oven, just to play
with, into Photoshop, I open Photo/Graphic Edges, and went from one
effect to another. It was intimidating at first to have so many options:
from selecting an edge, to applying the nine different effects, to using
the sliders under each effect to create even more changes. Within a
few minutes I think I had applied every effect to that poor oven that
was 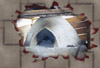 humanly possible. I kept on. After playing with the
effects and sliders again, I glanced at the oven and was amazed. The
original photo was just of a plain oven that was built for a woman's
baking cooperative in Chiapas. There was no brick wall in front of it
and it was a very ordinary picture. With the matte texture and carved
and burned edges it took on a unique look. Photo/Graphic Edges has a
variety of brick textures that can be combined with the carved and burned
edge effects to allow you to be really creative. I was hooked. The program
was addictive. humanly possible. I kept on. After playing with the
effects and sliders again, I glanced at the oven and was amazed. The
original photo was just of a plain oven that was built for a woman's
baking cooperative in Chiapas. There was no brick wall in front of it
and it was a very ordinary picture. With the matte texture and carved
and burned edges it took on a unique look. Photo/Graphic Edges has a
variety of brick textures that can be combined with the carved and burned
edge effects to allow you to be really creative. I was hooked. The program
was addictive.
I then proceeded to apply Photo/Graphic Edges to the other photos. I
had nine individuals that I wanted to include. Again, the photos were
not great. Most were group shots, with maybe one individual facing the
camera, and the rest of the picture filled with uneventful back views.
I didn't use Photoshop to enhance them in any way. I tried to use Photo/Graphic
Edges to frame the individuals and elements that I wanted to include.
And I also wanted edges and effects that would somehow represent the
quality and character of each individual. I will attempt to describe
what effects were applied; but to be truthful, I was having too much
fun and sometimes forgot what I had done!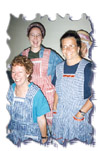
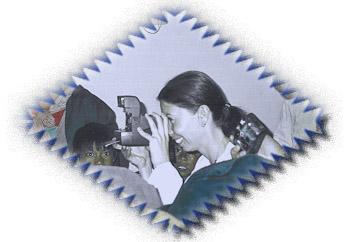
We had visited a sewing cooperative, where they made aprons and were trying on various styles. With this photo,
I had very little space beyond the three individuals and needed an edge that would hide very little of the background.
This is where Photo/Graphic Edge's bundle pack with all the volumes is convenient. I could find just the right
edge. I then applied a shadow effect with a distortion tile, and changed the color and distance.

For this image, I applied a slight edge with a glow effect, changed the color of the edge, increased the distance
of the glow, and then used the grain slider to add grain or pixelation to the glow.
I used 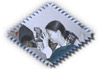 the
same photo here as in the User Level section, applied the same edge,
but added the glow effect with grain, the shadow effect, and the sepia
effect. I worked with this photo in the beginning when I was applying
anything and everything to the images, but I liked it anyway. I found the
same photo here as in the User Level section, applied the same edge,
but added the glow effect with grain, the shadow effect, and the sepia
effect. I worked with this photo in the beginning when I was applying
anything and everything to the images, but I liked it anyway. I found
 the
sepia effect very useful, even with color photos such as this one. the
sepia effect very useful, even with color photos such as this one.
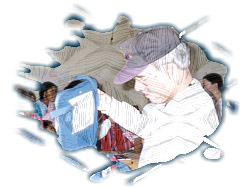
The next photo was very underexposed, plus the individual had a white jacket on. I think it also won the award
for having the most uninteresting back poses. I used an artistic frame that looked somewhat like a palette that
eliminated the boring backs, and I used a grain effect with a tile to add texture.
I was not sure what type of edge to use for this photo. At first I tried
the distort effect, but was not really satisfied. I then applied the
sepia effect, with a texture instead of a tile. I played with the opacity,
color, and scale and 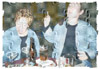 produced
an original look. This was one of the images where I could not remember
what effects I had used. This is not a program where you have to wonder
if someone else's work will look like yours, i.e. the canned image.
When I went back and tried to reproduce this look, I had to work at
it. What is fascinating about the program is that you can start with
an edge, effect, and texture and combine them in such a way that it
is difficult to connect them with the original elements. After this
experience I started to save my work as presets which contained all
of the information needed to recreate the effects I had applied. produced
an original look. This was one of the images where I could not remember
what effects I had used. This is not a program where you have to wonder
if someone else's work will look like yours, i.e. the canned image.
When I went back and tried to reproduce this look, I had to work at
it. What is fascinating about the program is that you can start with
an edge, effect, and texture and combine them in such a way that it
is difficult to connect them with the original elements. After this
experience I started to save my work as presets which contained all
of the information needed to recreate the effects I had applied.
I us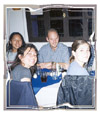 ed
a whimsical yet classy frame and applied a texture to the matte. I thought
I was finished and had gone into Photoshop. I then went back into Photo/Graphic
Edges just to check out if I had saved the frame. I had, and so I reloaded
it, made some changes, and then went back to Photoshop. The effects
had been applied twice. I hadn't intended to apply two edges to the
image, but I liked the effect. You can also apply more than one edge
with the select edge tab. ed
a whimsical yet classy frame and applied a texture to the matte. I thought
I was finished and had gone into Photoshop. I then went back into Photo/Graphic
Edges just to check out if I had saved the frame. I had, and so I reloaded
it, made some changes, and then went back to Photoshop. The effects
had been applied twice. I hadn't intended to apply two edges to the
image, but I liked the effect. You can also apply more than one edge
with the select edge tab.
For the last image, I decided to bevel. Now, even in Photoshop, I am
not the greatest beveler. I started with another washed out photo with
an individual in white. I used a bevel and textured matte effect. With
beveling, you can change the highlight and shado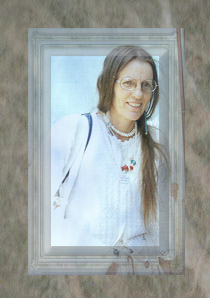 w
colors. I would often totally reverse what would seem reasonable: using
a dark color for the highlight and a light color for the shadow. With
this image, I used a light color for both, and I adjusted the opacity
of the effects. A lighting tile helped to add color to the image. I
was resizing the frame and happened to reduce it more than I intended.
I looked at the image and realized that by applying the background texture,
playing with the opacity of the matte and image, changing the color
of the highlight and shadow and reducing the frame, I had created a
image where it appeared that the person was coming out of a window or
frame. This was another example of starting out with little or no idea
of what I was doing or wanted, just that I wanted to bevel, and the
image seemed to take on a life of itself; something like in writing
when characters seem to take over and create the story. w
colors. I would often totally reverse what would seem reasonable: using
a dark color for the highlight and a light color for the shadow. With
this image, I used a light color for both, and I adjusted the opacity
of the effects. A lighting tile helped to add color to the image. I
was resizing the frame and happened to reduce it more than I intended.
I looked at the image and realized that by applying the background texture,
playing with the opacity of the matte and image, changing the color
of the highlight and shadow and reducing the frame, I had created a
image where it appeared that the person was coming out of a window or
frame. This was another example of starting out with little or no idea
of what I was doing or wanted, just that I wanted to bevel, and the
image seemed to take on a life of itself; something like in writing
when characters seem to take over and create the story.
|
 image
enhancement without having to buy or learn another program such as Photoshop.
Often, when I recommend a software program to someone, they will immediately
state that, "Oh no, I couldn't use that product. It is too difficult;
it is for professionals." And then they proceed to go out and
buy an item that is limited in its application and they soon tire of it.
If I can do only one thing of value in these reviews, it would be to debunk
this attitude and demystify the idea of "professional packages."
If a certain program is used by professionals, it is because it is good,
not that it is too difficult for the av
image
enhancement without having to buy or learn another program such as Photoshop.
Often, when I recommend a software program to someone, they will immediately
state that, "Oh no, I couldn't use that product. It is too difficult;
it is for professionals." And then they proceed to go out and
buy an item that is limited in its application and they soon tire of it.
If I can do only one thing of value in these reviews, it would be to debunk
this attitude and demystify the idea of "professional packages."
If a certain program is used by professionals, it is because it is good,
not that it is too difficult for the av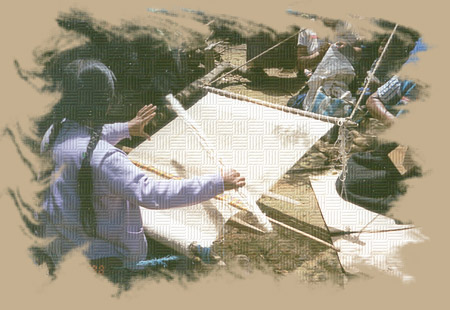 erage user. The three images above were easily created
in a few minutes using basic edges. Intermediate and advanced PC users
or designers, aware of how time consuming it is to create certain effects
in Photoshop, will appreciate the ease of use and unlimited possibilities
of design that Photo/Graphic Edges allows. Combining multiply effects
is limited only by your imagination. For the image to the left, I combined
a grain tile that simulated weaving and a matte color.
erage user. The three images above were easily created
in a few minutes using basic edges. Intermediate and advanced PC users
or designers, aware of how time consuming it is to create certain effects
in Photoshop, will appreciate the ease of use and unlimited possibilities
of design that Photo/Graphic Edges allows. Combining multiply effects
is limited only by your imagination. For the image to the left, I combined
a grain tile that simulated weaving and a matte color.