Adobe
LiveMotion 2.0 Classroom in a Book
"Master
LiveMotion 2.0 with Step-by Step Tutorials!"
Title:
Adobe
LiveMotion 2.0 Classroom in a Book
Author:
Team Adobe Development
Publisher:
Adobe Press in association with Peachpit Press http://www.adobe.com/adobepress/main.html
http://www.peachpit.com
Publication Date: June
2002
Pages: 376
with CD
ISBN: 0-201-75623-4
Price:
$45.00
Adobe
LiveMotion 2.0 Classroom in a Book
is part of an official training series from Adobe Systems. The Classroom
in a Book series of hands-on software training workbooks helps you learn
the features of Adobe software quickly and easily and at your own pace.
If you're new to Adobe LiveMotion, you'll learn the fundamental concepts
and features you'll need to master the program. If you have been using
Adobe LiveMotion for a while, you'll find that Classroom in a Book teaches
many advanced features, including tips and techniques for using this latest
version. It includes a cross-platform CD/ROM that contains material
that supplements the lessons in the book. The book begins with the basics:
the work area, drawing basic shapes, and the Pen tool, and then looks
at some of the advanced and new features such as writing Automation Scripts
and Live Tabs. You can follow the book from start to finish, or do only
the lessons that correspond to your interests and needs. There are also
special review lessons that summarize what you've covered. Written for
both PC and Macintosh users.
What I like:
- Step-by-step instruction;
- CD with starting and ending files for the lessons;
- Screen shots on almost every page;
- Special review lessons summarize what you've covered.
Adobe LiveMotion 2.0 Classroom in a Book is divided into a Getting Started Introduction and 15 chapters or lessons. Lesson 1 through Lesson 9 are similar in content to the lessons in Adobe LiveMotion 1.0 Classroom in a Book (click on the link to read our review). From Lesson 10 on, though, you will find tutorials that emphasize the new features in LiveMotion 2.0.
Getting Started --Describes basics about how the book works. The Adobe LiveMotion 2.0 Classroom in a Book CD includes folders containing all the electronic files for the lessons. Each lesson has its own folder, and you must copy the folders to your hard drive to do the lessons.
Lesson 4 Pen Tool

Lesson 8 Rollovers

Lesson 9 Movie Clips

Lesson 10 Script
Lesson 12 Variables

Lessons 1 through 15 cover the following:
- Lesson 1: Getting to Know the Work Area--This lesson gets you started in LiveMotion by showing you around the work area. You explore the menus and palettes and viewing features. Learn to open and save a file; select objects; move objects; use and rearrange palettes; and preview compositions. It takes approximately 30 minutes to complete, and there is a sample file on the CD to work with.
- Lesson 2: Drawing Basic Shapes--In this lesson you will learn how to create a logo and do the following: create shapes and layers; create text objects; add effects and textures to shapes; change the size, color, and opacity of shapes; and use various combine commands. It takes about 45 minutes to complete, and there is a beginning and ending file on the CD.
- Lesson 3: Working with Type--In LiveMotion, text can be manipulated like any other object, and it can be edited at any time while retaining its attributes. In this lesson, you'll explore the uses of type by creating and altering it in various ways. It discusses how to use the type tool; create, save, and apply a style; create a group mask; edit text; change the alignment of text; use the combine commands; and use a Photoshop filter. This lesson has you make a Web page, and it takes about 60 minutes to complete. There is a beginning and ending file on the CD.
- Lesson 4: Working with the Pen Tool--In previous lessons, you learned how to draw simple shapes using the shape tools. For more complicated shapes, you can use the LiveMotion pen tool, as it lets you draw straight lines, curves, and corners, which you can add to and edit while you draw. In this lesson, you practice drawing with the pen tool first by transforming a rectangle, then by drawing a bird. You'll learn how to do the following: draw straight lines; draw cured lines; add and remove control points; convert smooth points to corner points and vice versa; change shapes to paths; create closed paths; adjust lines; and use the fill and outline features. It takes about 45 minutes to complete and there is a beginning and ending file on the CD. See image to the left for a view of the file you create.
- Review A--In this first review section, you use the techniques you learned in the first four lessons to create a greeting card. You use the tools and palettes to create objects, such as a red heart, a greeting, and flowers; modify them; and create effects. Then you use masking to complete the project. There are files on the CD to work with.
- Lesson 5: Animating Position--With LiveMotion, you can add motion to objects, as well as change a variety of properties over time using the Timeline window. You can play the animation from start to finish, or click through it one frame at a time. In this lesson, you create an animation that consists of a flying saucer that zooms toward the bottom of the composition, turning and rotating as it comes closer. It examines how to do the following: create an object to animate; name the object; display and work with the animation Timeline window; create and edit keyframes; animate an object's position and other properties; create and edit motion paths; replace one object in an animation with another from a different file; time-stretch an animation; and preview and export an animation. It takes about 45 minutes to complete, and there are sample files on the CD.
- Lesson
6:
Editing Keyframes--In Lesson 5,
you learned how to animate an object's position, but in this lesson,
you will discover how to create more realistic, complex movement by
altering keyframes and repositioning objects. It examines how to do
the following: create hold frames; ease in and ease out of frames; reverse
animations by moving keyframes; and change the stacking order of objects.
You create an animation that consists of a plane that flies to three
different cites, as a cloud drifts across the scene. It takes about
30 minutes to complete, and there are beginning and ending files on
the CD.
- Lesson 7: Animating Object Properties--Using LiveMotion, you can animate nearly any aspect of an object. You can also make objects appear and disappear during an animation. This lesson explains how to: animate multilayered objects; change color, object opacity, and layer opacity over time; and work with sound. The lesson takes about 45 minutes to complete, and there are beginning and ending files on the CD.
- Review B--In this second review lesson, you use the techniques you learned in Lessons 5 through 7 to create an animated winter scene. You make elements of the animation move, rotate, and loop. You then add a song that will play through the animation. The files you need to work with are provided on the CD.
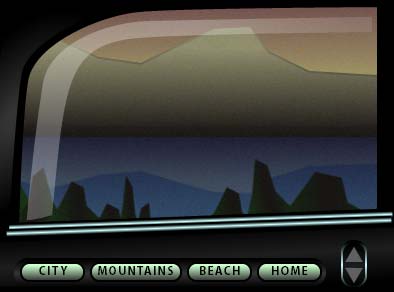
- Lesson 8: Creating Basic Rollovers--Rollovers are multi-state buttons that change their appearance or behavior when you roll the mouse pointer over them or click them. LiveMotion lets you create different effects for the normal, over, down, and out states of a rollover button. So after reading this lesson, you should know how to: create multiple rollover buttons simultaneously; apply different layered effects to a button; create a rollover state for each layered effect; apply a sound effect to a rollover state; use a linked URL with a rollover state; and add a label to each button. The lesson takes about 30 minutes to complete, and there is an end file on the CD to view. See image to the left for a view of the rollovers you create.
- Lesson 9: Movie Clips and Advanced Rollovers--This is where the really fun techniques begin. Movie clips enable you to animate multi-state rollover buttons so that they move when you click them. You can also set up custom rollover states and apply multiple conditions so that when one rollover is activated, another is activated remotely. This lesson covers how to: create movie clip groups; incorporate artwork from other LiveMotion files; animate a rollover button in different states; build masked groups; convert Illustrator artwork into a group of objects; and set up conditions for secondary, remote rollovers. There are beginning and ending files on the CD. Takes about 45 minutes to complete. See image to the left for a view of the file you create.
- Lesson 10: Basic Player Script Interactivity--Using the new scripting capability of LiveMotion 2.0, you can create complex compositions that are created as separate component files which are then placed into a final composition timeline. Once the components have been assembled, they can then be wired together with scripts. In this lesson, you learn how assemble multiple animations into one composition; create transitions between scenes; use labels in the composition and movie clip timelines; work with the Script Editor to add interactivity; and create a Wait for Download behavior. There are beginning and ending files on the CD. Takes about 45 minutes to complete. See image to the left for a view of the file you create.
- Lesson 11: Adding Sounds to Your Composition--In the same way that you add image files, you can add sound files to a composition timeline. In this lesson, you discover how to add streaming sound to a composition; add sound to a movie clip group; create a looping effect that makes a sound play continuously; use the Solo Event Sound property; create a controller to turn a looping sound on and off; and add a sound volume controller. There are beginning and ending files on the CD. Takes about 30 minutes to complete.
- Lesson 12: Working with Dynamic Data--LiveMotion's dynamic text fields allow your visitors to enter and retrieve customized information as variables. When you store data in variables, that data can be verified, manipulated, and submitted. This lesson covers all that. You learn how to: assemble a multi-page form; use variable data fields for input and output; create a password field; and use checkboxes to store variables. There are beginning and ending files on the CD. Takes about 45 minutes to complete. See image to the left for a view of the file you create.
- Review C--In this final review section, you use the techniques you learned in Lessons 8 through 12 to make a wire figure move in and out of the composition, and another figure move along a series of animated rectangles. You do all this by creating movie clip groups. You then create rollovers and add scripts to trigger the animations you create. The files you need are on the CD.
- Lesson 13: Advanced Interactivity: The Game--LiveMotion's scripting capabilities allow you to create fun and exciting games, and it doesn't even take a boatload of scripting savvy to produce an entertaining game. With a ready-made script on which to base your project, you can turn out a game without a major investment in time, and by altering the graphics, you can quickly adapt an existing game to create an entirely different look and feel. In this lesson you learn to: identify basic game components; adjust game settings; and update an existing game. The files you need are on the CD, and it takes about 60 minutes to complete.
- Lesson 14: Writing Automation Scripts and Live Tabs--LiveMotion 2.0's new automation tools take the tedium out of performing the same operations over and over. The first of these tools is automation scripting, which leverages the power of JavaScript to control LiveMotion and carry out repetitive tasks. Secondly, Live Tabs take automation to the next level by allowing you to build custom interfaces that collect user input and feed the information to your automation scripts. In this lesson, you work with Automation Scripts and Live Tabs and learn to: use Automation Scripts to create new LiveMotion objects; use the Script Editor to edit and debug automation scripts; use the automation menu to load automation scripts and Live Tabs; and create a Live Tab that makes 3D-style buttons with customizable features. The files you need are on the CD, and it takes about 45 minutes to complete.
- Lesson 15: Exporting--Exporting in LiveMotion is extremely flexible, allowing you to export your files to any of the common Web formats. In this lesson you learn to: choose which export format best suits your composition; use the Export palette; adjust object settings for optimal size and quality; export to different formats; and optimize SWF exports. There are beginning and ending files on the CD, and it takes about 45 minutes to complete.
For running Adobe LiveMotion 2.0, you need:
Windows:
- Intel Pentium III or faster processor (600 MHz or higher recommended);
- Microsoft Windows 98, ME, 2000 or XP;
- 64 MB of RAM minimum (128 MB of RAM recommended);
- 50 MB of available hard disk space;
- CD-ROM;
- Monitor resolution of 800x600 or greater, 1024x768 recommended.
Macintosh:
- PowerPC G3 or higher processor;
- Apple Macintosh OS 9.1, 9.2 or 10.1;
- 64 MB of RAM minimum (128 MB of RAM recommended);
- 50 MB of available hard disk space;
- CD-ROM drive
- Monitor resolution of 800x600 or greater, 1024x768 recommended.
Web Page Design: Macromedia Dreamweaver 4.0
| Educational | Books | Utilities | Web Tools | Legal | Articles