The Adobe Photoshop Classroom in a Book CD includes folders containing
all the electronic files for the lessons. Each lesson has its own folder,
and you must copy the folders to your hard drive to do the lessons.
Getting Started--This is a basic
description of the book and how to copy the files and fonts to your
hard driver.
Lesson 1: Getting to Know the Work Area--As
stated, this chapter deals with the work environment: how to open
files; select tools; use viewing options to enlarge and reduce the
display of an image; work with palettes; and use online Help.With
this lesson, there is really not a specific tutorial. You just use
a photo from the CD to practice with as you learn the work environment
of Photoshop.
Lesson 2: Working With Selections--Here
the different selection tools a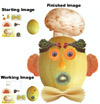 nd
techniques are demonstrated, when certain options work best, and combining
selection techniques. You learn to: select parts of an image using
a variety of tools; reposition a selection marquee; deselect a selection;
move and duplicate a selection; constrain the movement of a selection;
choose areas of an image based on proximity or color of pixels; adjust
a selection with the arrow keys; add to and subtract from selections;
rotate, scale, and transform a selection; combine selection tools;
and crop an image. You use pieces of fruits and vegetables provided
and create Mr. Fruit and Vegetable Man! See image to the right for
a view of the finished product.
nd
techniques are demonstrated, when certain options work best, and combining
selection techniques. You learn to: select parts of an image using
a variety of tools; reposition a selection marquee; deselect a selection;
move and duplicate a selection; constrain the movement of a selection;
choose areas of an image based on proximity or color of pixels; adjust
a selection with the arrow keys; add to and subtract from selections;
rotate, scale, and transform a selection; combine selection tools;
and crop an image. You use pieces of fruits and vegetables provided
and create Mr. Fruit and Vegetable Man! See image to the right for
a view of the finished product.
Lesson 3: Layer Basics--Both
Adobe Photoshop and Adobe ImageReady let you isolate different parts
of an image on layers. Each layer can then be edited as discrete  artwork,
allowing unlimited flexibility in composing and revising an image.
In this lesson, you learn to: organize your artwork on layers; create
a new layer; view and hide layers; select layers; remove artwork on
layers; reorder layers to change the placement of artwork in the image;
apply modes to layers to vary the effect of artwork on the layer;
link layers to affect them simultaneously; apply a gradient to a layer;
add text and layer effects to a layer; and save a copy of the file
with the layers flattened. See image to the left for a view of finished
product.
artwork,
allowing unlimited flexibility in composing and revising an image.
In this lesson, you learn to: organize your artwork on layers; create
a new layer; view and hide layers; select layers; remove artwork on
layers; reorder layers to change the placement of artwork in the image;
apply modes to layers to vary the effect of artwork on the layer;
link layers to affect them simultaneously; apply a gradient to a layer;
add text and layer effects to a layer; and save a copy of the file
with the layers flattened. See image to the left for a view of finished
product.
Lesson 4: Painting and Editing--You
can create graphics by painting and drawing in Photoshop. You learn
to: use the basic painting tools and experiment with different options
for each tool; work with colors, gradients, or patterns in a layer;
use layers to 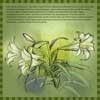 paint,
adjust, add effects, and make color changes to specific portions of
the image; set the blending mode and opacity of a layer to adjust
how colors and each element of the image combine with the others;
set the blending mode and opacity of a painting tool to adjust how
a paint stroke combines with other pixels in the image; use the eraser
tool, history paint brush, and history palette to make corrections;
use a pattern from a different image to create a border; and create
custom brushes and settings that appear in the tool options bar for
any painting tool. See image to right for view of the finished product.
paint,
adjust, add effects, and make color changes to specific portions of
the image; set the blending mode and opacity of a layer to adjust
how colors and each element of the image combine with the others;
set the blending mode and opacity of a painting tool to adjust how
a paint stroke combines with other pixels in the image; use the eraser
tool, history paint brush, and history palette to make corrections;
use a pattern from a different image to create a border; and create
custom brushes and settings that appear in the tool options bar for
any painting tool. See image to right for view of the finished product.
Lesson 5: Masks and Channels--Masks
and channels in Photoshop are one of the 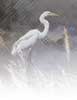 more
complex concepts. In this chapter you will learn to: refine a selection
using a quick mask; save a selection as a channel mask; view a mask
using the channels palette; load a saved mask and apply effects; paint
in a mask to modify a selection; make an intricate selection usign
the extract command; and create and use a gradient mask. See image
to the right for a view of the finished project.
more
complex concepts. In this chapter you will learn to: refine a selection
using a quick mask; save a selection as a channel mask; view a mask
using the channels palette; load a saved mask and apply effects; paint
in a mask to modify a selection; make an intricate selection usign
the extract command; and create and use a gradient mask. See image
to the right for a view of the finished project.
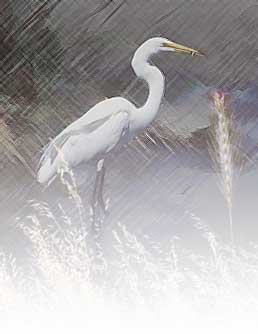
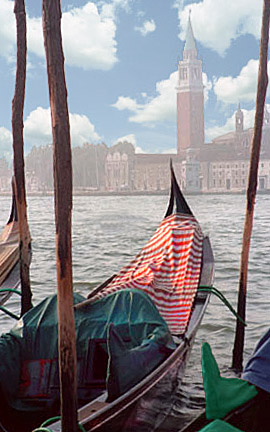
Lesson 6: Photo Retouching--Adobe
Photoshop and Adobe ImageReady include a variety of tools and commands
for improving the quality of a photographic image. This lesson steps
you through the process of acquiring, resizing, and retouching a photo.You
learn to: choose the correct resolution for a scanned  photograph;
crop an image to final size; adjust the tonal range of an image; remove
a color cast from an image using an adjustment layer; use the replace
color command to change the hue and saturation of a selected color
in a photograph; adjust the saturation and brightness of isolated
areas of an image using the sponge and dodge tools; use the clone
stamp tool to eliminate an unwanted object from an image; replace
parts of an image with anothr image; apply the unsharp mask filter
to finish the photo-retouching process; and save an Adobe Photoshop
file in a format that can be used by a page-layout program.
photograph;
crop an image to final size; adjust the tonal range of an image; remove
a color cast from an image using an adjustment layer; use the replace
color command to change the hue and saturation of a selected color
in a photograph; adjust the saturation and brightness of isolated
areas of an image using the sponge and dodge tools; use the clone
stamp tool to eliminate an unwanted object from an image; replace
parts of an image with anothr image; apply the unsharp mask filter
to finish the photo-retouching process; and save an Adobe Photoshop
file in a format that can be used by a page-layout program.
Lesson 7: Basic Pen Tool Techniques--The
pen tool draws precise straight or curved 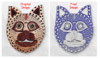 lines
called paths. You can use the pen tool as a drawing tool or as a selection
tool. In this chapter, you learn to: practice drawing straight and
curved paths using the pen tool; save paths; fill and stroke paths;
edit paths using the path editing tools; convert a path to a selection;
and convert a selection to a path. See image to the right for view
of starting and ending file.
lines
called paths. You can use the pen tool as a drawing tool or as a selection
tool. In this chapter, you learn to: practice drawing straight and
curved paths using the pen tool; save paths; fill and stroke paths;
edit paths using the path editing tools; convert a path to a selection;
and convert a selection to a path. See image to the right for view
of starting and ending file.
Lesson 8: Vector Shapes and Clipping Paths--You
can make simple illustrations using vector
paths in Adobe Photoshop or Adobe ImageReady. Working with vectors
allows you to create shapes, which can be filled or stroked, and use
clipping paths to control what is shown in an image. In this lesson,
you are introduced to advanced uses of vector shapes and clipping
paths. You learn how to: differentiate between bitmap and vector graphics;
use clipping paths to control what's shown in a layer; create a logo
using vector shapes and clipping paths; work with text in Photoshop;
and use actions and styles to re-create a vector graphic. See image
to the left for a view of the finished product.
vector
paths in Adobe Photoshop or Adobe ImageReady. Working with vectors
allows you to create shapes, which can be filled or stroked, and use
clipping paths to control what is shown in an image. In this lesson,
you are introduced to advanced uses of vector shapes and clipping
paths. You learn how to: differentiate between bitmap and vector graphics;
use clipping paths to control what's shown in a layer; create a logo
using vector shapes and clipping paths; work with text in Photoshop;
and use actions and styles to re-create a vector graphic. See image
to the left for a view of the finished product.
Lesson 9: Advanced Layer Techniques--You
can create complex effects in your artwork using layer masks, clipping
groups, and style layers. In this lesson, you learn the following:
create clipping groups, which let you use an iamge on one layer as
a mask for 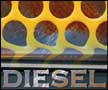 artwork
on other layers; create layer sets to organize and manage layers;
add adjustment layers to an image, and use them to apply color and
tonal adjustments withoyut permanently changing pixel data; create
knockout layers to use one layer selectively to reveal others; import
layers from other Photoshop files; work with type layers; duplicate
and clip layers; add layer styles to a layer, and apply the effects
to multiple layers; rasterize layers; convert clipping paths to masks;
liquify a layer, giving it a melted appearance; and flatten and save
layered files, greatly reudcing their file size. See image to right
for a view of the finished product.
artwork
on other layers; create layer sets to organize and manage layers;
add adjustment layers to an image, and use them to apply color and
tonal adjustments withoyut permanently changing pixel data; create
knockout layers to use one layer selectively to reveal others; import
layers from other Photoshop files; work with type layers; duplicate
and clip layers; add layer styles to a layer, and apply the effects
to multiple layers; rasterize layers; convert clipping paths to masks;
liquify a layer, giving it a melted appearance; and flatten and save
layered files, greatly reudcing their file size. See image to right
for a view of the finished product.
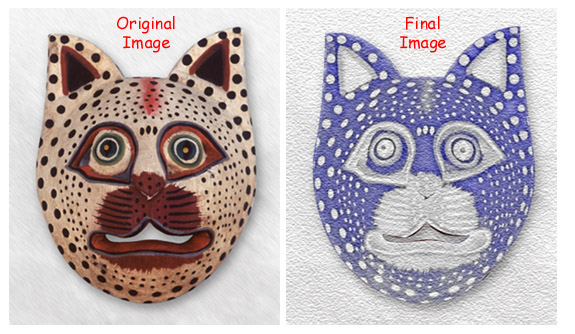
Lesson 10: Creating Special Effects--The
huge assortment of filters available for Adobe Photoshop lets you
transform ordinary images into extraordinary digital artwork. You
can select filters that simulate a traditional artistic medium--a
watercolor, pastel, or 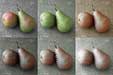 sketched
effect--or you can choose from filters that blur, bend, wrap, sharpen,
or fragment images. In addition to using filters to alter images,
you can use adjustment layers and painting modes to vary the look
of your artwork. In this lesson, you learn to: add a grid to an image
to help you make precise selections; desaturate a selection without
affecting the color in other parts of the image; paint on a layer
above the artwork to color the underlying artwork without changing
it permanently; choose colors that are safe to use on the Web; add
an adjustment layer to make a color correction to a selection; and
apply filters to selections to create various effects. See image to
the left for a view of the finished product.
sketched
effect--or you can choose from filters that blur, bend, wrap, sharpen,
or fragment images. In addition to using filters to alter images,
you can use adjustment layers and painting modes to vary the look
of your artwork. In this lesson, you learn to: add a grid to an image
to help you make precise selections; desaturate a selection without
affecting the color in other parts of the image; paint on a layer
above the artwork to color the underlying artwork without changing
it permanently; choose colors that are safe to use on the Web; add
an adjustment layer to make a color correction to a selection; and
apply filters to selections to create various effects. See image to
the left for a view of the finished product.
Lesson 11: Setting Up Your Monitor for Color
Management --In this lesson, you learn to: examine
the principles associated with color management; calibrate your monitor
using Adobe Gamma; and create an ICC profile for your monitor using
Adobe Gamma.
Lesson 12: Producing and Printing Consistent
Color --To produce consistent color, you define
the color space in which to edit and display RGB images, and in which
to edit, display, and print CMYK images. In this lesson, you learn
how to do the following: define RGB, grayscale, and CMYK color spaces
for displaying, editing, and printing images; prepare an image for
printing on a PostScript CMYK printer; proof an image for printing;
create a color separation, the process by which the colors in an RGB
image are distributed to the four process ink colors: cyan, magenta,
yellow, and black; and understand how images are prepared fore printing
on presses.
Lesson 13: Preparing Images for Two-Color
Printing--Printing in two colors using a  grayscale
image and spot color can be an effective and inexpensive alternative.
In this lesson, you will learn how to use Adobe Photoshop to prepare
full-color images for two-color printing. You learn how to: convert
a color image to monochrome, and improve its overall quality; adjust
the tonal range of the image by assigning black and white points;
sharpen the image; convert a color image to grayscale; and add spot
color to selected areas of the images. See image to the right for
a view of the finished project.
grayscale
image and spot color can be an effective and inexpensive alternative.
In this lesson, you will learn how to use Adobe Photoshop to prepare
full-color images for two-color printing. You learn how to: convert
a color image to monochrome, and improve its overall quality; adjust
the tonal range of the image by assigning black and white points;
sharpen the image; convert a color image to grayscale; and add spot
color to selected areas of the images. See image to the right for
a view of the finished project.
Lesson 14: Optimizing Images For the Web--Adobe
Photoshop and Adobe ImageReady let you optimize the display and file
size of your images for effective Web publishing results. In this
lesson, you learn to do the following: optimize JPEG and GIF files,
and adjust the optimization settings to achieve the desired balance
between file size and image quality; adjust the amount of dithering
applied to an image; define a transparent background for an image;
create a hypertext image map; and batch-process files to automate
the optimization process.
Lesson 15: Creating Web Graphics Using Slices
and Rollovers--You can divide your image into individual
slices so you can optimize each slice in different web image formats.
Slices can be animated, linked to URL addresses, and used for rollover
buttons.  In
this lesson, you learn how to: slice an image using four different
methods; optimize each image slice using various settings and file
formats; create "no image" slices to contain text and HTML;
create rollover buttons in a banner; apply a warped text style to
the image that appears only when the rollover button is in its Over
state; show or hide certain layers in the image when a rollover button
is in its Over state or Down state; and generate an HTML page that
contains the sliced image in a table. See image to right for view
of an example of Web page that was sliced.
In
this lesson, you learn how to: slice an image using four different
methods; optimize each image slice using various settings and file
formats; create "no image" slices to contain text and HTML;
create rollover buttons in a banner; apply a warped text style to
the image that appears only when the rollover button is in its Over
state; show or hide certain layers in the image when a rollover button
is in its Over state or Down state; and generate an HTML page that
contains the sliced image in a table. See image to right for view
of an example of Web page that was sliced.
Lesson 16: Designing Web Pages Using Multiple
Adobe Programs--Adobe Photoshop works well with other Adobe
programs to help you create your Web site. You can design the content
for your Web pages in Photoshop, review the designs and share review
comments in Adobe Acrobat, add rollovers or animations in Adobe ImageReady,
and import the designs into Adobe GoLive to create the Web pages.
In this chapter,you learn to: create and annotate a PDF (Portable
Document Format) file in Photoshop; annotate the Photoshop PDF file
in Acrobat and reopen it in Photoshop with all its layers intact;
import a layered Photoshop file into a GoLive document as separate
DHTML layers; use a Photoshop file as a tracing image in GoLive; and
link your Web page to an ImageReady file using a GoLive Smart Object.
Lesson 17: Creating Animated Images For the
Web--To add dynamic content to your Web page, use
Adobe ImageReady to create animated GIF images from a single image.
Compact in file size, animated GIFs display and play in most Web browsers.
In this chapter, learn to: open a multilayered image to use as the
basis for the animation; use the layers palette in conjunction with
the animation palette to create animation sequences; make changes
to single frames, multiple frames, and an entire animation; use the
tween command to automatically vary layer opacity and position across
frames; preview animations in Adobe ImageReady and in a Web browser;
open and edit an existing animated GIF image; and optimize the animation
using the optimize palette.

 Title:
Adobe Photoshop 6.0 Classroom in a Book
Title:
Adobe Photoshop 6.0 Classroom in a Book