Corel Photo-Paint 9: The Official Guide"Great for Beginners and Professionals" |
||
Click on a thumbnail to enlarge it. Use your browser's "BACK" button to return to this review when done. |
||
 Title:
Corel Photo-Paint 9: The Official Guide Title:
Corel Photo-Paint 9: The Official GuideAuthor: David Huss Publisher: Osborne/McGraw-Hill http://www.osborne.com Publication Date: May 1999 Pages: 771 ISBN: 0-07-322985-3 Price: $39.99 Corel Photo-Paint 9: The Official Guide is designed to help you make the most of your software tools. It shows you how to quickly upgrade to the Photo-Paint 9 working environment, 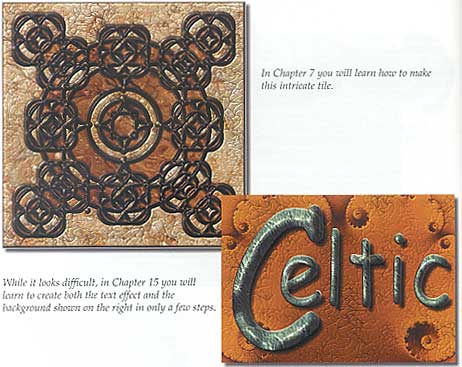 demonstrates
how to use the new tools and features, and gives excellent guidance on
making the most of Photo-Paint 9. The author has included special Workshop
Projects throughout the book so that you can follow along to learn about
the tools, features, and techniques that he explains. There is an exciting
chapter on creating Web graphics that offers a wealth of information to
ensure that your artwork is optimized for use on the Web. Inside the book,
you will learn how to: follow step-by-step workshops to learn to create
digital masterpieces; scan images like a pro and turn overexposed, scratchy,
or timeworn photographs into visions of beauty; master version 9's new
tools, brushes, filters, and masks; control your colors, including demonstrates
how to use the new tools and features, and gives excellent guidance on
making the most of Photo-Paint 9. The author has included special Workshop
Projects throughout the book so that you can follow along to learn about
the tools, features, and techniques that he explains. There is an exciting
chapter on creating Web graphics that offers a wealth of information to
ensure that your artwork is optimized for use on the Web. Inside the book,
you will learn how to: follow step-by-step workshops to learn to create
digital masterpieces; scan images like a pro and turn overexposed, scratchy,
or timeworn photographs into visions of beauty; master version 9's new
tools, brushes, filters, and masks; control your colors, including  corrections,
models, and palette setup; edit photos and remove portions of images without
disrupting composition using the Clone tool; maximize the power of the
Image Sprayer to create extraordinary images with a brush stroke; create
custom Web graphics and dazzling Web pages; plus browse the 16-page color
insert for brilliant ideas that will help you generate your own professional
digital works of art. The author, Dave Huss, is well-versed in Photo-Paint
and is a technical writer and graphic illustrator. He has authored or
co-authored nine books on Corel Photo-Paint, been on TV, and won the Grand
Prize in the 1997 Corel World Design Contest. You can download various
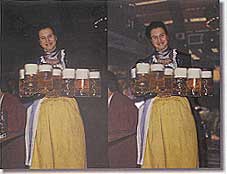
images used in the step-by-step tutorials in the book from the Free
Code section of the Osborne Web site. The image to the right is what
you will work on in Chapter 18 using a combination of contour filters
and merge modes. The original image appears at the top of the three photographs.
The two images below it show the results of the step-by-step tutorial. corrections,
models, and palette setup; edit photos and remove portions of images without
disrupting composition using the Clone tool; maximize the power of the
Image Sprayer to create extraordinary images with a brush stroke; create
custom Web graphics and dazzling Web pages; plus browse the 16-page color
insert for brilliant ideas that will help you generate your own professional
digital works of art. The author, Dave Huss, is well-versed in Photo-Paint
and is a technical writer and graphic illustrator. He has authored or
co-authored nine books on Corel Photo-Paint, been on TV, and won the Grand
Prize in the 1997 Corel World Design Contest. You can download various
images used in the step-by-step tutorials in the book from the Free
Code section of the Osborne Web site. The image to the right is what
you will work on in Chapter 18 using a combination of contour filters
and merge modes. The original image appears at the top of the three photographs.
The two images below it show the results of the step-by-step tutorial. |
||
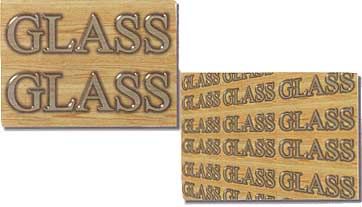
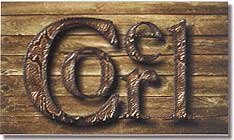
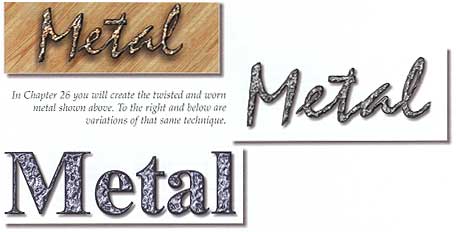
Beginning, Intermediate, and Advanced users.
New Corel Photo-Paint users, as well as those already familiar with the program, will find significant value in this
book, and should benefit from the in-depth knowledge the author has developed
from his experience with the program. Beginners will be amazed what they
can create in a few minutes after reading the book. In Chapter 14, you
will discover how to make the image to the right with metallic effects
that look rusty and deteriorated.
already familiar with the program, will find significant value in this
book, and should benefit from the in-depth knowledge the author has developed
from his experience with the program. Beginners will be amazed what they
can create in a few minutes after reading the book. In Chapter 14, you
will discover how to make the image to the right with metallic effects
that look rusty and deteriorated. |
||
|
Part 5: Extending the Power of Photo-Paint--discusses scanners
and scanning, photo CDs, and moving images between applications. Certain
Corel graphic utilities or tools such as Capture 9, the Batch |
||
Corel Photo-Paint 9: The Official Guide is a solid
and thorough reference book that you can use as 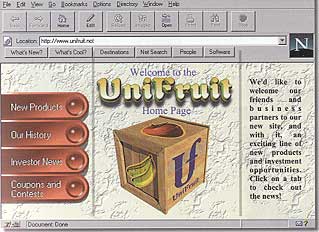 a
guide to the program. You can use it to learn the program or peruse it
when you want to review specific features. The author has a sense of humor
and makes learning Photo-Paint 9 very easy and painless. His writing style
is amusing, and he covers it all. He includes plenty of amazing techniques
and shortcuts and before you know it, you will be experimenting on your
own. It is great to have the examples that are used in the book so you
can work along with the author. In Chapter 24, you will create the Web
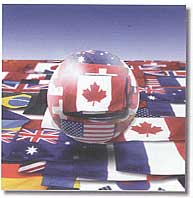
page shown on the left. a
guide to the program. You can use it to learn the program or peruse it
when you want to review specific features. The author has a sense of humor
and makes learning Photo-Paint 9 very easy and painless. His writing style
is amusing, and he covers it all. He includes plenty of amazing techniques
and shortcuts and before you know it, you will be experimenting on your
own. It is great to have the examples that are used in the book so you
can work along with the author. In Chapter 24, you will create the Web
page shown on the left. |
||
|
Graphics:
CorelDraw & Adobe Photoshop |
||
|
|
||