On-screen Look and Feel
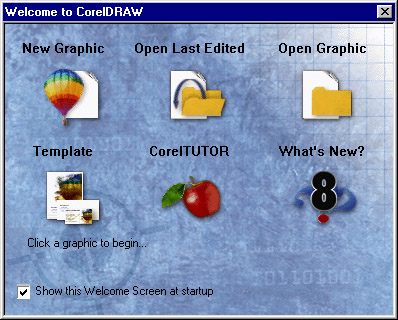
When you first launch Draw 8 you see a Getting Started window that
provides six opti ons
for getting started: New Graphics--creates a new window in which you
can design a graphic; Open Last Edited--Opens the last graphic image
file you worked on; Open Graphic--Opens the Open Drawing dialog box,
enabling you to select from any saved graphic image file; Template--Enables
you to choose from a list of predesigned page templates that you can
use as a basis to begin a design; CorelTutor--Enables you to select
from several categories of online help and instructions; and What's
New?--Lists and explains new features in Draw 8. ons
for getting started: New Graphics--creates a new window in which you
can design a graphic; Open Last Edited--Opens the last graphic image
file you worked on; Open Graphic--Opens the Open Drawing dialog box,
enabling you to select from any saved graphic image file; Template--Enables
you to choose from a list of predesigned page templates that you can
use as a basis to begin a design; CorelTutor--Enables you to select
from several categories of online help and instructions; and What's
New?--Lists and explains new features in Draw 8.
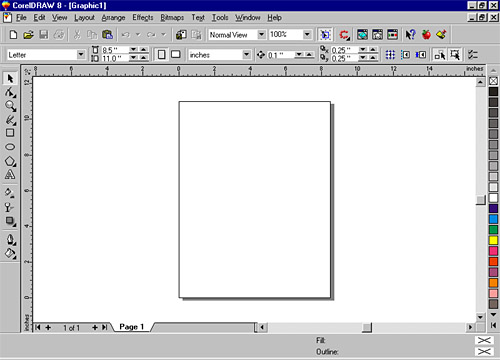
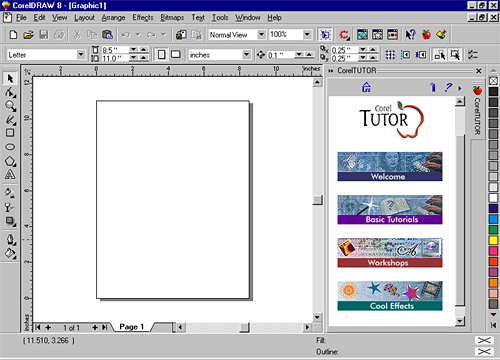
Flat Look--To create a new graphic
image, you use the New Graphic option. The user interface now has
a clean flat look with hot tracking over buttons, tools, and options
as you pass the cursor over the Drawing Window. This means that as
you move your cursor over options in the various bars, you get a raised
3D image that explains the item. The entire area below the Title Bar,
with the exception of the actual  drawing
page in the center of the screen, is called the Workspace. Down the
left side of the screen is the toolbox. The color palette is displayed
on the right-hand side. Across the top of the screen are displayed
Title Bar, Menu Bar, Toolbar, and Property Bar in descending order.
The bottom of the screen displays the scroll bar and below that the
Status Bar. In the center of the screen is the Drawing Page, with
a drop shadow around the page called the Page Border. The white area
surrounding the page is called the Desktop. The Property Bar is a
context-sensitive command bar. The settings and options available
on the bar change depending on the tool or object selected. The advantage
of the Property Bar is that it diminishes the need to use the menu
commands or access many of the dialog boxes. drawing
page in the center of the screen, is called the Workspace. Down the
left side of the screen is the toolbox. The color palette is displayed
on the right-hand side. Across the top of the screen are displayed
Title Bar, Menu Bar, Toolbar, and Property Bar in descending order.
The bottom of the screen displays the scroll bar and below that the
Status Bar. In the center of the screen is the Drawing Page, with
a drop shadow around the page called the Page Border. The white area
surrounding the page is called the Desktop. The Property Bar is a
context-sensitive command bar. The settings and options available
on the bar change depending on the tool or object selected. The advantage
of the Property Bar is that it diminishes the need to use the menu
commands or access many of the dialog boxes.
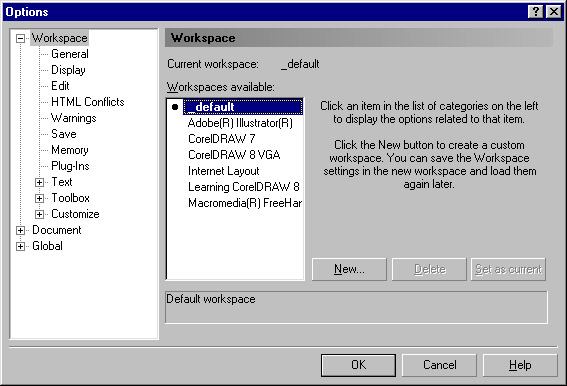
Workspace--The Options dialog
box allows you to specify and save wor kspace
settings. You can customize and save your menus, toolbars, shortcut
keys and more as part of your workspace settings and you can make
your custom workspace settings the default settings for the application. kspace
settings. You can customize and save your menus, toolbars, shortcut
keys and more as part of your workspace settings and you can make
your custom workspace settings the default settings for the application.
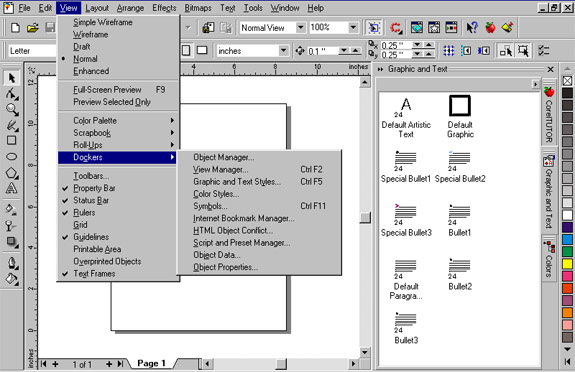
Docker Window--Docker windows
are new to Draw 8 and have replace many of the dialog boxes and roll-ups.
Docker windows can be positioned to th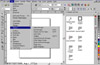 e right or left
of the Drawing Window or can become floating windows by dragging them
into the Drawing Window. They allow easy access to frequently used
features without cluttering the Drawing Page. When multiple Docker
windows are open, tabs appear on the right of the Docker Window allowing
you to flip through and change them quickly and easily. The image
to the right shows multiple docker windows open with tabs along the
right edge. The pulldown menu under View is open to show you the variety
of Docker Windows available. e right or left
of the Drawing Window or can become floating windows by dragging them
into the Drawing Window. They allow easy access to frequently used
features without cluttering the Drawing Page. When multiple Docker
windows are open, tabs appear on the right of the Docker Window allowing
you to flip through and change them quickly and easily. The image
to the right shows multiple docker windows open with tabs along the
right edge. The pulldown menu under View is open to show you the variety
of Docker Windows available.
Microsoft IntelliMouse--You can
adjust the zoom and pan view of your drawing or image by using the
Zoom Roller button on the Microsoft IntelliMouse.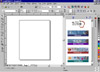
CorelTutor--Provides instructions on learning the basic features of CorelDraw
as well as guides you through workshops and advanced effects. The tutors are easy to follow and appear in a new
browser docker window.
Customization--The enhanced customization features, such as user-defined
zoom levels, toolbars, hot keys, menus, status bar, color palette, application defaults, and page sizes, allow
you to work more effectively. It helps to have zoomed views can be named and saved in the Zoom Level window on
the toolbar so you can return to that view with a single click-and-drag. And I really want to emphasize that almost
every item on the display is totally configurable, letting you build your own toolbars, nest dialog boxes, and
access the relevant features of the current function from the Property Bar.
Productivity and Performance
CorelDraw 8 lets you work more efficiently, increasing your productivity and performance. The new display modes
let you move and position objects accurately. Node editing using the basic tools lets you complete your drawing
quickly. Improvements to the Duplicate command and the addition of keyboard accelerators, provide quick results.
Using any of the fill types, you can now apply a fill to a curve.
Bitmap Display--When dragging objects, you can quickly change how the objects
are displayed from outline, to XOR (color inversion) to full bitmap representation by using TAB. Switching between
display views allows you to view and position objects with greater precision. When moving complex objects on-screen,
you can choose to have CorelDraw redraw objects directly to screen, or save them in memory before displaying to
screen. The default is to save images to memory to minimize the amount of unnecessary redraws caused by overlapping
windows. To conserve memory, you can turn off this feature by disabling the Use Offscreen Image button in the Options
dialog box.
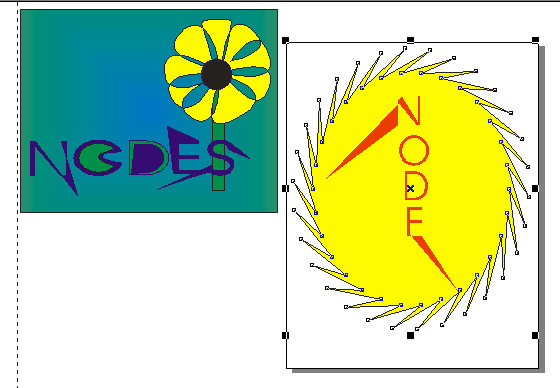
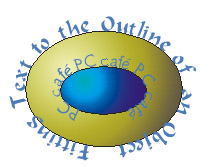
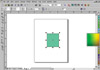
Node Editing--Basic node editing
with the Pick tool has been made easier. N ow,
using any of the basic drawing tools, you can manipulate an object's
position and shape. The Shape tool is accessible by simply double-clicking
any curve object. Understanding nodes is important for working in
CorelDraw. Objects in CorelDraw have small control points called nodes.
These nodes enable you to edit the shape of a selected object with
tremendous detail. You can edit nodes on text or shapes. The graphic
to the right was made editing nodes. The text in both images was converted
to curves and then manipulated. The yellow flower was created from
a circle by adding nodes and using the Stretch and Scale Nodes option.
I used the Fill Tool to apply a Fountain Fill, square type, of blue
and , for the background. The yellow circular image was created using
the Polygon Tool, with the Polygon as Star option, and then manipulating
the nodes. You can see the small nodes on the circular image. ow,
using any of the basic drawing tools, you can manipulate an object's
position and shape. The Shape tool is accessible by simply double-clicking
any curve object. Understanding nodes is important for working in
CorelDraw. Objects in CorelDraw have small control points called nodes.
These nodes enable you to edit the shape of a selected object with
tremendous detail. You can edit nodes on text or shapes. The graphic
to the right was made editing nodes. The text in both images was converted
to curves and then manipulated. The yellow flower was created from
a circle by adding nodes and using the Stretch and Scale Nodes option.
I used the Fill Tool to apply a Fountain Fill, square type, of blue
and , for the background. The yellow circular image was created using
the Polygon Tool, with the Polygon as Star option, and then manipulating
the nodes. You can see the small nodes on the circular image.
Guidelines--Guidelines offer more precision when working with graphics.
Like objects, guidelines can now be multiselected, rotated, deleted or placed at precise locations using the nudge
feature.
Smart Duplicates--Patterns can be repeated using the Smart Duplicate feature.
Once a duplicate object is created and moved to a new position, the Duplicate command will use this new translated
position to place the next duplicates.
Keyboard Accelerator--The ability to perform tasks using the keyboard has
been made easier with the inclusion of new accelerator keys. Use TAB and ALT to simplify object manipulations.
Using ALT you can select hidden objects in a stack or group in your drawing.
Drag and Drop--Almost every attribute--colors, styles, fills, outlines,
and clip art--can be dragged and dropped onto objects; plus, you can store your favorites inside their respective
palettes.
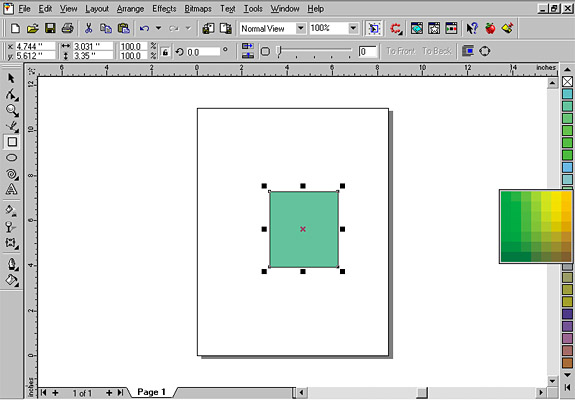
Interactive Controls--The added
on-screen controls for many of the inter active
tool vectors (Interactive Transparency tool, Interactive Drop Shadow
tool, etc.), provide quick and easy access for adjusting the feature
settings. With the image to the right I am using the Interactive Fill
tool to apply a Fountain Fill. The Interactive tools work in combination
with the Property Bar to eliminate the need to use dialog boxes and
roll-ups. Within the blue/green image is a dotted line with an arrow
at the end points. At each end of the line are small squares that
can be moved with the Interactive tool so you can manipulate you fill
right on the image. All the Interactive tools have options such as
this to manipulate on-screen as well as the Property Bar options. active
tool vectors (Interactive Transparency tool, Interactive Drop Shadow
tool, etc.), provide quick and easy access for adjusting the feature
settings. With the image to the right I am using the Interactive Fill
tool to apply a Fountain Fill. The Interactive tools work in combination
with the Property Bar to eliminate the need to use dialog boxes and
roll-ups. Within the blue/green image is a dotted line with an arrow
at the end points. At each end of the line are small squares that
can be moved with the Interactive tool so you can manipulate you fill
right on the image. All the Interactive tools have options such as
this to manipulate on-screen as well as the Property Bar options.
Undos--Undos are saved with your file, so you can return to earlier versions.
Interactive Tools
CorelDraw 8 includes several new interactive tools that let you create
special effects quickly and easily. The Interactive Distortion tool
lets you choose from either the Push and Pull, Zip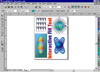 per, or Twister
tools to create new and exciting shapes. The Interactive Envelope tool
and the Interactive Extrude tool make adding envelope and extrude effects
to your drawing quick and easy. All the images in the Interactive Fill
Tools graphic to the right were created with Interactive tools. The
image in the top right of the graphic shows the on-screen controls for
the Interactive Fill tool. The Interactive tools make working in CorelDraw
easy and fast. You can create, edit, group, ungroup, and transform an
entire project without going to a menu bar. per, or Twister
tools to create new and exciting shapes. The Interactive Envelope tool
and the Interactive Extrude tool make adding envelope and extrude effects
to your drawing quick and easy. All the images in the Interactive Fill
Tools graphic to the right were created with Interactive tools. The
image in the top right of the graphic shows the on-screen controls for
the Interactive Fill tool. The Interactive tools make working in CorelDraw
easy and fast. You can create, edit, group, ungroup, and transform an
entire project without going to a menu bar.
Drop Shadow--A wonderful addition to the interactive tool list is the Interactive
Drop Shadow tool. This tool lets you apply a bitmap drop shadow to virtually any object. The Interactive Vector
lets you adjust the direction, opacity, and color of the drop shadow. I used this tool on the button in the lower
lefthand corner of the Interactive Fill Tools graphic above.
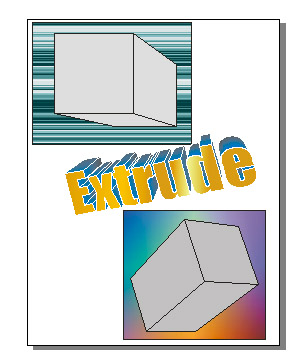
Distortion Tools--You can distort an object using any of the new Distortion
tools. You can apply a push and pull effect to drag nodes inward or outward from any point on the Drawing Page.
The Zipper tool creates a zigzag effect on an object. The Twister tool swirls the nodes in a clockwise or counterclockwise
direction around a center point. I used the Interactive Envelope tool to create the the image in the lower righthand
corner of the graphic. I started with a spiral I created with the Spiral tool, used the Interactive Envelope tool,
with the Putty option to change the shape, copied it to get four images, rotated them, applied color, then put
a circle in the middle.
Color Mixing--You can now change the appearance of a filled object by applying
a color mix. This is done interactively by holding down CTRL and clicking the Color Palette. Using this method
will add the selected color in increments of 10% to the object.
Fill Tiling--The Pattern and
Texture Fill features have increased usability with the new pattern
tiling vector. The onscreen interface lets you size, position, rotate,
and skew the fill. The Transform Fill With object option lets you
transform a pattern or texture fill with the object. I used fills
extensively in this review and the onscreen controls really made it
easy and quick.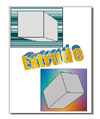
Extrude--Create an extrusion quickly and easily using the new Interactive
Extrude tool. The on-screen vector allows you to set the extrude depth and angle. The Extrude tool can be used
on text and on objects. I used it for all the images in the graphic to the right.
Free Transform--The Free Transform tools let you rotate, skew, scale, and
reflect any object from a point on the Drawing Page. These tools work more freely the closer you are to the center
of the selected object. You have greater control the further away you are from center of the object.
Internet Features
The ability to publish to the Internet has been enhanced with added
features such as the Internet Bookmark Manager and the HTML Conflict
Analyzer. There are a number of preconfigured Internet objects that
you can easily insert in your drawing. Now you can set a backdrop for
your Internet objects using the new Tile Page Background option. It
is easier to put together a Web page more using the Publish To Internet
dialog box or wizard.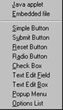
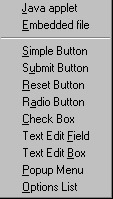
Insert Objects--Inserting Internet objects has been made extremely easy
by the inclusion of a variety of preconfigured Internet objects, such as buttons, fields, checkboxes and lists.
These objects, combined with HTML layers and the ability to position objects anywhere on the Drawing Page, make
designing Web pages easy.
Custom Page Sizes--The ability to define infinitely small page sizes lets
you create drawings that are useful for the Internet.
Tiled page Backgrounds--A new Internet feature in CorelDraw 8 lets you tile
the page background with a bitmap creating a unique look for the WWW.
FTP Access--CorelDraw lets you access FTP sites from the Scrapbook so that
you can download images quickly and easily for use in your drawings.
HTML Conflict Analyzer--Use the
new HTML conflict analyzer to review your Web page layout. This feature
flags potential errors and formatting that is not supported by standard
Web browsers. When I used the Draw's Publish to Internet, the Conflict
Analyzer found text that was not appropriate for the Web. This is
a helpful feature.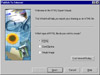
Publish to Internet Wizard--The ability to Publish to the Internet has been
made easier with the addition of a wizard. The feature will step you through the required process to publish your
drawing to the Internet. I used the wizard and found it worked well.
Text, Bitmap and Special Effects
CorelDraw supports numerous text and layout tools such as: columns,
bullets, drop caps, hanging indents, linked text boxes, multiple page
support, and many word processing and typography commands. There is
also a thesaurus as well as grammar and spelling checkers. This makes
it perfect for desktop publishing as you can design a complex brochure
using the built-in drop caps, vertical justification, headline text,
and copy fitting. Several improvements have been added to the text features,
including the ability to create 3D text directly on the Drawing Window.
The new Bitmap Inflation command lets you automatically or manually expand the bitmap
to ensure that the effect is properly aligned with the image. It is
fun to work with text in Draw. You can put text in objects, around objects,
etc.
Inflation command lets you automatically or manually expand the bitmap
to ensure that the effect is properly aligned with the image. It is
fun to work with text in Draw. You can put text in objects, around objects,
etc.
On-screen Preview--The bitmap effects now let you view the result of an
effect directly on your image before applying it.
3D Text Art--The new 3D text feature allows you to extrude text to create
your own special effect. This includes adding light sources and textures, as well as rotating, panning, and zooming
the 3D text.
Text Flow--Text linking has been enhanced with the ability to flow text
from a Paragraph text frame to a shape or curve.
Fit Text to Frame--With CorelDraw 8 you can add paragraph text without worrying
about the length of your text. The new Fit Text To Frame command will adjust the text to fit the size of the drawn
frame.
Object Locking--The ability to lock specific objects has now been added.
This lets you lock an object to prevent it from being modified accidentally.
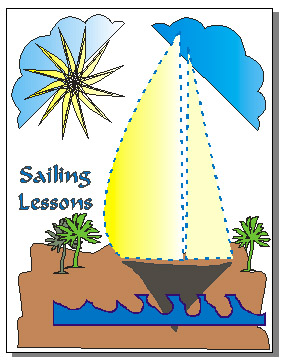
Knife Tool--The Knife tool has
been enhanced to allow curve segments to be "welded." You
can use the Knife tool to create freehand cuts through an object.
Used in connection with TAB the Knife tool lets you switch between
the differ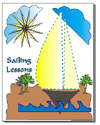 ent resultant shapes. The Knife Tool
was used for the boat image. I used two triangles cut with the Knife
tool for the sail. The Shape Tool and manipulated nodes to get the
billowing effect on sail. The sun was created with the Polygon Tool
using the Polygon as Star option. Then the Shape tool was used to
turn the star inside out, and a yellow Fountain Fill was applied.
The clouds and trees are Webding fonts. The blue waves were created
using a rectangle and the Eraser Tool. The island also was a rectangle
that was changed by manipulating nodes. The instructions for the graphic
are from Sans Teach Yourself CorelDraw 8 in 24 Hours. ent resultant shapes. The Knife Tool
was used for the boat image. I used two triangles cut with the Knife
tool for the sail. The Shape Tool and manipulated nodes to get the
billowing effect on sail. The sun was created with the Polygon Tool
using the Polygon as Star option. Then the Shape tool was used to
turn the star inside out, and a yellow Fountain Fill was applied.
The clouds and trees are Webding fonts. The blue waves were created
using a rectangle and the Eraser Tool. The island also was a rectangle
that was changed by manipulating nodes. The instructions for the graphic
are from Sans Teach Yourself CorelDraw 8 in 24 Hours.
Color and Printing
Choosing colors and printing your work is faster, easier, and more accurate using the new color and printing
features. The Palette Editor, enhanced on-screen Color Palette, and Color Harmonies color selector make selecting
colors simple. New color-management features ensure that the colors you choose are displayed and printed correctly,
and Adobe PostScript 3 support enhances the final printed document.
Adobe PostScrpt 3--You can now print PostScript documents using Adobe PostScript
3. Linear fountain fills are rendered at the printing device's resolution, which improves the image's quality and
printing time. Adobe PostScript 3 also handles complex objects more efficiently without causing errors or reducing
quality.
Color Management--You can now simulate the output of a color separations
printer on a composite printer. FOCOLTONE, TOYO, and DIC colors can now be treated as spot colors. You can also
create your own custom spot colors using user-defined inks.
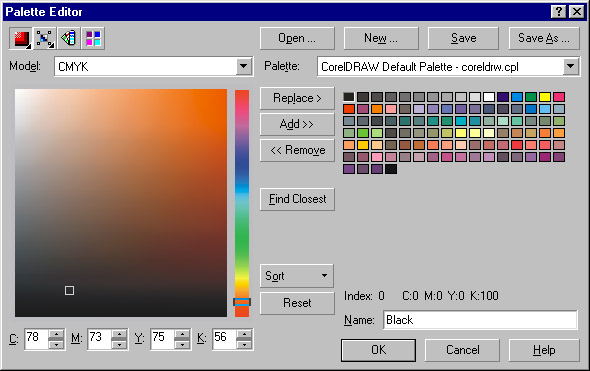
Pale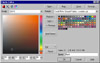 tte
Editor--The Palette Editor lets you create your own custom
color palettes or edit existing custom palettes. And, all of the tools
you need to add, remove, and edit colors are located in one dialog
box. This is a very handy feature. tte
Editor--The Palette Editor lets you create your own custom
color palettes or edit existing custom palettes. And, all of the tools
you need to add, remove, and edit colors are located in one dialog
box. This is a very handy feature.
Pop-up Palette--You can find the exact color you need with a single click.
Just click and hold a color in the on-screen Color palette to view a grid of neighboring colors.
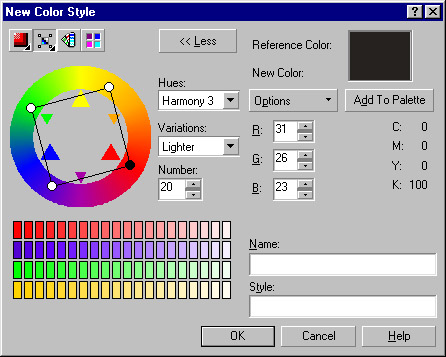
Color Harmonies--Select compatible,
complimentary colors using the 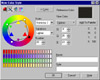 Color
Harmonies color selector. This color selector superimposes different
shapes on a color wheel. Moving the shapes around the color wheel
shows you different three-and-four color complementary color combinations
and which colors look best together. Color
Harmonies color selector. This color selector superimposes different
shapes on a color wheel. Moving the shapes around the color wheel
shows you different three-and-four color complementary color combinations
and which colors look best together.
Converting Bitmaps--The conversion of bitmaps to other color modes has been
enhanced with the addition of the Convert to paletted command. With the paletted feature, you can select from a
number of palettes, set the range sensitivity, and convert a series of images using the batch settings.
Color Correction--View colors that are out of the printer's color gamut using
the new transparent gamut alarm. If you make the gamut alarm color transparent, you can still view the color that
lies beneath it.
Prepare for Service Bureau Wizard--This wizard helps novices and experts
alike by gathering needed elements, downloading necessary fonts, and creating files in the appropriate formats
for delivery to a service provider. Corel has compiled an extensive database of service bureau profiles to assure
that materials are submitted for output in the proper format. Additional profiles are available at Corel's Web
site.
Object/Document/File Management
Adding and working with your files has been enhanced in many ways. Customizing your Workspace using the Options
dialog box, as well as specifying fonts using the Bitstream Font Navigator, allows you to work more productively.
Working in your drawing has been improved with the ability to rename page tabs as well as the ability to manipulate
objects using the Object Manager. Archiving your drawing can be done more efficiently using Corel Versions.
File Import--Working with images in CorelDraw 8 has been made easier with
the new multifile import capability. The Import dialog box now lets you select multiple files using SHIFT or CTRL.
When importing multiple images, you can now specify the exact location on the Drawing Page before placing the image.
Placing images using the mouse also lets you size the image proportionally by dragging. You can use ALT to size
the image nonproportionally while dragging.
Cor el Versions--The
utility CorelVersions provides increased file-management support by
allowing you to archive different versions of your drawing and retrieve
them when you need them. I constantly save versions of an image as
I work and change it, but I also want to be able to locate them easily.
This utility is an excellent tool for organizing your graphics. el Versions--The
utility CorelVersions provides increased file-management support by
allowing you to archive different versions of your drawing and retrieve
them when you need them. I constantly save versions of an image as
I work and change it, but I also want to be able to locate them easily.
This utility is an excellent tool for organizing your graphics.
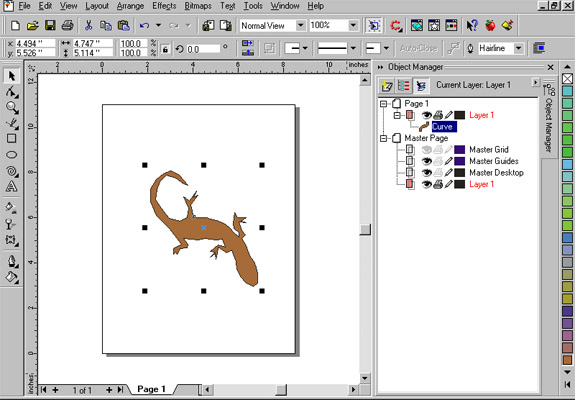
Object Manager--The Object Manager
has been enhanced to make obje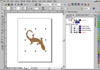 ct
manipulation from the Docker window easier and quicker. Using the
mouse, you can perform such object layout tasks as Group, Combine,
Copy, and Paste. The use of layers and master layers allows you to
view the placement of all the objects in your drawing, making it simple
to access small or buried elements. ct
manipulation from the Docker window easier and quicker. Using the
mouse, you can perform such object layout tasks as Group, Combine,
Copy, and Paste. The use of layers and master layers allows you to
view the placement of all the objects in your drawing, making it simple
to access small or buried elements.
Page Tabs--You now have the ability to specify the page name displayed on the
page tabs. This lets you add useful names that represent the objects in your drawing.
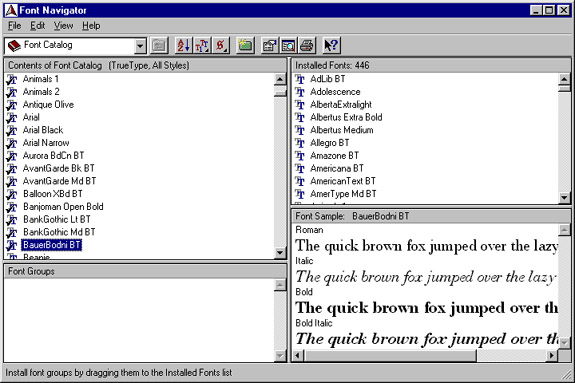
Bitstream Font Navigator--The
font manager from Bitstream offers 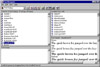 a
quick and easy way to find and install fonts, organize fonts into
manageable groups, and view and print font samples. The Font Navigator
program is located in the Draw8/FontNav folder. a
quick and easy way to find and install fonts, organize fonts into
manageable groups, and view and print font samples. The Font Navigator
program is located in the Draw8/FontNav folder.
Personal Comments
With Draw, you have uninterrupted editing with immediate feedback by using the interactive tools and procedures.
Text tools have been enhanced so that you can use it for desktop publishing, for newsletters and brochures, without
switching to another program. Because of the page layout tools, expanded collection of powerful bitmap creation
and editing tools, and support for Photoshop plug-ins, you really do not have to leave the program for any art
project. And if you need to do more work with bitmap images, you can launch Photo-Paint with a single click.
|