|
Menu Options: You have a variety
of options to choose from, all are accessible und er the Extensis menu on the Photoshop Toolbar. The
three options: Select, Mask, and Mask Composite use the same Mask Pro
interface and tools. er the Extensis menu on the Photoshop Toolbar. The
three options: Select, Mask, and Mask Composite use the same Mask Pro
interface and tools.
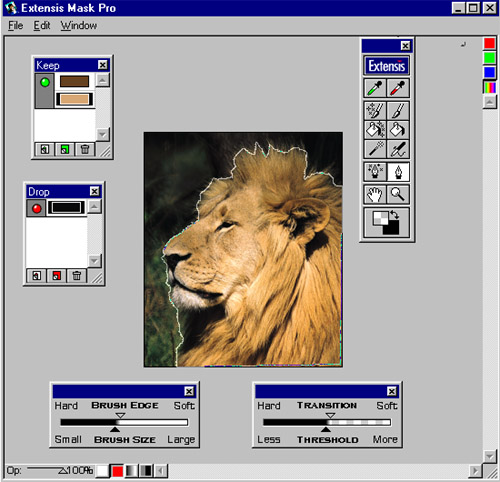
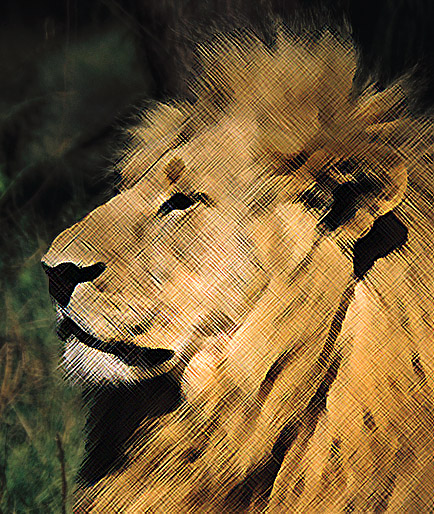
S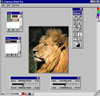 elect--creates a selection
marquee without affecting the currently selected layer. Selections
can then be saved as alpha channels or used to cre elect--creates a selection
marquee without affecting the currently selected layer. Selections
can then be saved as alpha channels or used to cre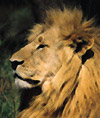 ate adjustment
layers. This is a perfect tool for separating a section of an image
so that you can then apply an effect or filter. With the image to
the right, I used the Select option as I wanted to keep the background,
but select the lion so I could then apply a filter. For the effect,
I used Photoshop's Crosshatch filter under Brush Strokes. ate adjustment
layers. This is a perfect tool for separating a section of an image
so that you can then apply an effect or filter. With the image to
the right, I used the Select option as I wanted to keep the background,
but select the lion so I could then apply a filter. For the effect,
I used Photoshop's Crosshatch filter under Brush Strokes.
Mask--creates a mask by dropping out the background from the
currently se lected
layer. This is the type of masking that was available in Mask Pro
1.0. This option is appropriate for the image to the right, where
I eliminated the background and placed the lion head on another background
made with the Cloud filter in Photoshop. lected
layer. This is the type of masking that was available in Mask Pro
1.0. This option is appropriate for the image to the right, where
I eliminated the background and placed the lion head on another background
made with the Cloud filter in Photoshop.
Mask Composite--like the above option, Mask Composite creates a mask by dropping out the background from
the currently selected layer. However, with this option, you can also view the underlying layers while you are
masking so you can instantly preview the results of any masking. In this way you can tailor your mask for a specific
background. The window is the same as the other two but you have a composite view.
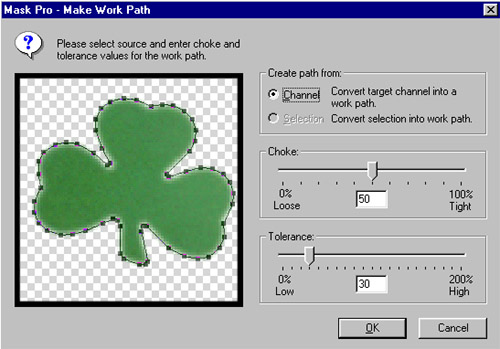
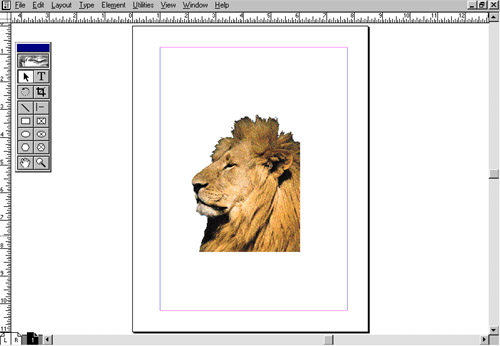
 Make Work Path--creates a work path either from
the current selection or from the transparency in the active layer.
This work path can then be used as a clipping path. Clipping paths
are very u Make Work Path--creates a work path either from
the current selection or from the transparency in the active layer.
This work path can then be used as a clipping path. Clipping paths
are very u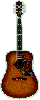 seful
when working in Photoshop. Photoshop creates an image as a square
or rectangle. Unlike vector images that can exist as freeform shapes,
bitmap images are always confined to the square or rectangular format.
When these rectangular images are placed in a page layout, the square
image can be distracting. Clipping paths enable you to save a file
as a silhouette, sidesteping the standard Photoshop restriction of
the rectangle or square. You have seful
when working in Photoshop. Photoshop creates an image as a square
or rectangle. Unlike vector images that can exist as freeform shapes,
bitmap images are always confined to the square or rectangular format.
When these rectangular images are placed in a page layout, the square
image can be distracting. Clipping paths enable you to save a file
as a silhouette, sidesteping the standard Photoshop restriction of
the rectangle or square. You have  control
over the flatness of the clipping path through two settings. The Choke
percentage designates how tightly or loosely the clipping path hugs
the masked image. The Tolerance setting determines how many anchor
points will be used in the path. The guitar image to the left was
created using a clipping path. Then I changed the path to a selection
and applied a filter to get the beveled guitar image that is shown
under the Type of Product heading. I created a clipping path for the
lion head image to the right so I could import it into Pagemaker. control
over the flatness of the clipping path through two settings. The Choke
percentage designates how tightly or loosely the clipping path hugs
the masked image. The Tolerance setting determines how many anchor
points will be used in the path. The guitar image to the left was
created using a clipping path. Then I changed the path to a selection
and applied a filter to get the beveled guitar image that is shown
under the Type of Product heading. I created a clipping path for the
lion head image to the right so I could import it into Pagemaker.
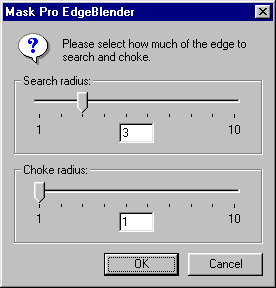
EdgeBlender--removes halos from masks by removing unwanted
backgrou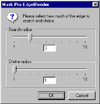 nd
colors from edge pixels. A common effect of masking images is unwanted
halos around the mask edge. This results from edge pixels retaining
color values from the original background. The EdgeBlender feature
removes these halos by removing background colors from the partially
transparent pixels at the mask edge while retaining all transparency
values of those same pixels. The Choke Radius tells EdgeBlender how
many pixels in from the edge to average the colors. The Search Radius
tells EdgeBlender how many pixels to examine to determine what color
the edge should be. nd
colors from edge pixels. A common effect of masking images is unwanted
halos around the mask edge. This results from edge pixels retaining
color values from the original background. The EdgeBlender feature
removes these halos by removing background colors from the partially
transparent pixels at the mask edge while retaining all transparency
values of those same pixels. The Choke Radius tells EdgeBlender how
many pixels in from the edge to average the colors. The Search Radius
tells EdgeBlender how many pixels to examine to determine what color
the edge should be.
Tools: One of the main advantages
to Mask Pro is the complete selection of tools availab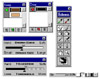 le for masking and creating selections. Not every image
or every area of an image requires the same approach to creating the
edge and its transition properties. The tools are available via keyboard
shortcuts and they mimic those of Photoshop wherever possible in order
to reduce the user's learning time. The tools are: le for masking and creating selections. Not every image
or every area of an image requires the same approach to creating the
edge and its transition properties. The tools are available via keyboard
shortcuts and they mimic those of Photoshop wherever possible in order
to reduce the user's learning time. The tools are:
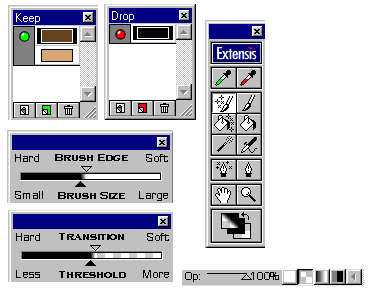
- Keep Color--define colors to keep. Drag across an area to define an average color to keep.
- Drop Color--define colors to drop. Drag across an areas to define an average color to drop.
- Magic Brush--creates an automatic mask as you paint over pixels based on the defined Keep and Drop Colors
and Threshold setting.
- Brush--manually add or subtract from a mask.
- Magic Fill--double-click to remove all holes and specks from the entire mask at once.
- Fill Bucket--like fill buckets in other programs, used to fill in large areas.
- Magic Wand--mask out large areas based on active Keep and Drop Colors.
- Airbrush--manual add or subtract from a mask. Airbrush opacity can be adjusted gradually.
- Magic Pen--automatically draw an area to mask or restore.
- Pen--Manually draw an area to mask or restore.
- Hand--use to pan around an image in the window.
- Zoom--click to zoom in. Drag to zoom to a specific area.
- Erase Mode--erases the selected area (fills with transparency). Only erases. Does not restore.
- Restore Mode--restores the selected area to the original image. Only restores. Does not erase.
- Dual Mode--both erases and restores. Available only with Magic Brush and Magic Fill.
- Toggle Modes--toggles between erase, restore and dual erase/restore masking modes.
View Modes: Mask Pro provides a variety of ways to view your mask as you
work.
Solid View-- allows you to view your mask against a background color of your choice rather than the checkerboard
background of Single Layer View.
Single Layer View--allows you to see the image as you isolate it from the background. Masked areas (transparent
pixels) are shown as erased areas on a checkerboard background. Unmasked areas appear as the image itself.
Quick Mask View--replaces masked (transparent) pixels with 50% red rather than a checkered background.
Quick Mask View replaces Single Layer View when mask Pro is opened with the "Select" option.
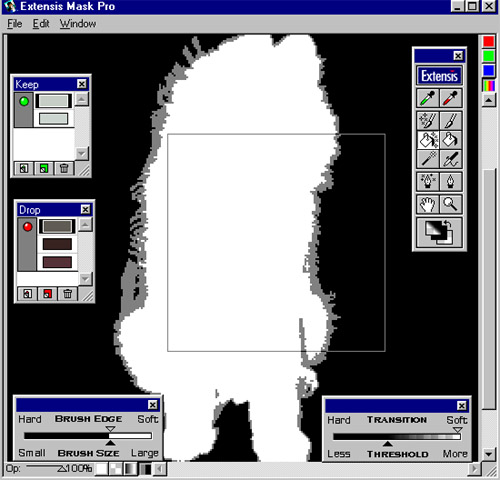
Mask View--displays the mask in grayscale. Transparent pixels are shown as shades of black, opaque pixels
are shown as white.
Cleanup View--similar to Mask View, except that pixels that are not completely transparent (shown as
black) or completely opaque (shown as white) are displayed as 50% gray. Viewing in Cleanup View is the easiest
way to spot and fill holes and find possible leaks.
Composite View--allows you to view your mask and any active layers. Available when you choose the "Mask
Composite" option.
Creating Soft Edges While Masking: The quality of a mask is really dependent
on the edge--whether it is smooth, choppy, and how it fades. With Mask Pro, you can adjust the edge softness during
the entire masking process with any of the painting tools or the Magic Wand. Three separate settings let you soften
the mask's edge precisely:
Threshold--determines how much of the foreground vs. background to keep. Dragging the slider toward More
means that more of the original image will be kept. Dragging toward Less keeps less of the original image.
Transition--determines how soft an edge will be produced to create a smooth transition between the Keep
and Drop colors. A good starting point is to set the distance between the Threshold and Transition about one third
of the entire available range. Transition works with all the Magic tools.
Brush Edge--determines how far the effect radiates out as it tapers from opaque to transparent. The softer
the brush edge, the smoother the transition. Brush Edge works with all the manual tools.
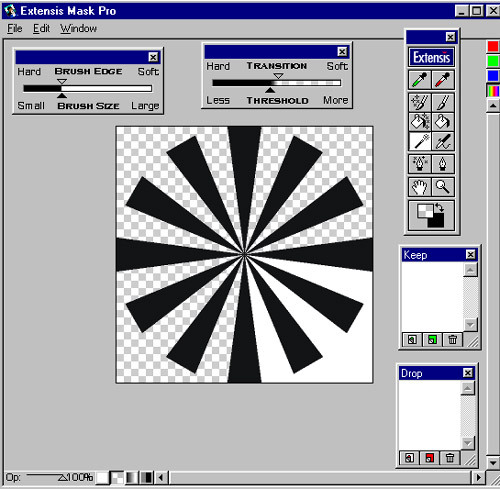
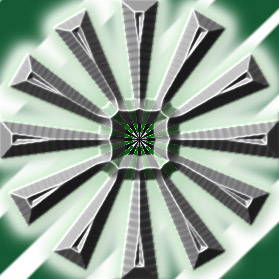
Creating a Mask with IntelliBrush/IntelliWand:
When you start masking, you can use Mask Pro's color matching techno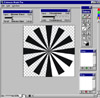 logy to select color
to keep and drop or you can us the Magic Brush and Magic logy to select color
to keep and drop or you can us the Magic Brush and Magic  Wand, which become IntelliBrush and IntelliWand when
no colors are selected. With either of these tools, the color value
of wherever you click on an image is temporarily assigned to be the
lone drop color. All other color values are kept. The user still has
full control over Brush Size and Threshold settings. For images with
highly contrasted and consistently colored backgrounds, using IntelliBrush
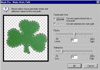
is the fastest way to mask out a background. For instance, I used the
IntelliWand on the plain black and white image shown on the left to
eliminate the white background by just clicking in the white areas.
I then applied Extensis PhotoGlow and PhotoGroove to the black spindle
image and produced the green image to the right. The IntelliWand is
easy to use and works like the wand in Photoshop. Wand, which become IntelliBrush and IntelliWand when
no colors are selected. With either of these tools, the color value
of wherever you click on an image is temporarily assigned to be the
lone drop color. All other color values are kept. The user still has
full control over Brush Size and Threshold settings. For images with
highly contrasted and consistently colored backgrounds, using IntelliBrush
is the fastest way to mask out a background. For instance, I used the
IntelliWand on the plain black and white image shown on the left to
eliminate the white background by just clicking in the white areas.
I then applied Extensis PhotoGlow and PhotoGroove to the black spindle
image and produced the green image to the right. The IntelliWand is
easy to use and works like the wand in Photoshop.
Creating a Mask with Keep and Drop Colors:
When you have a variety of colors, you can use Mask Pro's color matching
technology by using Keep Colors--colored pixels in the area that you
want to keep, and Drop Colors--colored pixels in the area that you want
to mask away. Colors are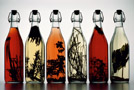 chosen with the Keep Color and Drop Color eyedroppers. To indicate keep
or drop colors, you select the appropriate eyedropper and then drag
across a region to indicate an average color or just click on individual
pixels for precise color selection. Colors can be collected into multiple
color sets, which can be toggled on and off. You can move or copy individual
colors among color sets. To help distinguish color differences, users
can view their image in an individual channel of the image's color mode,
whether CMYK, RGB, or Lab. Once the color sets are indicated, you can
smoothly mask away the selected colors to drop while retaining the selected
colors to keep. Keep and Drop Colors are used with the following painting
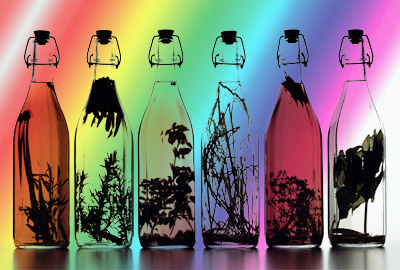
tools: Magic Brush, Magic Wand, and Magic Fill. I used a sample masking
tutorial, using Keep and Drop Colors, from the Extensis Web site to
eliminate the background on the bottle image. I selected a single Keep
Color, the black in the bottle tops, and a single Drop Color, the white
in the background; set the Threshold all the way to Less; set the Transition
all the way to Soft; then double-clicked the Magic Brush to process
the entire image. I then applied a different background in Photoshop
using the Gradient tool. If you click on the bottle image, you will
see the results. The Magic Brush is a versatile tool that you can drag
to eliminate colors in a section of an image, or use to Drop Colors
from the entire image by double-clicking.
chosen with the Keep Color and Drop Color eyedroppers. To indicate keep
or drop colors, you select the appropriate eyedropper and then drag
across a region to indicate an average color or just click on individual
pixels for precise color selection. Colors can be collected into multiple
color sets, which can be toggled on and off. You can move or copy individual
colors among color sets. To help distinguish color differences, users
can view their image in an individual channel of the image's color mode,
whether CMYK, RGB, or Lab. Once the color sets are indicated, you can
smoothly mask away the selected colors to drop while retaining the selected
colors to keep. Keep and Drop Colors are used with the following painting
tools: Magic Brush, Magic Wand, and Magic Fill. I used a sample masking
tutorial, using Keep and Drop Colors, from the Extensis Web site to
eliminate the background on the bottle image. I selected a single Keep
Color, the black in the bottle tops, and a single Drop Color, the white
in the background; set the Threshold all the way to Less; set the Transition
all the way to Soft; then double-clicked the Magic Brush to process
the entire image. I then applied a different background in Photoshop
using the Gradient tool. If you click on the bottle image, you will
see the results. The Magic Brush is a versatile tool that you can drag
to eliminate colors in a section of an image, or use to Drop Colors
from the entire image by double-clicking.
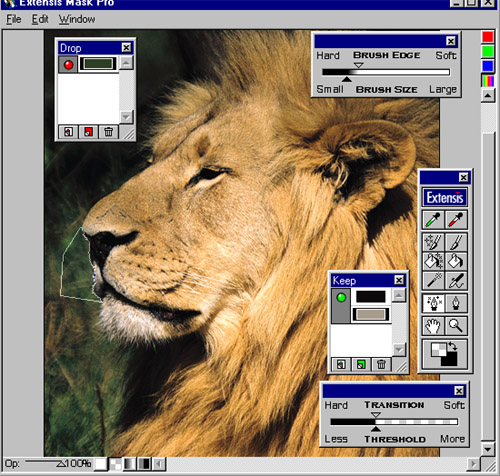
Detecting Edges with the Magic Pen:
A significant addition to Mask Pro 2.0 is the Magic Pen, a tool that
detects and snaps to edges between sharply contrasting areas of an image.
It is similar to Photoshop's Magnetic Lasso. You drag the Magic Pen
along an edge, and it automatically creates a freeform path that detects
the contrasting edge and snaps to it. Once the dragged region is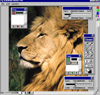 closed, clicking the hammer icon inside the region erases or restores
the mask, depending on the currently selected mask mode. The path created
by the Magic Pen can be re-edited. Reversing direction while dragging
retracts the path back to the cursor, allowing you to go back and forth
until satisfied. Once, the Magic path is complete, any segment can be
refined. The Magic Pen tool was used to remove the area around the nose
and lip of the lion in the image to the right. I was following a tutorial
from the User's Guide that came with the program and the first time
I attempted it, I only selected the area around the nose. When I then
re-did the tutorial, I accidentally selected the area around the nose
and lip, but as I had selected both the colors in the nose and lip area
for Keep Colors, it actually worked well.
closed, clicking the hammer icon inside the region erases or restores
the mask, depending on the currently selected mask mode. The path created
by the Magic Pen can be re-edited. Reversing direction while dragging
retracts the path back to the cursor, allowing you to go back and forth
until satisfied. Once, the Magic path is complete, any segment can be
refined. The Magic Pen tool was used to remove the area around the nose
and lip of the lion in the image to the right. I was following a tutorial
from the User's Guide that came with the program and the first time
I attempted it, I only selected the area around the nose. When I then
re-did the tutorial, I accidentally selected the area around the nose
and lip, but as I had selected both the colors in the nose and lip area
for Keep Colors, it actually worked well.
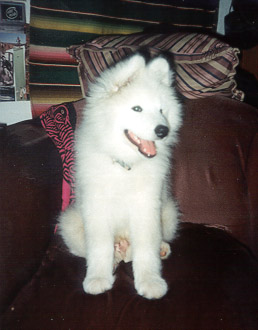
Clean Masks in a Single Step: When
finishing masking an image or creating a selection, you sometimes get
stray pixels and small holes remaining. Two tools in Mask Pro--the Fill
Buck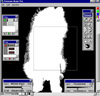 et
and Magic Fill--help you easily clean up masks. For clean up, the best
viewing mode to use is the Cleanup view because it displays in stark
black and white what is masked in or out. For filling in large areas,
you just click with the Fill Bucket. The Magic Fill, though, is rather
different. By selecting the Dual Erase/Restore View mode, the Magic
Fill tool lets you automatically fill holes and opaque specks in the
image at the same time.You can drag it over an area, or when you double-click
the Magic Fill, Mask Pro will remove all specks outside of the mask
and holes inside of the mask that are smaller than the current Brush
Size setting. I used it for cleanup in the image of the white dog. et
and Magic Fill--help you easily clean up masks. For clean up, the best
viewing mode to use is the Cleanup view because it displays in stark
black and white what is masked in or out. For filling in large areas,
you just click with the Fill Bucket. The Magic Fill, though, is rather
different. By selecting the Dual Erase/Restore View mode, the Magic
Fill tool lets you automatically fill holes and opaque specks in the
image at the same time.You can drag it over an area, or when you double-click
the Magic Fill, Mask Pro will remove all specks outside of the mask
and holes inside of the mask that are smaller than the current Brush
Size setting. I used it for cleanup in the image of the white dog.
|
 composition, where you take selections from a variety
of images and merge them into a new
composition, where you take selections from a variety
of images and merge them into a new 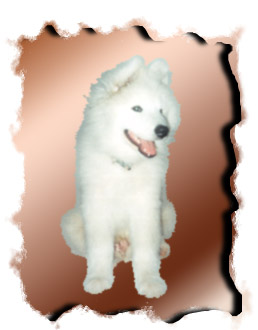 graphic;
isolating selections for color correction; adding effects and filters
to selections or masks; and cutting out an unwanted person or background.
For instance, I masked out the dog in the dark image to the left and created
a another graphic with a gold background. I then applied an edge with
Extensis PhotoFrame. See the result in the image to the right. You can
also create just a shape from an image, make it into a selection and apply
filters or special effects. The beveled guitar image to the right was
made in this manner. I then applied a bevel effect from Extensis PhotoTools.
You can veiw the original image under the Making Work Path section. Price:
$299.95, Upgrade $69.95. Extensis has a variety of products: PhotoTools,
PhotoFrame, Intellihance,VectorTo
graphic;
isolating selections for color correction; adding effects and filters
to selections or masks; and cutting out an unwanted person or background.
For instance, I masked out the dog in the dark image to the left and created
a another graphic with a gold background. I then applied an edge with
Extensis PhotoFrame. See the result in the image to the right. You can
also create just a shape from an image, make it into a selection and apply
filters or special effects. The beveled guitar image to the right was
made in this manner. I then applied a bevel effect from Extensis PhotoTools.
You can veiw the original image under the Making Work Path section. Price:
$299.95, Upgrade $69.95. Extensis has a variety of products: PhotoTools,
PhotoFrame, Intellihance,VectorTo Mask
Pro 2.0
Mask
Pro 2.0