|
| |
Click on a thumbnail to enlarge it. Use your browser's
"BACK" button to return to this review when done.
|
| |
|
|
 |
|
Extensis PhotoFrame 1.0 is a first generation plug-in for Adobe Photoshop
that allows you to create frames and borders. There are two volumes:
- The Fine Art Series (Brush, Canvas, Charcoal, Corrugated Brush, Corrugated
Stamp, Shapes, Stucco, Tape, Ripped, Vignette, Watercolor, Camera Edge, Pebble Board, Texture Rip, Wide Brush,
Wild Brush, and Wood Block);
- The Digital Series (Airbrush, Blend, Chisel, Crystal, Digital, Dots, Fabric,
Feathered Edges, Film Strip, Matte, Mondrian, Orange Peel, Rib, Sonic Wave, Stamp, Wall, and Wave).
Each volume (about 42MB) contains over 150 frames. For users who want to view their frames in large thumbnails,
Extensis makes Portfolio which is a database that allows you to do so. You are not limited to just these frames
as PhotoFrame is also fully compatible with frame files from any Auto F/X Photo/Graphic Edges volume. You can purchase
PhotoFrame with either volume for $129.95 or with both volumes as a bundle for $199.95.
|
|
|
| |
|
|
 |
|
|
| This program would be appropriate for just about anyone interested in creating unique frames. It is so user friendly
that a beginner would have no difficulty. And because you can use any frame file or JPEG file, it has the flexibility
to allure intermediate and advanced users. |
|
|
| |
|
|
 |
|
Installation is easy. You can copy any or all of the frames from the
CD to your hard disk. I decided to copy the frames to my hard disk so
that I could use photos from a CD and not have to switch back and forth
between the PhotoFrame CD and my photos on CD. PhotoFrame is straightforward.
Open a Photoshop file. You can create a new layer if you don't want
to apply the frame directly to the image. Therefore, if you decide you
don't want the frame, you can just delete the layer. Open PhotoFrame
which is under the Filter menu and then Extensis. The interface blends
well with Photoshop. You almost feel as if you are still in Photoshop,
just in another dialog box. PhotoFrame's dialog box is simply laid out.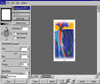
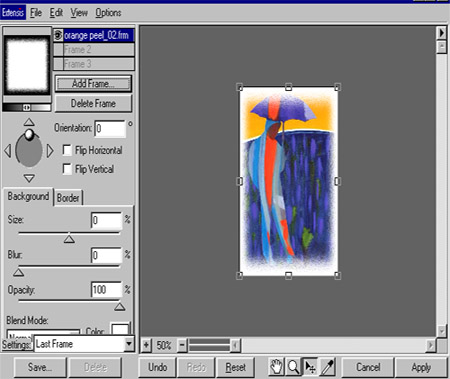
- Preview Area: Displays your
image with the selected effects applied, before you apply them to
your image. Updates changes in Real-time. This really works. You see
your changes on screen almost instantaneously. Even with large files,
PhotoFrame had no problem. Click on image for larger view.

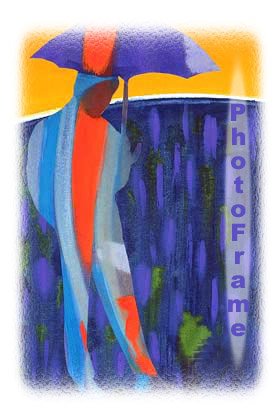
- Invert Frame: Inverts the selected frame. Nifty feature that allows you
to create different effects. By using a Vignette frame along with Invert frame and modified background Opacity
an overlay effect can be produced. In Photoshop this procedure involves a variety of steps. With PhotoFrame, you
just load a frame file, invert the frame, lower the Background opacity, scale and position the effect, and click
finish. I used this technique to create this graphic. Click on image for a larger view.
- Rotation Controls: Allows you to rotate the frame. Adjust rotation using
the control knob; by entering a value in the Orientation box; or by clicking the Flip Horizontal/Vertical boxes.
Clicking a directional arrow rotates the frame to the 0 degree, 180 degree, or 270 degree position. You can flip
and rotate to your heart's content. The variety of rotation controls gives you flexibility to make changes in small
increments or large.
- Undo/Redo/Reset: Provides multiple undos and redos. Reset returns all effect
settings to their default values. You are not locked into a design. With the undos and reset, you can be creative.
You are only limited by the amount of RAM you allocate to Photoshop.
- Zoom Controls and Indicator: Allows you to zoom in and out of the image
incrementally.
- Pan and Zoom Tools: Allows you to pan around and zoom around and zoom in
and out of the image in the preview area.
- Adjust Tool: Allows you to rotate,
resize, and relocate the frame in the preview area. Clicking on this
tool brings up an Interactive Wireframe which provides 10 hot spots
to interactively change the frame. I used this feature extensively.
Again, all changes are almost immediate.
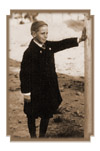
- Eyedropper: Allows you to extract a Background or Border color from the
image. For the image to the right, I started with a black and white photo of a relative and used Photoshop's sepia
action on it. I applied a matte frame and used the Eyedropper tool to pick a color from the photo for the border.
Click on image for a larger view.
- Interactive Color Palette: My favorite tool. When I first went to pick
a color, I would click on each color, like you do in other programs. You don't have to. You just drag the arrow
around on the Color Palette and watch the color changes in the Preview Area.
- Image Navigator: Click and drag in this pop-out window to instantly reposition
the image in the window. Only worked for me when I had the image previewed at 100% or over.
- Effect Options: Allows you to alter the background and the border of the
frame. You can set such options as Size/Width, Blur, Opacity, Blend Mode, and Color. Blend modes are: Normal, Multiply,
Screen, Darken, Lighten, and Difference. The Blend Mode is similar to Photoshop's effect but PhotoFrame's Blends
are applied only to frames. You can't access the Color Palette for a color unless you have a value of 1% or more
for the Border. You can for the Background.
- Settings: Allows you to Select, Save, and Delete effect settings. If you
create an original and creative effect, you are not limited to using it just one time or trying to remember how
you created it when you want to use it again. You just save it.
- Frame controls: Select the starting frame file. Allows you to load up to
three frames at one time. You can modify any or all of the frames individually, and you can apply and view the
frames on your image in the preview area either separately or together. If you don't like a certain frame you can
delete it or hide it and the frame will not be applied when you select the Applied button. You can move frames
up or down in the list to vary the affect. This is a very versatile feature.
|
|
|
| |
|
|
 |
|
|
|
The variety of frames and effects you can create with this program seems endless. It was difficult to stop experimenting
with frames and write the review. There is an excellent User Guide that comes with the package. It displays a visual
catalog of the frames found in both Volume 1 and 2. The Chapter, Using PhotoFrame, illustrates how you can use
PhotoFrame. There are step-by-step instructions for:
- Special Effects Using Invert and Opacity--I
liked this effect. See example under Invert Frame. It was easy and
quicker to create with PhotoFrame than to just use Photoshop.
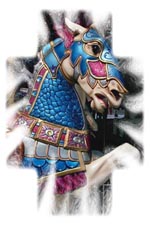
- Special Effects Using Multiple Frames--You can combine and combine. On
most of my examples, I used more than one frame. For the horse graphic, I used two frames: Wave and Feather.
- Creating Your Own Frame Files--I
followed the
 instructions
in the User Guide. I chose a 5" by 6" image area, grayscale,
with a white background as small frame files do not work well on large
images. I used the Airbrush tool and set the tool to Dissolve. I saved
the file as a JPEG file. The glasses graphic is an example. Click
on glasses image for a larger view. instructions
in the User Guide. I chose a 5" by 6" image area, grayscale,
with a white background as small frame files do not work well on large
images. I used the Airbrush tool and set the tool to Dissolve. I saved
the file as a JPEG file. The glasses graphic is an example. Click
on glasses image for a larger view.
- Special E
 ffects
Using a Photograph as a Frame--This effect can be used
to ffects
Using a Photograph as a Frame--This effect can be used
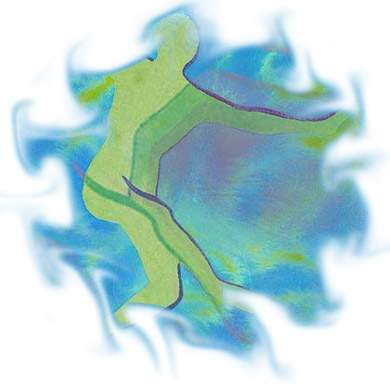
to 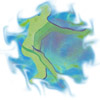 superimpose
an image on itself. I started with this red graphic. Again, I followed
the instructions in the User Guide. I opened the image and then opened
a copy of the same image as a frame file. I adjusted the parameters:
increased background and border size and used Difference as the Blend
Mode for both. A wave frame was also applied. I produced the blue/green
graphic. Click on green/blue image for a larger view. superimpose
an image on itself. I started with this red graphic. Again, I followed
the instructions in the User Guide. I opened the image and then opened
a copy of the same image as a frame file. I adjusted the parameters:
increased background and border size and used Difference as the Blend
Mode for both. A wave frame was also applied. I produced the blue/green
graphic. Click on green/blue image for a larger view.
You can guess by the number of examples that I used in this review
that I enjoyed the program. And these were only a few of the samples
I produced. PhotoFrame is easy to use. I am not a graphic artist and
I didn't try to create the perfect artistic masterpiece. I just wanted
to see how easy it was to use for the average person who did not want
to spend an inordinate amount of time producing something different.
The interface is simplicity at its most elegant, and the Real-time feature
is something that Photoshop could use. Being able to use any JPEG file
as a frame is a plus. You can experiment and experiment. I made the
Extensis title banner and the section bars using PhotoFrame. Parts of
a frame and graphic were selected and then type was placed in the banner
and sections. You can also perform wonders on old black and white photographs.
For instance with the photo below of the golfer under the Goodies secti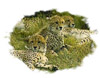 on,
I started with a simple scanned photo of a relative, then used Photoshop
sepia action on it. I then applied effects from PhotoFrame and created
a more interesting graphic image. I would enthusiastically recommend
it for any serious Photoshop user. Or if you are lazy like these guys
and want an easy and quick frame program, PhotoFrame should do it. Click
on lion image for a larger view. on,
I started with a simple scanned photo of a relative, then used Photoshop
sepia action on it. I then applied effects from PhotoFrame and created
a more interesting graphic image. I would enthusiastically recommend
it for any serious Photoshop user. Or if you are lazy like these guys
and want an easy and quick frame program, PhotoFrame should do it. Click
on lion image for a larger view.
|
|
|
| |
|
|
 |
|
|
More frames in each volume.
A cataloging utility that doesn't expire in 60 days.
More differentiated styles.
More Photoshop blend modes.
Expand PhotosFrame's capability to work with other programs such as Pagemaker. |
|
|
| |
|
|
 |
|
|
|
The CD includes demo ver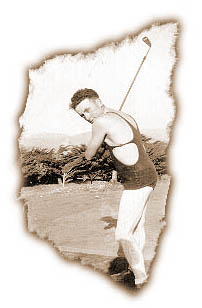 sions
of other Extensis products. They are fully functional for 30 to 60 days.
After that you can call Extensis to purchase a product. It is fun to
experiment with the other programs. The only problem is a dialog box
pops up every time you start to use a demo. If you are like me you have
various other programs running in the background and another pop up
box is not desirable. If you are seriously interested in a product,
it is best to purchase it after a quick initial trial. The following
is a list of demos for the Mac and/or PC: sions
of other Extensis products. They are fully functional for 30 to 60 days.
After that you can call Extensis to purchase a product. It is fun to
experiment with the other programs. The only problem is a dialog box
pops up every time you start to use a demo. If you are like me you have
various other programs running in the background and another pop up
box is not desirable. If you are seriously interested in a product,
it is best to purchase it after a quick initial trial. The following
is a list of demos for the Mac and/or PC:
PhotoTools 2.0
Portfolio 3.0
Preflight Pro 2.0
VectorTools 2.0
Intellihance 3.0
Mask Pro 1.0
BeyondPress 4.0
QX-Tools 4.0
PhotoAnimator 1.0
|
|
|
| |
|
|
 |
|
|
Processor: Intel Pentium or faster
Operating System: Windows 95 or Windows NT 4.0
Software: Adobe Photoshop 3.0.5 or later
Hard Disk Space: 3MB
CD-ROM drive |
|
|
| |
|
|
 |
|
|
| Extensis has an excellent Web sitehttp://www.extensis.com There are samples
of the various frames and how to use them. |
|
|
| |
|
|
|

|