|
PhotoSuite 4 Platinum Edition from MGI Software is the latest
release of their software package that turns your PC into a digital-photography
command center for fixing, enhancing, sharing, and being creative with
your favorite snap shots, or experiencing the benefits and opportunities
of Web-based photography. It is perfect for editing and manipulating
photos from a variety of sources: scanner, digital camera, CD, or images
downloaded from the Internet. Images can be made into a mosaic  with
the PhotoTapestry feature; stitched together to form a panorama; organized
into an electronic album; edited with special effects such as warp,
ripple, splatter, painterly, mirage, sepia, and with
the PhotoTapestry feature; stitched together to form a panorama; organized
into an electronic album; edited with special effects such as warp,
ripple, splatter, painterly, mirage, sepia, and  moonlight;
and made into a slide show with transitions, sound effects, voice-overs
and music. You can paint, cut, clone, crop, resize and move any part
of your photo. Finished projects such as calendars or cards can be printed,
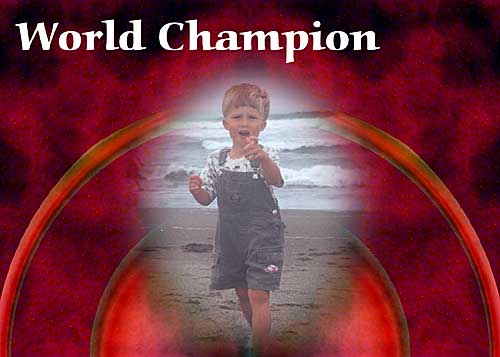
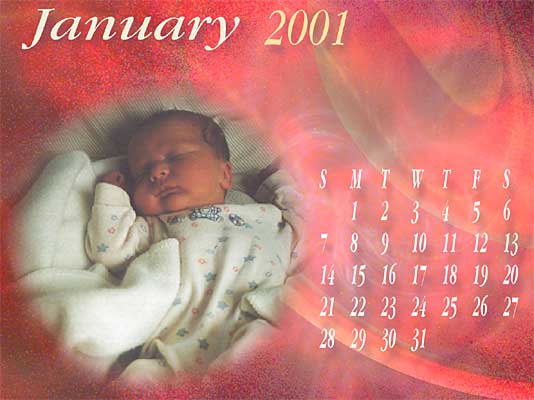
e-mailed, or made into a Web page. The program includes 1,500 templates
for home and business to create cards, calendars, flyers, stationery,
presentations, and other projects (the image to the right was created
using a template and a photo that had been enhanced with the painting
effect). PhotoSuite also comes with royalty-free photos, fun props and
fonts to use to customize your products. There are Print Multiples templates
that are designed to work with dozens of different specialty papers
from Kodak, Avery-Dennison, and Zweckform. Price of PhotoSuite 4 Platinum
Edition $49.95. Also, the program is always being upgraded. New templates,
photos, and other MGI PhotoSuite 4 Download Packs are available on a
regular basis. Check http://www.mgisoft.com
and http://www.photosuite.com
for upgrades, advice, hints, and tips and other information. moonlight;
and made into a slide show with transitions, sound effects, voice-overs
and music. You can paint, cut, clone, crop, resize and move any part
of your photo. Finished projects such as calendars or cards can be printed,
e-mailed, or made into a Web page. The program includes 1,500 templates
for home and business to create cards, calendars, flyers, stationery,
presentations, and other projects (the image to the right was created
using a template and a photo that had been enhanced with the painting
effect). PhotoSuite also comes with royalty-free photos, fun props and
fonts to use to customize your products. There are Print Multiples templates
that are designed to work with dozens of different specialty papers
from Kodak, Avery-Dennison, and Zweckform. Price of PhotoSuite 4 Platinum
Edition $49.95. Also, the program is always being upgraded. New templates,
photos, and other MGI PhotoSuite 4 Download Packs are available on a
regular basis. Check http://www.mgisoft.com
and http://www.photosuite.com
for upgrades, advice, hints, and tips and other information.
|
|
PhotoSuite 4 is easy to install. The program guides you step
by step through a Wizard-based installation. You have the option to
install additional content directly on your system such as PhotoTapestry
Tile collection and Jerry Down photos or using them from the CD. There
are also 19 fun fonts that are installed.
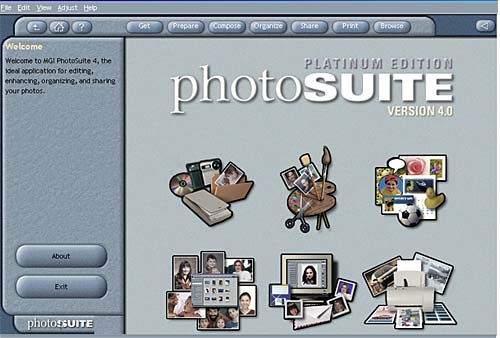
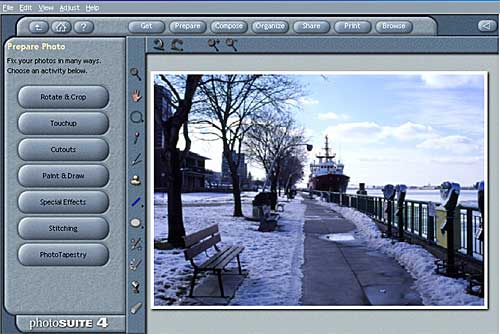
Interface--The
interface is fairly intuitive and is logically separated into seven
activities accessed through the Navigation Bar.
- The Navigation Bar is always
present along the top of the User Interface allowing you to move quickly
throughout the program. The Navigation Bar has additional buttons
available for moving up a level in the Activity Panel, moving Home
and also for accessing the Online Help.
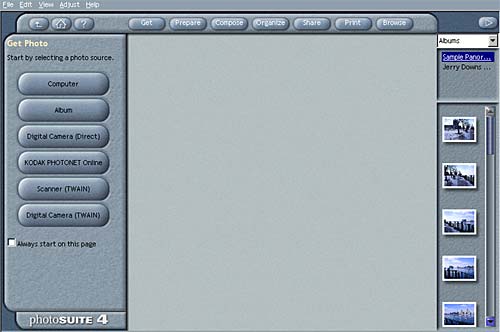
- Get is for bringing photos into PhotoSuite. You can bring
photos into the software from your hard drive, digital peripheral,
or the Internet within this activity.
- Prepare is the most feature-rich activity in the program.
Here you will find tasks for fixing and enhancing your photos.
This activity also includes PhotoTapestry and Stitching.
- Compose is the activity where you create collages, perform
body switches or combine your photos with a variety of professionally-designed
templates to make impressive home and business projects.
- Organize allows you to sort your photos and other multimedia
files into manageable albums.
- Share is the activity that allows you to send your photos
through e-mail, by preparing and posting to Web sites or by utilizing
an online photo service. You also can share your photos with impressive
photo slide shows within this activity.
- Print activity provides many print options and templates
for printing photos and creations at home or through an online
photofinisher.
- Browse activity enhances your experience with seamless
access to the Internet allowing you to search for photo content,
retrieve updates, or connect to online photo services.
- The Activity Panel down the
left-hand side, lists the functionality available in each Activity.
Once an area of functionality has been selected, the Activity Panel
changes to display specific tasks. Once a specific task has been selected,
the Activity Panel provides step-by-step instructions for completing
that task.
- The Command Bar, directly above
the Workspace, contains additional tools such as the unlimited undo/redo
feature and zoom capabilities.
- The Windows Menu System contains
standard Windows functions such as File, Edit, and View.
- The Photo Workspace is in the
center part of the screen where your photo, album, slide show or project
appears. For maximum workspace area, you can close the Library and
Toolbar views.
- The Status Bar, at the bottom
of the interface displays additional tips and information.
- The Library is on the far right
of the screen and gives you a visual representation of all of the
photos, projects, albums, and slide shows that are are currently open.
Workflow--The
program has been designed for both the novice and advanced user. For
individuals new to PC photography, PhotoSuite provides a logical workflow
complete with step-by-step instructions for completing any photo task.
Novice users can use the four-step workflow: (1) Select one of the seven
general activities from the Navigation Bar; (2) Select the area of functionality
from the Activity Panel; (3) If necessary, select a specific task from
the list in the Activity Panel; and (4) Follow the step-by-step instructions
in the Activity Panel to complete the task.
Toolbar--PhotoSuite also has a
Toolbar to allow more experience users direct access to the program's
functionality. This Tool bar is accessed in the Prepare activity.
- Zoom--zoom free-hand, by increments, fit to page or by percentage.
- Pan--use this tool to move around a photo that you have zoomed
in on.
- Selection Tools--includes round, square and rectangular selection
tools for creating cutouts; also includes the Magic Wand and Edge
Finder.
- Eye Dropper--set foreground and background colors from your
photo.
- Touch-Up Brush--for applying touch-up effects and traditional
paint styles to photos.
- Clone Tool--replicate one part of a photo onto another part.
- Unfilled Shapes--add lines and shapes to a photo.
- Filled Shapes--add filled shapes to a photo with/without
borders.
- Effect Brush--selectively paint PhotoSuite 4's Special Effects
and traditional paint styles on your photo.
- Photo Sprayer--allows you to add unique photo objects such
as butterflies and flowers to your photo or project.
- Flood Fill--quickly applies effects and traditional paint
styles to areas with a uniformed color.
- Eraser--undo areas you have painted with the Eraser.
Getting
Photos--You can get photos from many sources. Digital
peripherals, such as scanners and 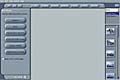 cameras
are accessed through the industry standard TWAIN, or WIA, but PhotoSuite
4 also supports a number of Digital Cameras directly through their Application
Programming Interface (API). Various models of Agfa, Epson, Kodak, Olympus
and Sanyo cameras are supported directly. Direct API support provides
more capabilities than standard TWAIN, such as the ability to download
and delete all the images from the camera at one time, and the ability
to save video files (AVI) and sound clips. PhotoSuite 4 supports eighteen
image formats: BMP, GIF, JPG, PCX, TGA, TIF, EPS, PCD, PNG, STN, WMF,
PIC, FPX, SFW, IMG, KQP, RAS, and PSD. cameras
are accessed through the industry standard TWAIN, or WIA, but PhotoSuite
4 also supports a number of Digital Cameras directly through their Application
Programming Interface (API). Various models of Agfa, Epson, Kodak, Olympus
and Sanyo cameras are supported directly. Direct API support provides
more capabilities than standard TWAIN, such as the ability to download
and delete all the images from the camera at one time, and the ability
to save video files (AVI) and sound clips. PhotoSuite 4 supports eighteen
image formats: BMP, GIF, JPG, PCX, TGA, TIF, EPS, PCD, PNG, STN, WMF,
PIC, FPX, SFW, IMG, KQP, RAS, and PSD.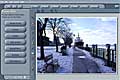
Preparing Photos--The
Prepare activity lets you make all sorts of enhancements to your photos.
You can perform such functions as: rotating and cropping, touchups,
making cutouts, painting, applying special effects, stitching photos
together to create panoramas, and creating a Photo Tapestry. Within
the Prepare module, there are four main enhancements:
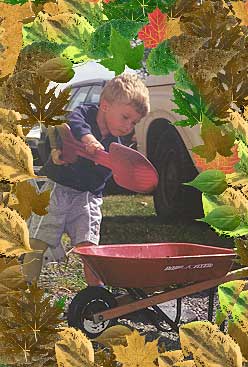
1. Photo Sprayer--With this new
tool, you can cover a photo with other small images,  supplied
by the program, such as flowers, clocks, leaves, pastry, and more.
It is also possible to add your own images to the collection. You
can use the cursor to drag across the screen and lay down a trail
of pictures, or repeatedly click with the mouse and place images precisely
where you want them. There are other options that let you choose the
size, opacity, orientation or rotation, and distance between the small
images. Another advanced option allows you to lay down a trail of
images at various sizes or opacity, but within the range that you
specify. The tool is effective for making photo borders. I used the
photo sprayer to spray on leaves on the picture to the right. I then
used the antique effect on the leaves. supplied
by the program, such as flowers, clocks, leaves, pastry, and more.
It is also possible to add your own images to the collection. You
can use the cursor to drag across the screen and lay down a trail
of pictures, or repeatedly click with the mouse and place images precisely
where you want them. There are other options that let you choose the
size, opacity, orientation or rotation, and distance between the small
images. Another advanced option allows you to lay down a trail of
images at various sizes or opacity, but within the range that you
specify. The tool is effective for making photo borders. I used the
photo sprayer to spray on leaves on the picture to the right. I then
used the antique effect on the leaves.
2. Photo Stitch--PhotoSuite's
stitching capabilities have been revamped. Stitching allows 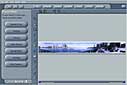 you
to map together a series of photos taken while panning a subject (such
as an horizon or a tower). You can use up to 48 photos (previous version
limited you to 5 photos). Stitching combines these photos to form
one continuous photo. It is possible to produce three stitching types,
depending on your requirements: (a) Normal: several photos
are stitched, producing a normal panorama; (b) Partial Interactive
Panorama: a stitched photo with the warping effect applied, so
that when the interactive panorama is created the panning motion appears
more natural. A Partial Interactive Panorama is commonly 180-degrees,
but can be any value less than 360-degrees; (c) Full Interactive
Panorama: a copy of the first image is added at the end of the
stitch, so it wraps into one continuous photo. This lets you see the
panorama in a complete 360-degree circle when it is viewed in a browser
or in PhotoSuite. The Interactive Web Panoramas allow you to zoom
in and out, rotate around and move up and down. you
to map together a series of photos taken while panning a subject (such
as an horizon or a tower). You can use up to 48 photos (previous version
limited you to 5 photos). Stitching combines these photos to form
one continuous photo. It is possible to produce three stitching types,
depending on your requirements: (a) Normal: several photos
are stitched, producing a normal panorama; (b) Partial Interactive
Panorama: a stitched photo with the warping effect applied, so
that when the interactive panorama is created the panning motion appears
more natural. A Partial Interactive Panorama is commonly 180-degrees,
but can be any value less than 360-degrees; (c) Full Interactive
Panorama: a copy of the first image is added at the end of the
stitch, so it wraps into one continuous photo. This lets you see the
panorama in a complete 360-degree circle when it is viewed in a browser
or in PhotoSuite. The Interactive Web Panoramas allow you to zoom
in and out, rotate around and move up and down.
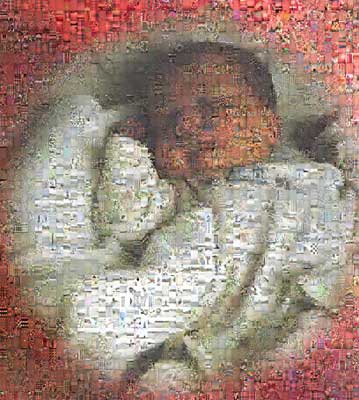
3. Photo Tapestry--This feature
has been reworked. Now you can add your own image 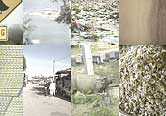 to
the tile set or create a new set from scratch. Photo Tapestry recreates
any photograph using small thumbnail to
the tile set or create a new set from scratch. Photo Tapestry recreates
any photograph using small thumbnail  photos
drawn from a large database that comes with PhotoSuite. Photo Tapestry
analyzes the original photo's hue, saturation and brightness over
its entire area and then searches the photo thumbnail database, assigning
the values in order to select the best photo thumbnails to replace
each part of the original photograph. Thus the finished image is composed
of hundreds of small tiles. I applied photo tapestry to the baby image,
using 2000 images to get the finished product on the right. The image
to the left shows a small enlarged section of the 2000 small images. photos
drawn from a large database that comes with PhotoSuite. Photo Tapestry
analyzes the original photo's hue, saturation and brightness over
its entire area and then searches the photo thumbnail database, assigning
the values in order to select the best photo thumbnails to replace
each part of the original photograph. Thus the finished image is composed
of hundreds of small tiles. I applied photo tapestry to the baby image,
using 2000 images to get the finished product on the right. The image
to the left shows a small enlarged section of the 2000 small images.
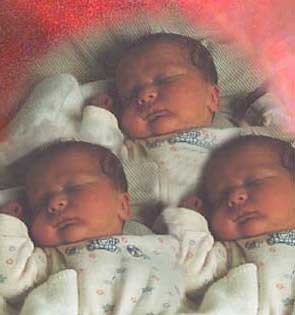
4. Cutouts--This new feature
lets you select an area of your photo for copying, moving, 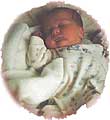 or
applying effects. Areas not selected remain unaffected by any effects
you may apply. or
applying effects. Areas not selected remain unaffected by any effects
you may apply. 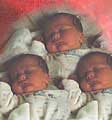 Cutouts
are similar to what other image-editing programs call objects. You
trace around the area to select it, with a variety of tools, ranging
from rectangle, ellipse, freehand, magic wand, and edge finder), then
click on Make a Cutout. Once you have a cutout, you can move it around,
paste it in a different place, cut or copy it to the clipboard, or
send it to the library for storage. Then you can get another image
and add it to that one. Cutouts have handles so you can easily grab
a corner to resize or rotate it. There is also a new transparency
tool that can be used with cutouts. It allows you use alpha channels
and make parts of your photo transparent. I cut out the baby from
the calendar and then placed and combined cutouts to create the image
to the right. Cutouts
are similar to what other image-editing programs call objects. You
trace around the area to select it, with a variety of tools, ranging
from rectangle, ellipse, freehand, magic wand, and edge finder), then
click on Make a Cutout. Once you have a cutout, you can move it around,
paste it in a different place, cut or copy it to the clipboard, or
send it to the library for storage. Then you can get another image
and add it to that one. Cutouts have handles so you can easily grab
a corner to resize or rotate it. There is also a new transparency
tool that can be used with cutouts. It allows you use alpha channels
and make parts of your photo transparent. I cut out the baby from
the calendar and then placed and combined cutouts to create the image
to the right.
Compose--The Compose activity lets
you place your photos into over 1,500 templates. In addition, you can
create and save your own templates or modify most elements of existing
 templates. Business projects include items such as signs, labels, stationary,
business cards, certificates, and promotional materials, while home
projects include posters, calendars, magazines, greeting cards, sports
cards, and photo collages. You can also add text and props, and combine
photos and cutouts into collages. You have a variety of editing elements
to use, such as rotate, change order, add drop shadows and borders,
or use any other editing tools found in the Prepare Activity. I used
a calendar template and added the baby photo to produce the image to
the left.
templates. Business projects include items such as signs, labels, stationary,
business cards, certificates, and promotional materials, while home
projects include posters, calendars, magazines, greeting cards, sports
cards, and photo collages. You can also add text and props, and combine
photos and cutouts into collages. You have a variety of editing elements
to use, such as rotate, change order, add drop shadows and borders,
or use any other editing tools found in the Prepare Activity. I used
a calendar template and added the baby photo to produce the image to
the left.
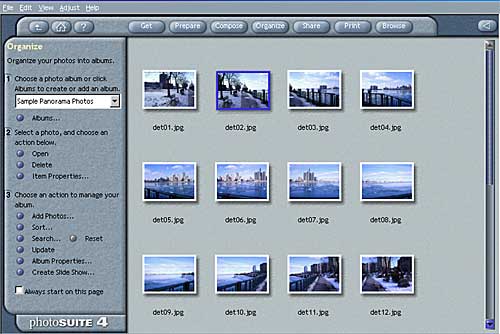
Organize Photos--You can organize
photo collections into albums, complete with titles and  individual
descriptions. There is also a Master Album that keeps track of all of
your albums (an unlimited number). Albums are versatile enough to handle
content like video (AVI) files, and sound (WAV & MP3) files, and
their properties can be changed such as size of thumbnail and descriptions.
There are also search and sort capabilities. Once your photos are organized
into albums, you can use these albums as the basis for slideshows, printing
and Web display. individual
descriptions. There is also a Master Album that keeps track of all of
your albums (an unlimited number). Albums are versatile enough to handle
content like video (AVI) files, and sound (WAV & MP3) files, and
their properties can be changed such as size of thumbnail and descriptions.
There are also search and sort capabilities. Once your photos are organized
into albums, you can use these albums as the basis for slideshows, printing
and Web display.
Share Photos--The Share activity
lets you save your work, send your photos through e-mail, post your
photos to an online photo community, present your photos in multimedia
slide shows, create an album screen saver, or create and publish your
own media-rich Web site.
1. E-Mail: Photos, albums, and
slide shows can be shared through e-mail. You have the choice of using
your normal e-mail application such as Microsoft Outlook, or a Web-based
e-mail service such as MSN Hotmail. There is the option to send your
photos in their current file formats or convert them to JPEGs. You
can set options depending on the file type such as color reduction,
compression, and overall quality.
2. Slide Shows: Slide shows can
be displayed full-screen on a computer monitor or a TV screen. You
can also send slide shows, as EXE files, to your friends via e-mail.
Photos which compose a slide show are sent as a single file that can
be played back without any special software or PhotoSuite. The recipient
double-clicks on this file to view the photos with any sound file
you may have assigned to the slide show. The slide show player is
an easy-to-use player with play and pause functions. To minimize the
file size, the player has been kept very small and photos are automatically
converted to JPEG files. Also, by saving slide shows as EXE files,
you can burn them onto CD-ROMs and distribute them that way. Slide
shows may also be posted on personal Web pages.
3. Kodak PhotoNet Online: If
you are a subscriber to Kodak PhotoNet Online, you can send your photos
to your account directly from within PhotoSuite 4's Share Activity.
4. GatherRound.com: A built-in
link is provided to GatherRound.com, a photo community site, where
you can post entire photo albums to a password protected Web page.
Once created, you can invite friends and family to the site to view
the album, perhaps to even share comments.
5. Web Pages: Web access is important
in this age of the internet, so PhotoSuite has added two new Web options:
(a) Animated GIFs--there is an animated GIF command
that lets you create and edit simple bitmap-based animations for inclusion
on Web pages. You can select several pictures, arrange and rearrange
them in the sequence you want, select the duration time for each frame,
and enliven them with a clever transition.; (b) Web Page
Creation--you can output image albums or selected images as Web
pages, using pre-designed templates that can be customized to add
titles, captions and dates. You can also add or delete any object
on the page. Once the Web pages are completed, PhotoSuite will lead
you through the process of posting the results.
6. Screen Savers: You can create
screen savers from your albums. You can select as many albums as you
wish to be included in the screen saver and adjust several settings
such as timing and photo size. You can also change the properties
of the screen saver from Windows. Your photo or project can also be
seen as Wallpaper.
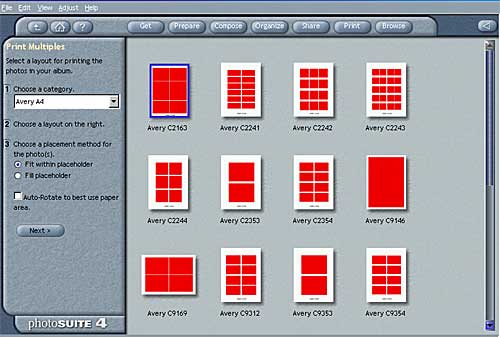
Print Photos--Realizing that it
is costly to print photos on photo quality printers with photo quality
paper, PhotoSuite 4 provides an extensive layout and print preview to
give you complete control  over
output. You can make changes to the layout within this print preview
to avoid having to go back to make a correction. Adjustments that can
be made in print preview include realignment for use with specialty
papers, incremental nudging to correct for printer misfeed, and even
centering. A number of print templates are included that allow you to
print multiple copies of a photo or project on a single page. When printing
multiples, you can choose whether to resize items so that they fit within
the placeholders or to fill the placeholders. You can also choose to
auto-rotate items to best fit with the placeholders. As well as generic
layouts, PhotoSuite now provides layouts designed for Kodak and Avery
stock, and you can even print your images on CD labels or mini stamps. over
output. You can make changes to the layout within this print preview
to avoid having to go back to make a correction. Adjustments that can
be made in print preview include realignment for use with specialty
papers, incremental nudging to correct for printer misfeed, and even
centering. A number of print templates are included that allow you to
print multiple copies of a photo or project on a single page. When printing
multiples, you can choose whether to resize items so that they fit within
the placeholders or to fill the placeholders. You can also choose to
auto-rotate items to best fit with the placeholders. As well as generic
layouts, PhotoSuite now provides layouts designed for Kodak and Avery
stock, and you can even print your images on CD labels or mini stamps.
Browse--PhotoSuite 4 is built on
a browser. This means that you can surf the Internet from within PhotoSuite
4 by simply typing in the URL or accessing your Favorites from the menu.
The 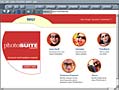 Command
Bar in PhotoSuite changes to include traditional Browser functions:
back, forward, stop, refresh, print, and home. One of the many benefits
of having a browser built into PhotoSuite 4 is the ability to drag any
picture off the Web directly into the Library (following copyright laws).
Using the Home Icon which is linked to the PhotoSuite Web site, you
can get extra content, new project templates, additional filters, online
tutorials and more.. Command
Bar in PhotoSuite changes to include traditional Browser functions:
back, forward, stop, refresh, print, and home. One of the many benefits
of having a browser built into PhotoSuite 4 is the ability to drag any
picture off the Web directly into the Library (following copyright laws).
Using the Home Icon which is linked to the PhotoSuite Web site, you
can get extra content, new project templates, additional filters, online
tutorials and more..
|