Procreate KPT Effects

"Filters To Create Dazzling Effects!"
| Type of Product | User Level | Features |
| Product Analysis | Final Comments | System Requirements |
   
Type of Product

cover


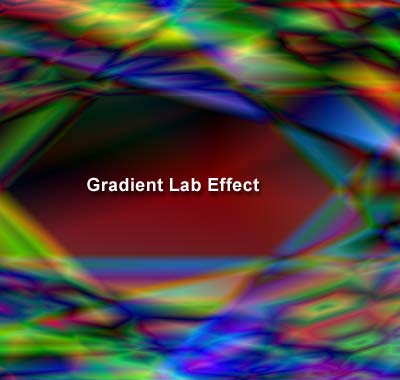
Procreate KPT Effects is a set of nine creative plug-in filters for Adobe Photoshop and other compatible hosts, that allows you to apply image transformations and original effects ranging from realistic to artistic to surprising. It can be used in Painter 7, CorelPhoto-Paint 10, and Bryce 5, as well. The product, created by Kai Krause, was originally known as Kai's Power Tools, and has been considered an invaluable plug-in for designers. In 1999, Corel acquired the software from MetaCreations, a company that Kai Krause co-founded. Corel then made it part of their new line, Procreate, a category of products that adds enhanced capabilities to your collection of tools. Procreate features KnockOut 2, KPT Effects and Painter 7. KPT Effects gives you tools to quickly render unique effects, with maximum control options. A unique feature of the program is that you can use the filters to enhance images as well as to create them, starting with a blank canvas. It includes a preset library that lets you get started quickly by choosing a predefined set of options for the plug-in filter you are using. You can keep the preset settings or customize them until you achieve exactly the result you want. You can also create presets, which help save time when repeatedly applying the same effect. Presets can also be exported to other programs. Unlike most plug-in programs that produce newer versions with patches or enhancements, each new version of KPT is completely unique. With this version, there are feature enhancements, and nine new KPT filters: Pyramid Paint, Lighting, Fluid, Hyper Tiling, Scatter, Channel Surfing, Ink Dropper, FraxFlame II, and Gradient Lab.

Procreate KPT Effects is available for the PC and Macintosh at the price of $199.00. See the Procreate web site for more information: http://www.procreate.com

   
User Level
complex project
Advanced Beginners, Intermediate, and Advanced computer users. KPT Effects can be used by hobbyists, Web developers, or professional designers. The presets make it easy for beginners to use, but the numerous controls allow intermediate and advanced designers to tweak the settings until they get just the look they want. You can create very complex projects such as the image to the left. It was created using the following effects: Gradient lab, Fluid, FraxFlame II, Scatter, Lightning, Ink Dropper, and Channel Surfing.
   
features


Key Features

  • Enhanced Color Picker: The Color Picker now lets you enter precise red-green-blue (RGB) values, and hue, luminance, and saturation values to get the exact color you want.
  • User-Controlled Preferences: The Global options menu lets you set global preferences for all the KPT effects plug-in filters. For example, you can toggle between normal and smiley buttons on the user interface, or you can choose to show or hide the extended KPT effects desktop. The Filter options menu sets preferences for the individual filters, letting you choose how panels display and behave.
  • Accuracy: You can manipulate control points and handles precisely, giving you greater control over your images. You can also see numeric values for slider positions as you move the sliders.
   
Product Analysis

Installation, User Guide, and Help
Installation is easy. There is a 110 page User Guide with color photos showing how each effect reacts to a particular setting. The Help files are also fairly thorough.

Interface
interface

You access the KPT Effects interface from a host application, such as Photoshop, select your filter and options, and then render the effect in the software package you are using. The KPT workspace is very customizable. There is a Preview window that lets you view the effects you create. You can move and size this window and also apply a background to it. All filters have two panels: Recall and Layout. The Recall panel lets you use memory dots to save and compare up to nine versions of the same effect. When you no longer need a saved version, you can delete it. And the Layout panel lets you use memory dots to save different workspace layouts. Then, each filter contains other filter-specific panels that let you adjust the effect you create. You can set the style in which panels display, and you can set the attributes of an effect by moving sliders or by typing values. Each filter provides preset effects. You can load preset effects, save effects you create as presets, and organize presets in categories. When you are unsure how to perform a task, you can use the KPT effects Help. See image to the left for a view of the interface.

KPT Channel Surfing
channel surfing

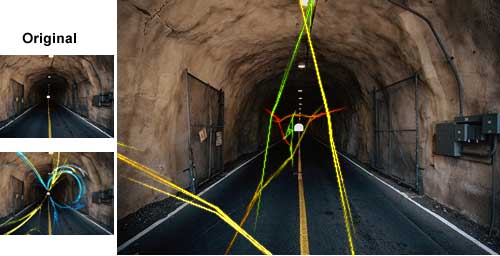
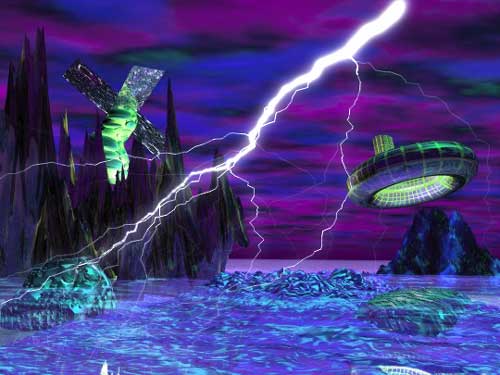
With the KPT Channel Surfing filter you can split an image into RGB and HLS color channels, which allows you to apply an effect to one or all of the channels: Red, Green, Blue, Hue, Luminance, and Saturation. It's possible to blur or sharpen a channel, or adjust its contrast or value. You can adjust the strength of an effect in two ways: by globally adjusting its amount and by using another channel to attenuate the effect in varying amounts across the image. When you attenuate an effect, you decrease its amount based on another channel known as the attenuating channel. For example, if you are applying a blur effect to an image and you choose the Red channel as the attenuating channel, the blur amount will be adjusted based on the value of the Red channel. After you have achieved the effect you want, you can adjust the effect's transparency and control how the effect blends with the source image. You can choose from the following blend modes: Normal, Put behind, Dissolve, Inverse, Multiply, Multiply norm, Screen, Screen norm, Lighten, Darken, Procedural, Procedural inv, Extrapolate, Difference, Similarity, Difference inv, Similarity inv, Hue, Saturation, Color, and Brightness. See image to the left for a view of the Channel Surfing effect.

KPT Fluid

fluid

The KPT Fluid filter lets you manipulate images by applying liquid-like transformations and distortions that simulate dragging a brush across a wet surface. You can control the effect by setting the thickness of the fluid as well as the brush size and velocity. You can use various preview techniques to fine-tune the effect, and choose to save the fluid effect as a series of PICT images or as a QuickTime movie. Preview options are: replay, rewind, pause, or reset. See image to the left for a view of the Fluid effect.

KPT FraxFlame II
flaxflame II

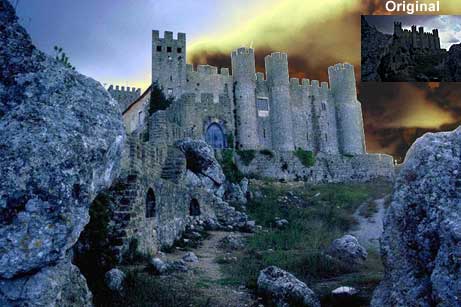
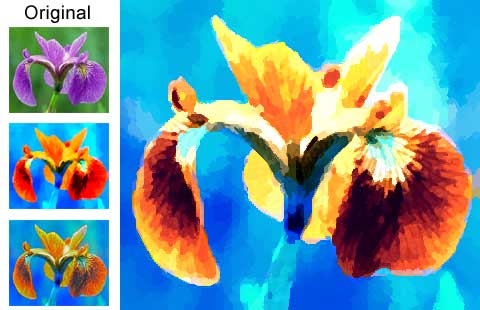
With the KPT FraxFlame II filter, you can explore and mutate an infinite variety of flame fractals. A fractal is a geometric pattern repeated at very small scales to produce irregular shapes like crystal clouds. Fractals can be customized with various color, contrast, and distortion techniques. You can choose from seven preset style: Linear, Sinusoidal, Spherical, Swirl, Horseshoe, Polar, and Bent. Once you have chosen a fractal style, you can mutate the parameters of the parent fractal. See image to the left for a view of the FraxFlame II effect. It shows the original, a large image with the effect, and then another smaller image with the effect.


KPT Gradient Lab

gradient lab

You can create complex, multi-layered gradients with interesting shapes and styles with this filter. By default, effects that you apply encompass the entire gradient, and are not isolated to a specific section unless you define a work area. You can apply a color, shade of gray, or level of transparency to a gradient. You can adjust the intensity of colors in a gradient by modifying the hue, saturation, and brightness. Plus, you can adjust the contrast of colors in a gradient. By adjusting the contrast, the differences in the color values of neighboring light and dark pixels are adjusted. It is also possible to feather, blur, squeeze, and repeat a gradient. Changing the gradient orientation is easy and you have the following options: flip, rotate, or change the angle. Gradients can also be mirrored, and you can add multiple layers to a gradient. There are blending modes for this effect and they are: Add, Blend, Blend into, Darken, Difference, Difference 2, Lighten, Multiply, Normal, Procedural, Replace hue, Replace luminance, Replace saturation, Reverse, Screen Similarity, and Subtract. Lastly you can apply a style to a gradient. The options are: linear, radial, rectangular, squared, circular, elliptical, angular, curved shapeburst, and mapped. If you have applied a circular, elliptical, radial, rectangular, or squared style to a gradient, you can also view its active layer from different perspectives. See image to the left for a view of the Gradient Lab effect.
  KPT Hyper Tiling
hyper tiling
The KPT Hyper Tiling filter lets you create and save intricate tiling effects by reducing the source image to create a tile. Then, the tile is repeated to create a hypertiling effect. You can create different blends between the source image and the effect. The blend modes are the same as for the Channel Surfing filter. This filter lets you control the viewer's perceived distance from the effect. Increasing the field of view creates the illusion that the viewer is stepping away from the image, and can see a larger portion of the effect. Decreasing the field of view makes the image look as if the viewer is very close to it, and can see only the central part of the effect. Plus, you can also change the effect's depth, transparency, position, and size, and rotate it through space. You can rotate a hypertiling effect around the X, Y, and Z axes. You can also rotate a hypertiling effect through 4-D space. The fourth dimension, the W axis, is a mathematically generated exploration axis. Although the effects of this rotation are unpredictable, they tend to emulate turning the geometric 3-D construct of the hypertiling effect inside out. The program also lets you choose one of the five preset hypertiling styles to apply to an image: Vortex, Pinch, Cube, Sphere, and Cylinder. See image to the left for a view of the Hyper Tiling effect. It shows the original, a large image with the effect, and then two smaller images with the effect.
  KPT Ink Dropper
ink
With the KPT Ink Dropper filter, you can create the effect of dropping colored liquid (ink) onto a surface. It's great for creating drops, stains, and smoky swirls. Options allow you to choose the color of the liquid, and change its intensity and transparency. You can also change the size of the individual drops and the rate at which they disperse on the surface. See image to the left for a view of the Ink Dropper effect.
  KPT Lightning
lightning
Customized lightning bolts can be created with the KPT Lightning filter. You have control over every aspect of the lightning bolt, from setting its length and color, to determining its path and how much it sags and wanders. The lightning effect can then be realistically integrated into your source image using one of the several blend modes. KPT Lighting lets you position lightning bolts so that you choose where you want the lightning bolt to originate and where you want the lightning to point to. A lightning effect consists of a parent bolt and child bolts, and you can increase or decrease the length and thickness of the parent and child bolts. You can also control the intensity of child bolts. You can increase or decrease the glow radius around the lightning and set the color of the bolt's glow. There are 21 blend modes to use. See image to the left for a view of the Lightning effect.
  KPT Pyramid Paint
pyramid paint
The KPT Pyramid Paint filter uses the Lab color mode to let you transform source images into effects that resemble paintings, and perform various color and contrast adjustments to them. Lab color mode is a 24-bit color mode that separates the brightness of an image from its color channels, and creates color from the luminance, red to green, and yellow to blue chromatic components it contains. Lab color mode is device-independent, and can be used to transport images from one platform to another. KPT Pyramid Paint first converts a source image to Lab color mode, and then lets you adjust its color settings in various ways. You can adjust the red to green and yellow to blue chromatic components in an effect. You can modify the color intensity in an effect by rotating its hues. You can also change the saturation of an effect to amplify the adjusted red to green and yellow to blue chromatic components. You can adjust the lightness of colors in an effect by illuminating or obscuring them. You can also adjust the contrast between the light and dark colors in an effect. See image to the left for a view of the Pyramid Paint effect. It shows the original, a large image with the effect, and then two smaller images with the effect.
  Scatter
scatter
The KPT Scatter filter lets you disperse particles over a source image. You can disperse a single particle or a grid of particles over an effect to emulate intricate effects such as paint strokes or mosaics. A particle is any image you want to disperse across a source image. You can import up to 25 particles to a gird (5 tiles by 5 tiles). If you import particles to grid tiles directly adjacent to one another, the particles will display close together. If you leave a blank grid tile between imported particles, the particles will display with some space between them. You can also use variants to create special effects based on the way particles interact with different components of a source image. The variants are: None, Hue, Luminance, Saturation, Horizontal distance, Vertical distance, Radial distance, Circular distance, Random, Smooth random, and Time. You can control every aspect of particle placement, color, and shadow. Also, you can adjust the radius, opacity, and position of a shadow. See image to the left for a view of the Scatter image.
   
Final Comments
pyramid paint complex

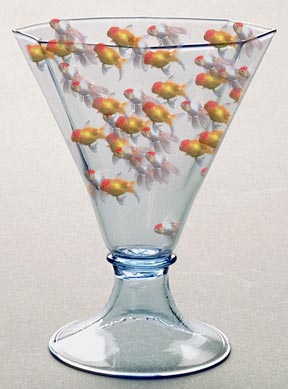
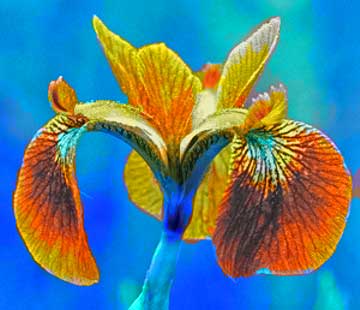
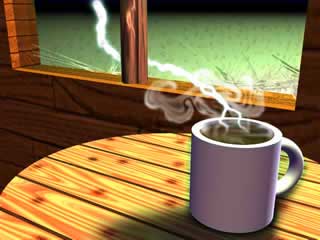
KPT Effects is an impressive package. Bottom line--this is a must have effects program that is topnotch. It takes a while to get used to the nonstandard interface, but it's easy to learn and use. And the program is not a simple point, click, and instant effects package. It's powerful, sophisticated, and includes numerous option panels that are filter-specific so you need to experiment with them to see how they work to get the look you want. The program could benefit from onscreen tool tips, the ability to switch from one effect to another within the KPT Effects interface, and tutorials. Some of the effects are pretty straightforward to use, but some have so many options that it is a little bit intimidating at first. The User Guide does an excellent job of explaining the various filter options, but I still didn't know how to put the information together. Since, I tend to be tutorial obsessive and probably spoiled by having tutorials in other Corel products, such as CorelDraw and Corel PhotoPaint, I looked for tutorials to help me get started. I could not find any on the Corel or Procreate site. Nor is there any mention of tutorials in the User Guide. I happened to find some in the User Guide that was buried in the program files for Painter 7. They clarified how to use each filter, and then as I got braver, I really began to experiment. I must say I am impressed with the program and its ability to make your design time fun, creative, and unlimited in possibilities. For instance, the image to the left was created using the Pyramid Paint filter. After I had applied the filter, I used the Fade option in Photoshop to fade it 50% and then changed the color mode from normal to color.

   
System Requirements

Windows:

  • Windows 98, 2000, NT 4.0 Service Pack 6, or Windows Me
  • IBM-compatible PC, Pentium 166 processor or higher
  • Adobe Photoshop 4 or higher (or compatible host)
  • 32MB RAM or greater allocated to host (64 MB recommended)
  • 25 MB or greater available hard disk space
  • 24-bit (800 x 600) color display
  • CD-ROM drive
  • Mouse or tablet

Macintosh:

  • Mac OS 8.6 or higher, or Mac OS X
  • Power Macintosh (180 MHz or faster recommended)
  • Adobe Photoshop 4 or higher (or compatible host)
  • 32 MB RAM or greater allocated to host (64 MB or greater recommended)
  • 128 MB RAM for Mac OS X
  • 25 MB or greater available hard disk space
  • 24-bit (800 x 600) color display (1024 x768 for Mac OS X)
  • CD-ROM drive
  • Mouse or tablet
   
Graphics: Adobe Photoshop 6.0
Web Page Design: Macromedia Dreamweaver 4.0
| Applications | Games | Hardware | Children | Plug-Ins | Tutorials | Back to PC Cafe Home |
| Educational | Books | Utilities | Web Tools | Legal | Articles |
Return to PC CafeGo To Top
This site is (c) Copyright 2001, by PC Cafe Online. All World Wide Rights Reserved