|
 Part I: Getting Started Part I: Getting Started
Hour 1--Getting to Know Illustrator. Users who are familiar with other programs
might need to adjust to working with Illustrator and vector images. This chapter explains the difference between
raster and vector images and discusses Illustrator's environment, tools, palettes, and views. All of the tools,
as well as their function, are listed. And there is a great picture of all of the 18 palettes.
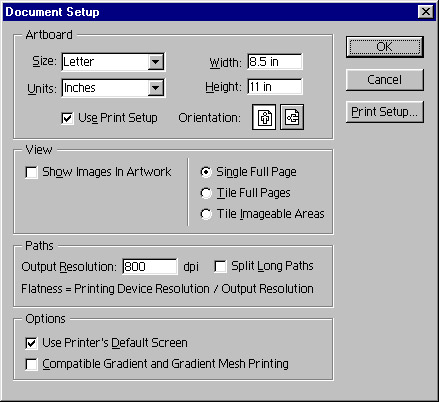
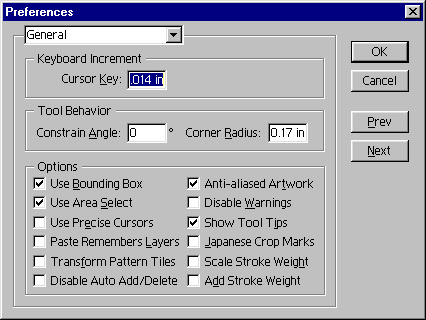
Hour 2 -- -- Customizing
Illustrator. For those users who like to set up their program
environments to suit their special needs, this chapter explains all
the ways to do just that. It covers setting Document Setup options;
setting Illustrator preferences; using guides and grids; and creating
an Illustrator Startup file. There is a whole separate section on working
with guides, smart guides, and grids. Customizing
Illustrator. For those users who like to set up their program
environments to suit their special needs, this chapter explains all
the ways to do just that. It covers setting Document Setup options;
setting Illustrator preferences; using guides and grids; and creating
an Illustrator Startup file. There is a whole separate section on working
with guides, smart guides, and grids.

Hour 3--Drawing Basic Objects. This is a fun chapter that shows you how to
create some basic objects or shapes, such as: rectangles, ellipse, polygons, stars, and spirals. They can be drawn
freely or numerically. The author provides illustrations of the different options you have by using the modifier
keys--Shift, Alt, Control, tilde, and Spacebar.
Part II: Getting the Basics
Hour 4--Working with Selections. Drawing objects is just part of what you
need to learn in Illustrator. Just as important, is how to select those objects and in Illustrator you have three
main tools: selection tool, direct selection tool, and the group selection tool. This chapter discusses using the
selection tools, grouping objects, locking and hiding objects, and arranging objects.
Hour 5--Working with Layers. Layers are an important feature when you are working
on complex illustrations. This chapter concentrates on using the Layers palette, shuffling layers, hiding and locking
layers, and moving artwork between layers. And you learn from a Tips box that Version 8 gives you the capability
to export Illustrator files in Photoshop format while keeping layer information intact. You also learn about making
nonprinting layers and moving and copying shapes from one layer to another without cutting and pasting.
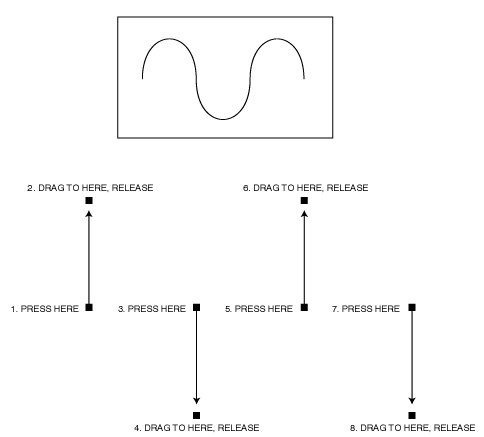
Hour 6--Drawing Bézier Paths.
In this chapter you learn about: working with the Bézier 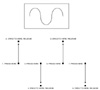 path; working with anchor points; drawing with the
Pen tool; and drawing with the Pencil tool. There is a good description
of the three different kinds of anchor points: the straight corner point,
the smooth point, and the combination point. The author uses two different
types of diagrams for illustration which makes it easier to understand.
He first presents an outline of where to click and then repeats the
procedure showing the path and anchor points. You can download the illustrations
for this chapter from the author's Web site. http://www.mordy.com path; working with anchor points; drawing with the
Pen tool; and drawing with the Pencil tool. There is a good description
of the three different kinds of anchor points: the straight corner point,
the smooth point, and the combination point. The author uses two different
types of diagrams for illustration which makes it easier to understand.
He first presents an outline of where to click and then repeats the
procedure showing the path and anchor points. You can download the illustrations
for this chapter from the author's Web site. http://www.mordy.com
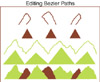
Hour 7--Editing Bézier Paths. In Hour 7, you find out how to edit any
horrible paths you make in the last chapter. You learn to add and delete anchor points; use the Reshape tool, use
the Smooth tool, cut paths; and join paths. I especially like the section on the Reshape tool and the Knife Tool.
The author also shows you how to use the Average command to align lines in different ways.
Part III: Getting Colorful
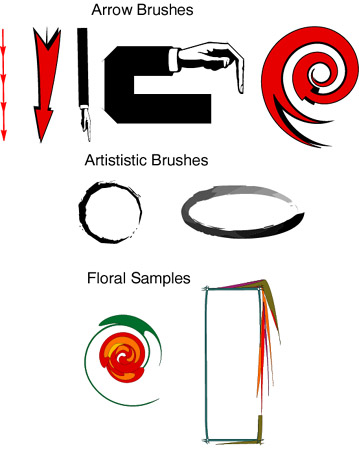
Ho ur
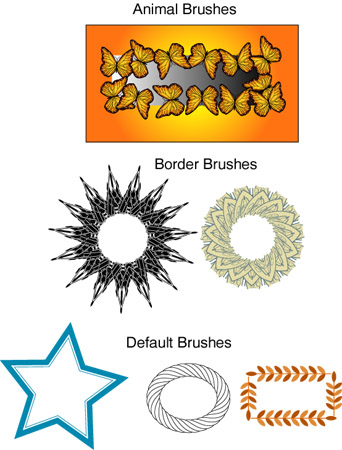
8--The Paintbrush Tool. The Paintbrush tool is made up of
four different kinds of b ur
8--The Paintbrush Tool. The Paintbrush tool is made up of
four different kinds of b rushes,
called "live" as you can edit them even after you have used
them. The author covers the Brushes palette and the four brushes: Calligraphic,
Scatter, Art, and Pattern brushes. This is another fun chapter. The
author discusses all of the brushes and the Options dialog box that
is associated with each and how you can customize the brushes. rushes,
called "live" as you can edit them even after you have used
them. The author covers the Brushes palette and the four brushes: Calligraphic,
Scatter, Art, and Pattern brushes. This is another fun chapter. The
author discusses all of the brushes and the Options dialog box that
is associated with each and how you can customize the brushes.
Hour 9--Coloring Objects. Learn how to select colors for the fill and stroke
attributes of objects; how to use the Color palette and choose different color models and create custom colors;
use the Swatches palette to save a color that you define; sample colors with the Eyedropper tool to apply to other
objects; and use the Paint Bucket tool to apply colors to objects.
Hour 10--Fills. This Hour focuses
on the fill attribute of an object. You learn to apply a f ill to an object; use the Gradient Palette and make
gradient fills, work with the Gradient Mesh tool; make pattern fills;
and use the Expand command. ill to an object; use the Gradient Palette and make
gradient fills, work with the Gradient Mesh tool; make pattern fills;
and use the Expand command.
Hour 11--Strokes. There are several stroke options that you can use to create
special effects and this chapter discusses them. The author covers the Stroke palette; stroke weights, miters,
and caps; dashed lines; and layered strokes. The author shows you how to use different settings, dashed lines,
and layered strokes to create a train track and a four-lane freeway. You also learn how to use the Offset Path
and Outline Path and also gives you a workaround for filling an outlined stroke with a gradient.
Hour 12--Compound Paths and Masks. You can use more than one object to create
what looks like just one object with the techniques in this chapter: compound paths; masking objects; and masking
placed images. I really liked this chapter and used the compound paths and masking techniques to make the section
headings.

Hour 13--Transformations. Illustrator provides numerous ways to transform your
objects and they are covered in this chapter. You learn to scale and rotate; use the Free Transform tool; the function
of the Align palette; blend objects with the Blend tool; and use the Pathfinder palette. This is probably one of
the longest chapters but it provides valuable information.
Part IV: Getting Stylized
Hour 14--Adding Text. Working with
text can be fun and in this chapter you learn to w ork with three types of text: point text (regular text),
area text (text within a shape), and text on a path. Illustrator allows
you to work with vertical text as well as horizontal text. The author
also covers how to link text blocks and how to use the rows and columns
feature. ork with three types of text: point text (regular text),
area text (text within a shape), and text on a path. Illustrator allows
you to work with vertical text as well as horizontal text. The author
also covers how to link text blocks and how to use the rows and columns
feature.
Hour 15--Advanced Typography. More
fun with text. Various palettes are discussed such as
the Character palette, the Paragraph Palette, the Tab palette, and the
MM Design palette. You learn to control type with leading, kerning,
tracking, baseline shift, justification, and word and letter spacing
options. The author includes a section on converting text to outlines
and demonstrates how you can use type as a mask. as
the Character palette, the Paragraph Palette, the Tab palette, and the
MM Design palette. You learn to control type with leading, kerning,
tracking, baseline shift, justification, and word and letter spacing
options. The author includes a section on converting text to outlines
and demonstrates how you can use type as a mask.
Hour 16--Working with Raster Images. You learn to work with raster images such
as placing raster images; linking and embedding; using the Links palette; and working with raster art. File formats
supported by Illustrator are also covered as well as the use of the Autotrace tool.
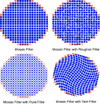
Hour 17--Vector Filters. Apply filters to vector images with this chapter.
You learn to use the Adjust Colors filter, the Object Mosaic filter, the Roughen filter, the Twirl filter, and
the Zig Zag filter. These filters really get the creative juices running.

Hour 18--Filters with Style. Learn to use complex filters to create unique
styles and borders. The following filters are covered: Pen and Ink filter; Photo Crosshatch filter; arrowhead;
and Photoshop-compatible filters. I especially liked the Pen and Ink filter.
Hour 19--Charts and Graphs. This chapter discusses the different type of editable
graphs that can be made in Illustrator. The author lists the nine types; how to create a graph; editing data; importing
graph data; graph options; and using a feature called graph design which lets you use any vector art to display
information in your graphs.
Part V: Getting the Most Out of Illustrator
Hour 20--Saving/Exporting Files. This is an excellent chapter that outlines
the different formats that can be used for saving and exporting files, and the following is discussed: saving files
as native Illustrator files; EPS files; or PDF files; exporting to other file formats such as TIFF, GIF89a, JPEG,
and PNG, and Photoshop.
Hour 21--Working Smart in Illustrator.
Hour 21 includes important tips: using actions; saving files; creating "clean" files; tracing images; and
managing placed images. I thought the scanning and tracing section was
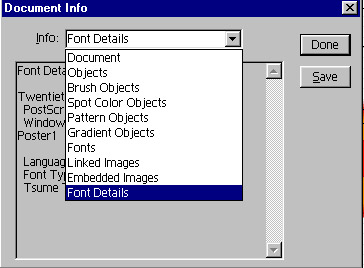
quite helpful. There is also a tip on unlocking just one item. Also
the author discusses the Document Info option. It gives you an exhaustive
list of your file's details and attributes.
saving files; creating "clean" files; tracing images; and
managing placed images. I thought the scanning and tracing section was
quite helpful. There is also a tip on unlocking just one item. Also
the author discusses the Document Info option. It gives you an exhaustive
list of your file's details and attributes.
Hour 22--Printing. Manage your printing jobs with this chapter. Printing your
files; producing color separations; the PostScript language; and troubleshooting tips are all covered here. Good
section on color separations.
Hour 23--Web Graphics. Use Illustrator to design for the Web with the techniques
in this chapter. It discusses dealing with Web-safe color issues; assigning URLs to objects; exporting in Web-compatible
formats; and working with animation. Nice chapter.
Hour 24--Cross-Platform Issues. Cross-platform issues are discussed, such as:
naming files; fonts; and color management, as well as the drag and drop features of Illustrator.
|
 Sams Teach Yourself Illustrator 8 in 24 Hours
is a guide to Adobe Illustrator 8. In just 24 sessions of one hour or
less, it takes you through the program, with each lesson building upon
the previous one. You will learn about: major changes in the Illustrator
interface; cutting production time by using the transformation tools;
customizing Illustrator to fit your individual needs; mastering the selection
tools; creating precise Bezier paths with the Pen tool; using the Pathfinder
command, a set of path-editing functions; creating and editing brush shapes
and brush art; and much more. The Sams Teach Yourself series offers other
books that are written with a clear and easy manner. The series is aimed
at the reader who does not already know how to use an application, and
the material is presented in a tutorial approach to guide the reader through
the learning process. Some of the other Sams series are: Sams Teach Yourself
in 10 Minutes; Sams Teach Yourself in 24 Hours; and Sams Teach Yourself
in 21 Days. As Illustrator is a bi-platform (Macintosh and Windows) product,
the book is written with commands for both types.
Sams Teach Yourself Illustrator 8 in 24 Hours
is a guide to Adobe Illustrator 8. In just 24 sessions of one hour or
less, it takes you through the program, with each lesson building upon
the previous one. You will learn about: major changes in the Illustrator
interface; cutting production time by using the transformation tools;
customizing Illustrator to fit your individual needs; mastering the selection
tools; creating precise Bezier paths with the Pen tool; using the Pathfinder
command, a set of path-editing functions; creating and editing brush shapes
and brush art; and much more. The Sams Teach Yourself series offers other
books that are written with a clear and easy manner. The series is aimed
at the reader who does not already know how to use an application, and
the material is presented in a tutorial approach to guide the reader through
the learning process. Some of the other Sams series are: Sams Teach Yourself
in 10 Minutes; Sams Teach Yourself in 24 Hours; and Sams Teach Yourself
in 21 Days. As Illustrator is a bi-platform (Macintosh and Windows) product,
the book is written with commands for both types. Beginning, Intermediate, and Advanced
PC or Macintosh users. Sams Teach Yourself Illustrator 8 in 24 Hours is
an excellent basic book for just about anyone. It is extremely well-suited
for users just starting out working with vector images as it is low-key,
basic, clear, and concise with plenty of graphics to clarify the text.
The chapters are small and written with just enough information to get
you started and not overwhelm you. Experienced Photoshop users who want
to enjoy the precise illustration benefits of the program, FreeHand converts,
and experienced Illustrator users who want to get up to speed with the
new version will also find the book valuable.
Beginning, Intermediate, and Advanced
PC or Macintosh users. Sams Teach Yourself Illustrator 8 in 24 Hours is
an excellent basic book for just about anyone. It is extremely well-suited
for users just starting out working with vector images as it is low-key,
basic, clear, and concise with plenty of graphics to clarify the text.
The chapters are small and written with just enough information to get
you started and not overwhelm you. Experienced Photoshop users who want
to enjoy the precise illustration benefits of the program, FreeHand converts,
and experienced Illustrator users who want to get up to speed with the
new version will also find the book valuable. Sams
Teach Yourself Illustrator 8 in 24 Hours is an excellent choice if you
are looking for a basic book that presents an overview. It doesn't include
a CD or color images. Nor does it have the step-by-step tutorials for
creating specific images, such as the Adobe Classroom in a Book series.
But it is full of black and white illustrations, tips, shortcuts, and
workarounds for features that Illustrator does not have. The chapters
are short, well-written, and organized. The author gives you the key strokes
or shortcut commands for all the features he is explaining. And the price
is right!
Sams
Teach Yourself Illustrator 8 in 24 Hours is an excellent choice if you
are looking for a basic book that presents an overview. It doesn't include
a CD or color images. Nor does it have the step-by-step tutorials for
creating specific images, such as the Adobe Classroom in a Book series.
But it is full of black and white illustrations, tips, shortcuts, and
workarounds for features that Illustrator does not have. The chapters
are short, well-written, and organized. The author gives you the key strokes
or shortcut commands for all the features he is explaining. And the price
is right!