Series
1
Total Photoshop Series
1 is comprised of the first 7 tapes in the Total
Photoshop Complete set. This series introduces novices to the
features of Photoshop, while providing those of you who are
advanced users with further knowledge about some of the key
concepts involved within Photoshop. You will learn the basics
with the first 2 introductory tapes and then immediately begin
putting those foundational skills to work with tapes 3-7, which
dive right into the core features of Photoshop. With tapes 3-7
you will learn about: Paint, Color, Retouch, Selections and
Paths.
|
|
Tape
1:
Introduction to Photoshop One
1. Introduction (13 min)
What Photoshop does; pixels; digital photos; a history
of photo retouching.
2. Interface (14 min)
The basics; image window; menu bar; toolbox; palettes.
3. Navigation (34 min)
Opening files; navigation essentials.
4. Resolution (55 min)
Image size v. canvas size; cropping; rotting and cropping at once.
|
Tape
2:
Introduction to Photoshop Two
1. Rotating Images (17 min)
Measure Tool tip; Arbitrary command.
2. Rulers & Units (6 min)
Displaying ruler; tracking position with info palette; changing
units.
3. Saving Image (50 min)
Save v. Save As v. Save a Copy; extensions; previews; formats.
4. Preferences (22 min)
Recommendations; memory; scratch disks, prefs file.
|
|
Tape
3:
Paint, Color and Retouch One
1. Paint Tools (3 min)
An overview of basic tools; and shift-clicking.
2. Brushes (55 min)
Brushes palette; modifying brush shapes; pressure-sensitive tablets.
3. Color (26 min)
Specifying colors; matching colors; eyedropper; color picker;
color palette; basic color theory.
|
Tape
4:
Paint, Color and Retouch Two
1. Eraser (13 min)
Primary eraser tool; background color; eraser brushes.
2. Edit Tools (32 min)
Dodge; burn; sponge; smear; sharpen; blur; "Use All Layers."
3. Rubber Stamp (40 min)
Retouching photographs; eliminating extraneous details and dirt;
creating repeating patterns.
|
|
Tape
5:
Selections and Paths One
1. What They Are (11 min)
Isolate areas of images; move selected area; apply area filter;
marching ants.
2. Selection Tools (44 min)
Marquee; lasso; magic wand; polygons with the magic wand; magnetic
lasso; contiguous v. discontiguous; antialiasing; tolerance.
3. Changing Selections (20 min)
Select menu; inverting selections; smoothing corners; expanding
& contracting; feathering a selection; deselecting; adding,
subtracting and intersecting; transforming selections.
|
Tape
6:
Selections and Paths Two
1. Move & Clone (23
min)
Moving secessions independent of content; moving pixels, drag
and drop between windows; replace part of an image with another.
2. Color Range (27 min)
Selecting; limiting selected areas.
3. Applying Color In Selections (34 min)
Painting inside the selection mask; using the paint bucket tool;
filling selection; using gradients; stroking selections; and arrowheads.
|
|
Tape
7:
Selections and Paths Three
|
|
1. Editing Gradients (8 min)
Change, create, and use gradients.
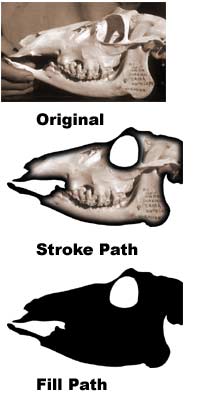
2. Pen Tool (50 min)
Adjust paths; convert to selections; fill with color; clipping
paths.
|
3. Ram on the
Mac (8 min)
Optimum settings for Photoshop
4. Happy Easter (4 min)
Impress your friends with hidden Photoshop secrets. |
Series
2
Total Photoshop Series
2 is comprised of 7 tapes. With Series 1 you learned
about some basic features of Photoshop as well as some core
features of the Photoshop suite. Total Photoshop Series 2 continues
to exploit core features, and you will learn about Layers, Text/Layer
Effects, Web Graphics, History as a Creative Tool, Color Theory
& Management and Color Correction. Total Photoshop Series 2
is designed to take your skills to the next level.
|
|
Tape
8:
Layers
1. Layers Intro (10 min)
Layers; drag & drop: copy, paste; paste inside layers.
2. Commands & Options (15 min)
Layer menu; layers palette; painting on layers; hiding and showing
layers.
3. Stacking Order (10 min)
Reorder layers; switch between layers; find layers; "layer
express" function.
4. Transparency Masks (25 min)
Converting transparency boundary to selection; preserving transparency.
5. Moving & Aligning (10 min)
Link and move layers; ruler guides; grid; clone layers; drag layers
& linked layers between files.
6. Transformations (9 min)
Transforming a layer or linked layers.
7. Saving & Simplifying (11 min)
Saving in PSD; merging & flattening.
8. Big Layer (8 min)
Visible layer hides contents beneath; cropping outside the image.
|
Tape
9:
Text & Layer Effects
1. Introducing Text (9
min)
Bit-mapped text; Illustrator text vs. Photoshop text.
2. The Type Tool (17 min)
Creating text; the Type Tool dialog box; text from the keyboard.
3. Type on a Layer (12 min)
"Live" type; how to edit type; limitations of the
feature.
4. Layer Effects (40 min)
Creating text; working in the Type Tool dialog box; text from
keyboard.
5. Character Masks (16 min)
Selection outline type tools; filling text with color or imagery.
6. Chrome Text with Layer Effects (12
min)
Creating a Chrome look quickly.
|
|
Tape
10:
Web Graphics
1. Rules of Web Graphics
(20 min)
Explanation of formats: GIF, JPEG, and PNG; using Save As.
2. Saving JPEG Images (22 min)
How JPEG compression works; JPEG save options, extensions.
3. Saving GIF Images (49 min)
Reducing colors with Indexed Color command; working with transparency
inside indexed image; saving PNG.
4. PNG (3 min)
Uses for the PNG format.
5. Saving for the Web (4 min)
Using Photoshop 5.5's "Save for the Web" command.
|
Tape
11:
History as a Creative Tool
1. History Palette (19
min)
Intro; multiple undos; before & after.
2. History Drawbacks (14 min)
Memory and scratch considerations.
3. The History Brush (30 min)
Painting and filling from source state.
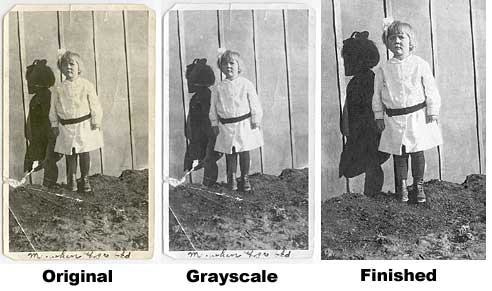
4. Retouching with History (11 min)
Using History to clean up and restore.
5. Art History Brush (14 min)
Creating Impressionistic effects from the History palette.
|
|
Tape
12:
Color Theory & Management
1. Color
Theory and Management (42 min)
RGB vs. CMYK; how primaries mix; viewing channels in color and
grayscale; color conversions.
2. Adobe Gamma (32 min)
Calibrating your monitor for consistent output.
3. CMYK Setup (22 min)
Ensuring that colors match from the monitor to the printed page.
|
Tape
13:
Color Correction One
1. Intro to Color Correction
(17 min)
Correcting brightness, contrast, & colors.
2. Variations (8 min)
A way to learn color theory; using Fade Command to back off color
correction.
3. Hue and Saturation (36 min)
Globally changing hue and saturation; isolating specific image
areas.
4. Levels (38 min)
Gamma; fixing an image on a channel by channel basis; using Output
Level sliders.
|
|
Tape
14:
Color Correction Two
|
1. Curves and
Levels (32 min)
Levels allow three edit options per channel--black, white, and gamma;
Using Curves to specify additional points on a graph. |
2. Adjustment Layers (33 min)
Applying temporary changes; including masks; screening image onto
itself.
3. Actions (22 min)
Recording and playing back Actions.
|
|
Series
3
Total Photoshop
Series 3 is comprised of 6 tapes. With Total
Photoshop Series 1 & 2 you learned key concepts, core features
and many shortcuts. Total Photoshop Series 3 is all about the
Filters. Here you will learn about Filter Basics, Blur, Emboss,
Distortion, Displacement Maps, Masks and Extractions. Filters
are important in Photoshop and Deke McClelland has them mastered
and shares his expertise with you. While Total Photoshop Series
3 helps you elevate your general Photoshop skills, Total Photoshop
Series 3 is designed to elevate your skills with Photoshop filters
to the next level.
|
|
Tape
15:
Filters One
1. Filter Basics (26 min)
Using filters to sharpen and blur; filter plug-ins; corrective,
destructive, and effects filters; using the Fade Filter option.
2. Unsharp Mask (19 min)
Best of several sharpening filters; Threshold.
3. Blur and Median (30 min)
Using Gaussian Blur; apply the Median command; using Median and
Min/Max.
4. Descreening Halftones (21 min)
Applying scan large, rotate and reduce technique; median and sharpen
on a channel by channel basis.
|
Tape
16:
Filters Two
1. The Emboss Filter (51
min)
Restoring color robbed by using the Emboss filter; and amplifying
embossing to create patterns.
2. Distortion Filters (43 min)
Deke creates wild trippy patterns with Twirl, and polar coordinates;
tear apart an image.
|
|
Tape
17:
Filters Three
1. 3-D Transform (21 min)
Wrapping an image around shapes.
2. Displacement Maps (55 min)
Using Displacement Maps so you can distort images.
3. The Custom Filter (19 min)
Creating your own specialized effects with the Custom Filter.
|
Tape
18:
Masking One
1. Masks (23 min)
How selections mask paint; using the simplest masking command--Color
Range; saving selections as an alpha channel; Feather vs. Gaussian
Blur.
2. Quick Masks (14 min)
Creating generalized selection and choke inside Quick Mask mode.
3. Full Masking (84 min)
Masking: The Rest of the Story.
|
|
Tape
19:
Masking Two
1. Combining Masks (17 min)
Mixing masks together with easier keyboard tricks and Calculations
command.
2. Layer Masking (19 min)
Using automatic mask to paste inside; use of layer mask for retouching;
gradients and clipping groups can mask layers above.
3. Alternative Masks (31 min)
Specialized masks such as the blue screen technique; creating
an edge mask, improving Unsharp Mask Threshold.
4. Extractions (27 min)
New Photoshop 5.5 extraction tools; using the Extract command.
|
Tape
20:
Blend Modes
1. Normal and Dissolve (8 min)
Mixing layers with math; normal shows top layer subject to Opacity
value.
2. Multiply and Screen (26 min)
Primary blend modes; burn a dark image into background for a drop
shadow; burn a logo into a background; dodging a light image out
of a background; adding spotlight to logos.
3. Layer Options (23 min)
Fade layers in and out according to color; combining Multiply
& Screen; lens flares.
4. Overlay and Lights (18 min)
The importance of gamma; fixing an image on a channel by channel
basis; using Output Level sliders.
5. Other Modes (18 min)
Hue, Saturation, Color, Luminosity, Difference, and Difference
Clouds; Sandwiching effects.
|