Total Training For Adobe Photoshop 6
"A Valuable Addition to Your Reference Library"
![]()
Total Training for Adobe Photoshop 6 is comprised of 12 videos split between three series. Appropriate for users of all levels, this 20 hour compilation is a thorough and in-depth Photoshop training package that has tips for beginners trying to move from creating simple one-step manipulations to generating exciting effects using Photoshop's powerful tools; and veteran Photoshop users who need to learn about new and revised tools. It covers all the new features and options, tells you what has been dropped or changed, describes time-saving shortcuts and configuration settings, and discusses changes in the interface. With each new version of an application, adjusting to the new material can be time-consuming for veterans and even confusing for beginners. Manuals do help, but many can be tedious for individuals who are visually oriented. The Total Training videos make learning fun and definitely reduce the learning curve. With these videos, you'll get clear demonstrations of key concepts and techniques while working with the same graphic elements on your computer that Photoshop expert Deke McClelland works with onscreen. These files are included on a CD-ROM. Each series also includes a Quick Reference Card with the tape number, title, section titles, location (in minutes) on the tape, and duration of the section.This is great for going back to watch a lesson again. Deke is an excellent teacher who blends artistic skill, technical expertise, and a humorous presentation style to create an enjoyable learning experience. Not only does he walk you through the the tutorials step-by-step, but he explains why you are doing things that way and provides you with keystroke shortcuts. Deke McClelland is quite qualified to teach Photoshop as he is a well known author of books about computer graphics, digital imaging, and electronic design. He has written more than 50 titles in the past decade, and his work has been translated into 24 languages. His books on Adobe Photoshop include Photoshop 6 Bible, Photoshop for Dummies, and Photoshop Studio Secrets. The tapes are appropriate for both Windows and Macintosh users. The instructor uses a Macintosh computer for his demonstrations, but he gives keystrokes and techniques for both Windows and Mac users.
This 20-hour collection is broken into three different series, and each series can be purchased separately or as an entire collection. And you have your choice of purchasing this collection on VHS or DVD. Price for total package: $249.00. See the Total Training Web site for more information: http:/www.totaltraining.com
Rubber Stamp Tool
![]()
- Provides a thorough guided tour of Photoshop 6;
- Teaches valuable time-saving workflow techniques;
- Taught by a top expert in Photoshop 6;
- Designed to build skills and stimulate new ideas;
- Uses applied learning to reinforce new skills; and
- Makes learning fun.
Series
One
Annotating &
Saving
Program 1 -- The Basics:
- Getting Around Photoshop: 33 min. -- Setting up Photoshop: settings, preferences, memory allocation; launching the program; color settings; introduction to layers; screen modes & image viewing options; displaying & hiding palettes; changing intermediate background colors; the Gradient tool; the Magnifying & Hand tools. Good discussion of how to use F key to cycle between the 3 screen modes, and also use shift-click in Full Screen Mode with Menu Bar to change background color of screen.
- Resolution, Rotate, & Crop: 38 min. -- Arranging your palettes; Rulers & Units; what is resolution; Image Size & Canvas Size; the Navigator palette; saving your image; rotate & straighten; two ways crop: the Rectangular Marquee tool or the Crop tool. Nice tips, and something I always forget is to use the Alt key when you are resizing with the Crop tool if you want to crop equal distances from the center.
- Annotating & Saving: 26 min. -- Annotation tools: the Note & Audio tools; hiding & saving annotations; image formats & saving options; saving layers. Great information on saving, especially that if you turn on the Enable Advanced TIFF Save Options under Preferences > Saving Files, then you can save a TIFF file with layers. See image to the left for a view of the Preferences dialog box.
Move & Transform

Program 2 -- Selections:
- Define Selections: 43 min. -- Introduction to selections; the Marquee tool: Rectangular & Elliptical; the Selection tools: Lasso, Polygon, Magnetic Lasso; Using selections to effect different layers; the Magic Wand tool; Contiguous & Discontiguous; inversing your selection; utilizing the Eye Dropper tool to expand & contract selection; the Fade command. Excellent discussion of options for the Eyedropper tool that influence how the Magic Wand works.
- Modify Selections: 35 min. -- Fine tuning your selections using options bar and menu bar commands; using the Grow & Similar commands; expanding & contracting selections; smoothing Magic Wand selections; Hue & saturation; the Add & Subtract from Selection commands; the Defringe command; the Feather command; the Trim command. Very succinct but thorough discussion of how to modify selections.
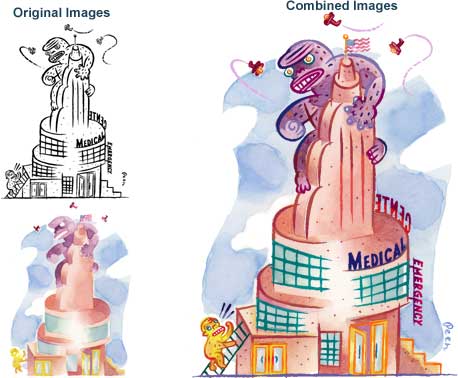
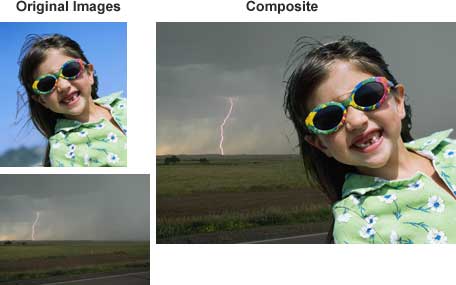
- Move & Transform: 24 min. -- The Transform command for scaling & distorting; transforming options; nudging from the keyboard; compositing images: Moving & Cloning; introduction to layer masks; creating a basic layer mask. This section walks you step by step through the process of creating a composite image using the Transform Command and other techniques. See to the left for a view of the starting images and the final composite.
Fill, Stroke, & Color
Painting & Brushes
Using the Rubber Stamp
Program 3 -- Paint, Color, & Retouch:
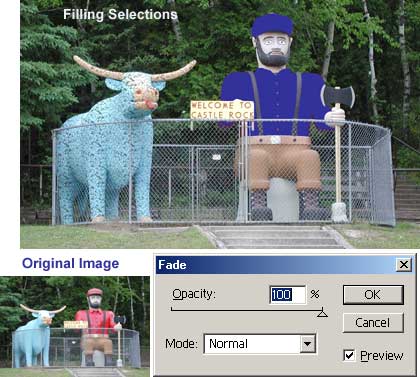
- Fill, Stroke, & Color: 28 min. -- Color theory in Photoshop: RGB & CMYK; defining foreground & background colors; using the Color palette; applying fills, blend modes & gradients; using the stroke option. Lots of tips on filling selections with patterns and color, plus how to use the Fade command to edit fills. I found this section really helpful. Using the Fade command to edit fill is great because it has a preview window which the Fill command doesn't have. You learn to fill with a pattern or with a color. See image to the left for a view of the starting image, ending image, and Fade dialog box. Babe is filled with a pattern, and Bunyan's shirt and hat have been filled with a color.
- Painting & Brushes: 37 min. -- The Airbrush tool; brush pressures and modes; brush options & custom palettes; working with the standard brush palettes; the Paintbrush tool; the Pencil tool; painting with a pressure sensitive tablet; the Paint Bucket tool; colorizing & shading. Important demonstration on using layers for your painting so that you can then apply blend modes, paint behind image, and use layer effects. See from image to the left for a view of starting image and ending image after it was painted.
- The Edit Tools: 26 min. -- Using the Edit tools: Blur, Sharpen, Smudge; working with the Dodge, Burn & Sponge tools; the Use All Layers option. Important discussion of how to sample and edit using pixel values from all visible layers by using the the Use All Layers option that is available for the Edit tools, Magic Wand, Paint Bucket, and other tools.
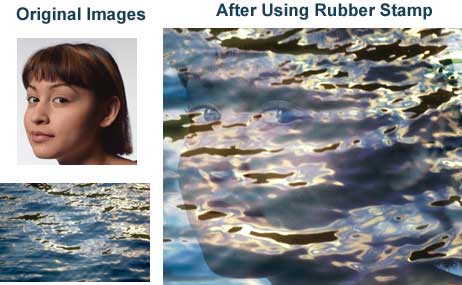
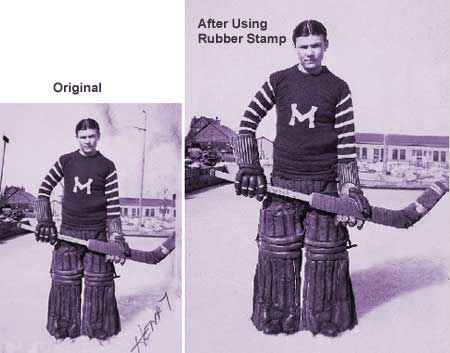
- Using the Rubber Stamp: 15 min. -- Using the Pattern & Clone Stamp tools; cloning across images; working with cloning options: the Aligned check box; the Dust & Scratches filter; retouching with the Clone Stamp tool. I especially liked this tutorial on the Rubber Stamp tool and the tip on the difference between having the Aligned option on or off. Also, it has a great tutorial on touching up old images. See hockey image to left for a view of how you can use the Rubber Stamp tool to retouch an old photo. Scratches in the background were removed, along with some other items, and the end of the hockey stick was reconstructed.
Working
with
Transparency
The Big Layer
Program 4 -- Working with Layers:
- Introducing Layers: 29 min. -- What is a layer; viewing layers; linking layers; the Background layer; fading a layer; creating floating layers & new layers from a selection; naming a layer; moving & arranging layers; activating a layer. Great information on using keyboard shortcuts, such as Shift [] to move layers up and down in Layers Palette or use Ctrl. Shift [] to move layers to top or bottom of Layers Palette.
- Working with Transparency: 35 min. -- What is a transparency; customizing your transparency background; modifying transparency opacity; duplicating layers; transparency masks; the Move & Scissors tools; coloring within a transparency mask; creating new background layers. This is a meaty section that you will need to take notes on and review a few times to take it all in. See Gorilla image to the left for an example of what you can accomplish working with transparency.
- Layer Hodgepodge for $500, Alex: 29 min. -- Transforming layers; linking layers for transforming multiple layers; perspective distortion on multiple layers; creating layer sets; merging layers; deleting multiple layers; transplanting linked layers into separate images. Includes numerous techniques on how to transform and apply blend or layer modes to multiple layers.
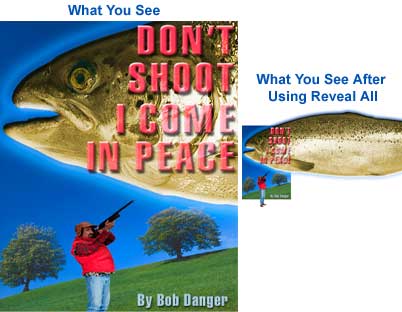
- The Big Layer: 12 min. -- Rasterizing type; the Reveal All command; the Image Crop command; the Delete & Hide buttons; cropping the Canvas Size. I had forgotten about the Hide option on the Crop command, and this section included an excellent tutorial on how to use it. See image to right for a view of a graphic where I used the Hide option to save a portion of the fish but not show it. If you use Image > Reveal All, you see the hidden part. This is an excellent option for projects when you need to have an image to show a client, but still have a graphic that you can edit easily.
Essential Photoshop delves deeper into Photoshop and is targeted toward the intermediate user. The second series (Programs 5-8) covers: Extract & Mask; Blend & Stylize; Shapes & Paths; and Create & Edit Type.
Series Two
Automatic Masking
Automatic Masking
Basic Masking

Real World Masking
Program 5 -- Extract & Mask:
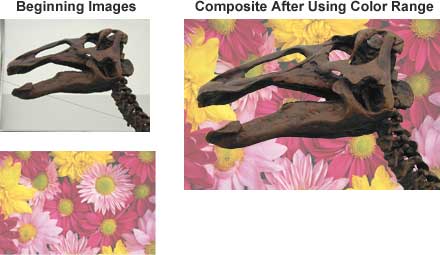
- Automatic Masking: 41 min. -- Introduction to the Color Range command; the Magic Wand tool vs. the Color Range command; the Color Range dialog box; inverting a color range mask; using Color Range for automatic masking; the Eraser Tools: Eraser, Magic Eraser, Background Eraser; the Background Eraser options; using the Extract command dialog box: tools & options. This section is very well done. Deke starts out with the basics and not only shows you how to use each of the tools, but when to use each tool for different types of images. See two images to the left for a view of starting and ending graphics; and the Color Range dialog box.
- Basic Masking: 35 min. -- Using the Quick Mask mode; saving a quick mask as a selection outline; saving selection outlines as masks; Alpha Channels; using multiple masks; saving images with masks; combining multiple masks to a single selection; editing masks; viewing images with a mask; loading a mask as a selection. In this section, Deke does a great job of simplifying masking and shows you how to use the Quick Mask mode along with other selection tools to create a mask. I especially liked the tutorial on combining multiple masks to a single selection. See image to the left for a view of the Channels palette showing the individual masks and then the combined mask. The green part was selected first and created into a mask; then the white under belly was made into a mask; finally the sky was selected to create a mask that could be deleted. The Altogether Now is the combined mask.
- Real World Masking: 31 min. -- Creating a mask from scratch; using RGB channels to create a mask; using the Dodge & Burn tools to edit your RGB channel mask; touching up a halo effect using blend modes & layers; layer masking; grouping & ungrouping layers; masking using clipping groups. Anyone interested in great techniques for creating a mask from scratch will appreciate this section with its step-by-step tutorial and will want to take notes as it is packed with information. The image to the left shows the starting graphics of the girl and sky and then the composite that was created using channels to create the masks. Deke also used the Dodge and Burn tools and a layer blend mode to finish the image.
Screen,
Multiply &
Blending Options
![]()
Screen,
Multiply &
Blending Options
![]()
Program 6 -- Blend & Stylize
- Blend Mode Overview: 21 min. -- Introduction to the blend modes: Normal, Multiply, Screen, Overlay, Hard Light, Soft Light, Color Dodge, Color Burn, Darken, Lighten, Difference, Exclusion, Luminosity, Color, Hue & Saturation. This section is an excellent demonstration of why these videos can be a better choice than a book on the subject. I have read the list of blends modes that you find in the Photoshop books, but I either get bored in the middle of the long list, get confused by too much information, or can't remember a thing I read an hour later. Well the video was perfect for learning the blend modes. Deke applies each of the modes to the same image and succinctly explains what each does and when to use each one. There was just enough information to get the point over and not confuse the viewer.
- Screen, Multiply & Blending Options: 41 min. -- Working with the Screen & Multiply blend modes; introduction to the Blending Options dialog box; using the Knockout & Fill Opacity options; applying blending options. This section was one of my favorites. It is full of ideas and walks you step-by-step through a tutorial where you produce the eye image to the left using blending modes, knockout, and fill opacity options. Deke gives you a tip on how to get rid of a background on a logo selection without masking. You just use the Levels option and the blend mode of multiple. The image to the left shows the logo graphic with the rough selection. The rough selection was copied and placed within the eye image; the multiple blend mode was applied, and the background is gone.
- Layer Effects: 53 min. -- History of the drop shadow; making drop shadows in Photoshop 6 using Layer Styles dialog box; using Layer Effects: Drop Shadows, Inner Shadows, Glows, Bevel & Emboss, Satin, Overlay; creating a layer style. Deke covers the Layers Styles dialog box and has tips on how you can apply multiple styles to get interesting effects.
Vector Masks
Program 7 -- Shapes & Paths:
- Vector-Based Shapes: 35 min. -- Overview of the Shape tools; what is a vector-based shape; the Change Layer Content command: Dynamic Fills option; shape layers; clipping paths; deleting shapes; the Shape options bar: layers style; loading a style library from disk; Shape tool options: Rectangular, Elliptical, Rounded Rectangle, Circle, Polygon, Line, & Custom. This is a nice overview of vector tools and their options.
- Create & Edit Custom Shapes: 36 min. -- Using the Custom Shape tool; applying blend modes & layer styles to your custom shape; the Shapes option bar: creating more than one shape, adding to the existing shape layer, shape intersection options; transforming a custom shape; the Show Bounding Box option; the Define Custom Shape command; how layer styles update; saving vector shapes; rasterizing & flattening vector shapes; scaling layer effects. It can get tricky working with vector shapes because your options change depending on whether the clipping path is active or not. Deke clearly explains the different options.
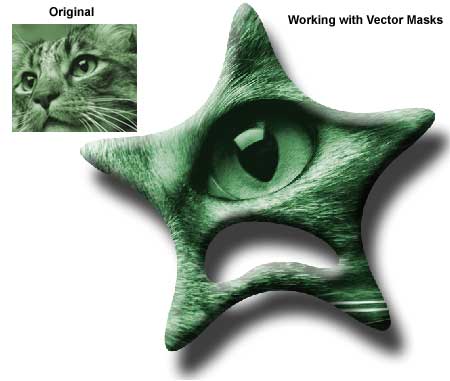
- Vector Masks: 34 min. -- Creating vector masks; the Selection tools: White Arrow & Black Arrow; the Rasterize Fill Content command; masking an image with a shape; creating a new work path; clipping image to a work path; the Pen tool; transferring a clipping path to other applications; naming a work path; Clipping Path dialog box; saving a clipping path. This was another fun section filled with information. See cat image to the left for a sample of using vector masks.
Excellent
Type Effects

Excellent
Type Effects
Program 8 -- Create & Edit Type:
- Fun with Vector Type: 44 min. -- What is vector type; the Text tool; transforming type; masking type; the Add a Mask button; editing type; adding a new text layer; formatting type; Point text; Paragraph text; navigating the text bounding box; the Text options bar: text layer, create a mask, horizontal, vertical; rotating type. Deke explains the basics about working with vector type and gives you an excellent tip on using a layer mask so you can paint inside the type without rasterizing it.
- Formatting Attributes: 27 min. -- The Text tool options bar: font options; True Type vs. Postscript Type; ATM; the Text tool options bar: font style, font size, anti-aliasing; docking palettes in the options bar; the Character palette: fractional widths, type size, leading, kerning, tracking, vertical scale, baseline shift, color, faux bold, faux italic; the Paragraph palette; alignment& justification. This section is loaded with information. Good tip on how to make your small web text look better by changing the spacing. You just turn off the Fractional width option in the Character palette and turn off anti-aliasing.
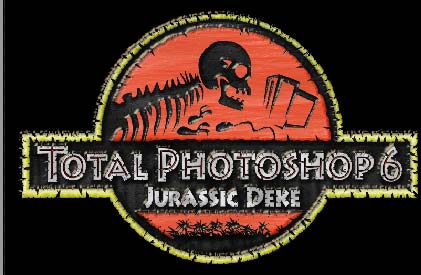
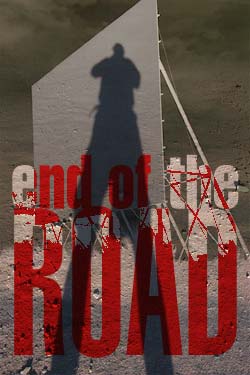
- Excellent Type Effects: 36 min. -- The Text options bar: Create Warp Text button; the Warp Text palette; applying a gradient map to text; tips on removing anti-aliasing artifacts from text; adding a drop shadow to text; example of using layer effects to create a 3D look. Includes helpful tips on how to remove anti-alias or jagged edges from effects by using the Create Layers option to put effects on separate layers. See chrome image to the left for a view of type effects. And see Jurassic Park image to see how you can create mock 3D effects with using vector type, layer masks, layer effects, and clipping groups.
Photoshop at it's Best, the third and advanced series (Programs 9-12), covers: Correcting Colors; Adjustment Layers & Corrective Filters; Distortions & Custom Effects; and History, Actions, & Color Management.
Series Three
Color Manipulations

Red-eye & Levels
Program 9-- Correcting Colors:
- Color Manipulations: 56 min. -- Introduction & critique of the Adjust commands: Equalize, Posterize, Brightness & Contrast, Levels; the Variations command dialog box; removing color cast & improving brightness & saturation using Variations; the Hue & Saturation command dialog box; adjusting selected portions of an image using Hue & Saturation; solving compression artifacts; colorizing a grayscale image using Hue & Saturation. Deke tells you what are the best manipulation tools to use and goes into depth on the two that he thinks are good: Variations and Hue & Saturation. He gives you a great tip for just using the Hue & Saturation dialog box to change a color. See image to the left for view of the Hue & Saturation dialog box.
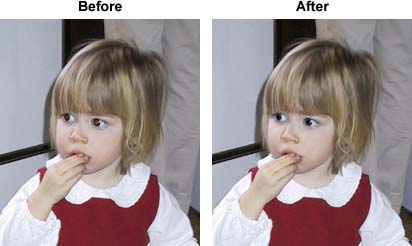
- Red-eye & Levels: 59 min. -- Eliminating red-eye using the Channel Mixer command; Auto Levels, & Auto Contrast; the Levels command dialog box. Photoshop doesn't have an automatic red-eye adjust, but Deke shows you how easy it is to use the Channel Mixer command to get rid of red-eye. See image to the left for an example of how you can reduce red eye using the Channel Mixer command with some manual touchup with the Paint Brush tool.
- Curves: 23 min. -- When to use Curves instead of Levels; the Curves command dialog box; setting preference for automatically adding an extension to file name when saving (Mac only); color correction using layers & the Color blend mode. I especially liked the color correction technique that he shows you in this section. You combine two images and then use the Color blend mode.
Adjustment Layers
Program 10 -- Adjustment Layers & Corrective Filters:
- Adjustment Layers: 21 min. -- What are adjustment layers; setting preferences for saving adjustment layers; the Change Layer Content command; constraining adjustment layers to sets & individual layers; Create New Fill or Adjustment Layer button; converting text to shapes. You can get very interesting results using adjustment layers that you couldn't get just using color correction methods. See image to left for an example using adjustment layers.
- Introducing Filters: 23 min. -- What is a filter; filter plug-ins; pluses & minuses of dialog boxes: Gaussian Blur filter dialog box, Pinch filter dialog box, Extrude filter dialog box; modifying filters with blend modes & commands; the float & filter technique; reapplying filters. Deke shows you which filter dialog boxes give you great control and which don't. The float and filter technique is a useful tip.
- The Sharper Image: 22 min. -- The Sharpen filters: Sharpen, Sharpen Edges, Sharpen More, & Unsharp Mask; the Unsharp Mask dialog box: amount, radius, threshold; practical application of Unsharp Mask. This section is very useful. Deke shows you what each Sharpen filter does and then goes into depth on the one he prefers: the Unsharp Mask and explains each option in the dialog box.
- Blurring & Averaging: 44 min. -- The Blur filters: Blur, Blur More, Gaussian, Motion, Radial, Smart; the Gaussian Blur dialog box; the Motion Blur dialog box; the Radial Blur dialog box; practical applications of Gaussian Blur; the Dust & Scratches filter; the Median filter; combining filters to sharpen a JPEG artifacted image; the Minimum filter dialog box; the Maximum filter dialog box; edge masking: creating a better threshold through masking; Find Edges filter. Great detail on applying the Gaussian Blur filter to channels to get rid of JPEG artifacts.
Fun with Distortions
Synthetic Effects

Displacement Map

Program 11 -- Distortions & Custom Effects:
- Fun with distortions: 28 min. -- The Distort filters: Pinch, Spherize, Twirl, Zigzag, Ripple, Glass, Ocean Ripple, Wave; combining filters; the Shear filter; the Polar Coordinates filter. Deke demonstrates how you can use the Distort filters to turn natural images into unique effects that can be perfect for backgrounds. See image to the left for a view of textures created with the Distort filters.
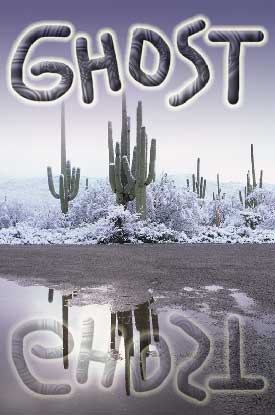
- Synthetic Effects: 21 min. -- Creating textures & backgrounds with filters; the Add Noise filter; the Emboss filter; using Hue & Saturation to colorize filter effects; the Clouds filter; effects of Foreground & Background colors on the Clouds filter; the Difference Clouds filter; applying combinations of filters. This is a fun section where you learn to create functional paper textures to outrageous backgrounds. See image to the left for a view of four textures you create following the tutorials.
- Liquify & Displace: 29 min. -- Liquefy dialog box tools: Warp, Twirl Clockwise, Pucker, Sherize, Bloat, Shift Pixels, Reflection, Reconstruction, Freeze, Thaw; the float & filter technique; the Displace filter; what is a displacement map; the Displace filter dialog box; creating a displacement map; the Gradient tool; the Gradient Editor dialog box; the Gradient tool option bar; Dither; saving a displacement map; applying a displacement map. This is a fun section where you use the Liquefy tools to create outrageous effects. The tutorial on displacements maps is excellent. See the woman image to the left for an example of using a displacement map.
- Lighting FX & More: 35 min. -- Combining displacement maps with the Lighting Effects filter; the Bump map; Raise & light letters: Displace filter, Lighting filter; the Lighting filter dialog box: Soft Spotlight mode, texture channel; the Crystallize filter; the Stained Glass filter; the Custom filter; effects of custom filters; creating your own custom filter. Deke gives you an in-depth look at the Displace filter and the Custom filter. Excellent tutorial on using the Custom filter.
A Lesson in History
The History Brush

Program 12 -- History, Actions, & Color Management:
- A Lesson in History: 35 min. -- What is the History palette; changing preferences for the Redo key; changing the number of history states tracked; History palette snapshots; History palette options; Non-Linear history; RAM & the History palette; saving a state. Deke explains the relevant options in the History palette and goes into detail on two useful options, Allow Non-linear History, and Automatically Create New Snapshot When Saving. See image to the left for a view of the History options.
- The History Brush: 36 min. -- The History Brush options; using the History brush; the Art History brush; the Fill From History command. This is another fun section where you learn to use the History brush and the Art History brush. The image on the left was created using the History Brush.
- Actions: 20 min. -- What is the Actions palette; default actions; assigning keys to actions; creating new actions; recording action sets; Button mode; the Chrome action. Deke shows you how to create new actions. There are also actions on the CD that you can load and use.
- Color Management: 20 min. -- Color theory overview: RGB vs. CMYK; characterizing your monitor; setting the gamma; the Color Setting command. Important information on how to set your Color settings.
Requirements for Adobe Photoshop 6:
Windows
- Pentium or faster Intel processor;
- Windows 98, Windows Millennium, Windows 2000 or Windows NT 4.01;
- 64 MB of RAM (128 MB required to run Photoshop and ImageReady concurrently);
- 125 MB of available hard-disk space;
- Color monitor with 256 color (8-bit) or greater video card;
- 800x600 or greater monitor resolution;
- CD-ROM drive.
Macintosh
- PowerPC processor;
- Mac OS software version 8.5, 8.6, or 9.0;
- 64 MB of RAM w/Virtual Memory on (128 MB required to run Photoshop and ImageReady);
- 125 MB of available hard-disk space;
- Color monitor with 256 color (8-bit) or greater video card;
- 800x600 or greater monitor resolution;
- CD-ROM drive.
Web Page Design: Macromedia Dreamweaver 4.0
| Educational | Books | Utilities | Web Tools | Legal | Articles