| |
 Installation,
Manual, & Help: As with the previous version, Installation
is easy and quick. There are two manuals: (1) a 465 page User Guide
that is the same as the one shipped with Adobe InDesign 1.0; and (2)
a 79 page User Guide Supplement just on the new version. The three tutorials
excerpted from the Adobe InDesign Classroom in a Book that were on the
CD for the previous version are now on the Adobe Web site instead, but
there is still the instructional tour, in Chapter 1 of the User Guide,
with step-by-step instructions and explanations of features and tools.
Adobe also provides a Quick Reference Card with all the shortcuts and
palettes that you can keep by your computer for reference. As usual,
Adobe includes a variety of other goodies on their CDs, and with InDesign
1.5, a demonstration version of a script called Build Booklet is available,
along with a Script Guide that explains how to create scripts using
Visual Basic. Installation,
Manual, & Help: As with the previous version, Installation
is easy and quick. There are two manuals: (1) a 465 page User Guide
that is the same as the one shipped with Adobe InDesign 1.0; and (2)
a 79 page User Guide Supplement just on the new version. The three tutorials
excerpted from the Adobe InDesign Classroom in a Book that were on the
CD for the previous version are now on the Adobe Web site instead, but
there is still the instructional tour, in Chapter 1 of the User Guide,
with step-by-step instructions and explanations of features and tools.
Adobe also provides a Quick Reference Card with all the shortcuts and
palettes that you can keep by your computer for reference. As usual,
Adobe includes a variety of other goodies on their CDs, and with InDesign
1.5, a demonstration version of a script called Build Booklet is available,
along with a Script Guide that explains how to create scripts using
Visual Basic.
Benefits: The new features and
enhancements in InDesign 1.5 offer four significant benefits:
I. Tight Integration Among Adobe Products
Integrated Adobe Design Environment:
Adobe InDesign 1.5 is integrated tightly with Adobe Photoshop and Adobe
Illustrator.
- Illustrator and InDesign now share similar pencil, smooth, erase,
and eyedropper tools. Illustrator and Photoshop both have a free transform
tool like the one in InDesign 1.5.
- InDesign now offers dockable palettes like those in Photoshop and
Illustrator. Plus, you can make palette lists more compact to display
more, just as you can in Illustrator.
- The new text-on-a-path feature is related to what you can do in
Illustrator. And the ability to draw shapes from a center point works
similarly in both Photoshop and Illustrator.
- InDesign now supports drag-and-drop color, so you can apply colors
to objects just by dragging them from the Swatches or Color palette
and dropping them on the fill or stroke of an object. Illustrator
uses a similar approach to color applications. In addition, the InDesign
Swatches palette can display colors in large or small swatches or
in a named list--again, just like Illustrator.
- The transformation dialog boxes in InDesign work like their counterparts
in Illustrator.
- InDesign supports alpha channels and paths in imported Photoshop
files.
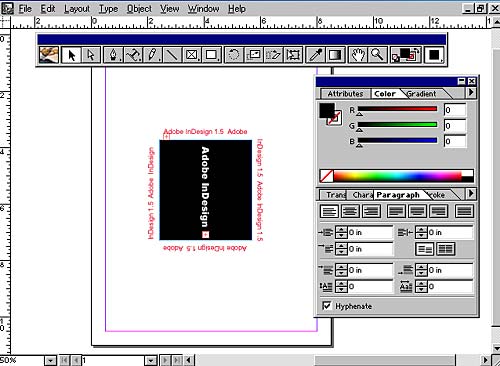
Interface: Adobe has used the same
basic interface in this version as was found in InDesign 1.0, but has
included new features that enhance the work area and make it easier
for you to set up 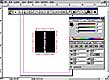 documents
and work with pages. You can now change the overall layout of the toolbox
to fit your needs. The toolbox can be set to two vertical columns (typical);
a single vertical column, or as one horizontal row. The amount of time
before a tool tip displays can now be set. In addition, the palettes
in InDesign 1.5 are now dockable. You can connect them together and
then move, hide, or display them as a unit. Rows in palettes can be
compacted to save space. There is a new pop-up menu that makes it easier
to go to a specific page. The direct-selection tool has been enhanced
so you now can select segments and multiple points on a path, as well
as subpaths on compound paths. With the new grid and ruler options,
you can specify different values for horizontal and vertical grid spacing,
and you can position the document and baseline grids in front of or
behind page objects. It is also possible to set the horizontal ruler
origin (zero point) in relation to each spread, each page, or each spread
at its spine. In the interface image to the left, I changed the toolbox
to a single horizontal row and connected palettes: Attributes, Color,
Gradient, Transform, Character, Paragraph, and Stroke together to save
space. documents
and work with pages. You can now change the overall layout of the toolbox
to fit your needs. The toolbox can be set to two vertical columns (typical);
a single vertical column, or as one horizontal row. The amount of time
before a tool tip displays can now be set. In addition, the palettes
in InDesign 1.5 are now dockable. You can connect them together and
then move, hide, or display them as a unit. Rows in palettes can be
compacted to save space. There is a new pop-up menu that makes it easier
to go to a specific page. The direct-selection tool has been enhanced
so you now can select segments and multiple points on a path, as well
as subpaths on compound paths. With the new grid and ruler options,
you can specify different values for horizontal and vertical grid spacing,
and you can position the document and baseline grids in front of or
behind page objects. It is also possible to set the horizontal ruler
origin (zero point) in relation to each spread, each page, or each spread
at its spine. In the interface image to the left, I changed the toolbox
to a single horizontal row and connected palettes: Attributes, Color,
Gradient, Transform, Character, Paragraph, and Stroke together to save
space.
II. New Creative Options
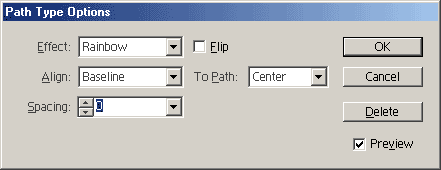
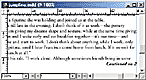
Text on a Path: Now you can add
flair to your pages by inserting text along an InDesign path, whether
open or closed. You can apply settings that modify the relationship
between the text and  path.
Using sliding indicators, you can manipulate starting and ending points
for the text, path.
Using sliding indicators, you can manipulate starting and ending points
for the text, 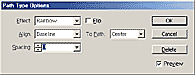 which
is handy if you want to indent the text from either end of the path.
You can set how the text aligns vertically with the path, flip the text
across a path, apply a distortion effect, or specify leading, kerning,
tracking, and other typographical controls (see image to the left for
view of dialog box). Plus, you can choose whether the text's baseline,
ascender, descender, or center is aligned to the path (see image to
the right for examples). Path type has an in port and an out port just
like other text frames, so you can thread text to and from it. Also,
InDesign 1.5 introduces the following new formatting options for creating
special effects with path text: which
is handy if you want to indent the text from either end of the path.
You can set how the text aligns vertically with the path, flip the text
across a path, apply a distortion effect, or specify leading, kerning,
tracking, and other typographical controls (see image to the left for
view of dialog box). Plus, you can choose whether the text's baseline,
ascender, descender, or center is aligned to the path (see image to
the right for examples). Path type has an in port and an out port just
like other text frames, so you can thread text to and from it. Also,
InDesign 1.5 introduces the following new formatting options for creating
special effects with path text:
- Rainbow Effect--it rotates each
character so that its center is tangential to the path and creates
a natural-looking effect.
- Skew Effect--it adjusts each
character's horizontal edge to follow the path without changing
 the
vertical edges and creates an effect that could suggest a wave or
a cylinder. the
vertical edges and creates an effect that could suggest a wave or
a cylinder.
- Stair Step Effect--it keeps
the left edge of each character on the path without rotating the character
and creates a stepped effect.
- 3D Ribbon Effect--it maintains
each character's horizontal edge while rotating its vertical edge
perpendicular to the path and creates a splayed effect.
- Gravity Effect--it keeps the
center of each character on the path while shifting each vertical
axis to align with the path's center point.
Drawing Tools and Options: InDesign
1.5 has new drawing tools and new features for existing tools. The new
drawing tools--pencil, smooth, and erase--work much like the ones in
Illustrator. The pencil tool lets you draw open and closed paths as
if you were drawing with a pencil on paper. It's handy for fast sketching
or creating a hand-drawn look. The smooth tool allows you to remove
 unwanted
bumps from an existing path or section of a path or smooth a path. It
retains the original shape of the path as much as possible, and you
have fewer points, which can make images easier to edit, display, and
print. The erase tool lets you remove a portion of an exiting path or
stroke and can be used on paths but not on text. You can set options
for the pencil and smooth tools, which control how sensitive these tools
are to the movement of a mouse or a stylus for a graphics tablet. New
drawing options allow you to draw shapes from the center out with the
rectangle, ellipse, polygon, and line tools. Plus, by pressing the spacebar
as you draw an element, you can move it at the same time. See image
to the left for examples of the new drawing tools. unwanted
bumps from an existing path or section of a path or smooth a path. It
retains the original shape of the path as much as possible, and you
have fewer points, which can make images easier to edit, display, and
print. The erase tool lets you remove a portion of an exiting path or
stroke and can be used on paths but not on text. You can set options
for the pencil and smooth tools, which control how sensitive these tools
are to the movement of a mouse or a stylus for a graphics tablet. New
drawing options allow you to draw shapes from the center out with the
rectangle, ellipse, polygon, and line tools. Plus, by pressing the spacebar
as you draw an element, you can move it at the same time. See image
to the left for examples of the new drawing tools.
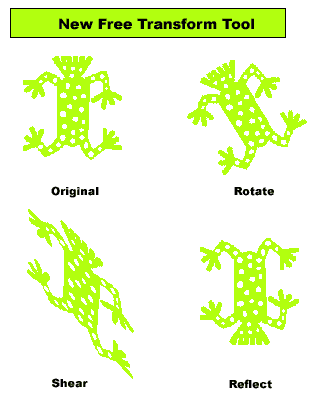
New Free Transform Tool and Dialog Boxes:
This new tool, similar to the one in Photoshop and Illustrator, allows
you to make multiple changes to an object with one tool. You can use
the 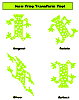 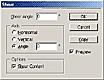 new
tool to rotate, scale, shear, and move selected objects with a single
action (see image to right for examples). InDesign is unique in desktop
page layout programs in that you can shear multiple objects together,
including text and graphics. The new transform dialog boxes enable you
to transform objects precisely by entering numeric values for many operations
(see image to left for example of Shear dialog box). new
tool to rotate, scale, shear, and move selected objects with a single
action (see image to right for examples). InDesign is unique in desktop
page layout programs in that you can shear multiple objects together,
including text and graphics. The new transform dialog boxes enable you
to transform objects precisely by entering numeric values for many operations
(see image to left for example of Shear dialog box).
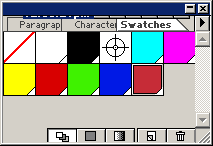
Improved Color Handling: The new
version of InDesign provides a number of enhancements that make it easier
to work with colors. You can control how the colors in the swatches
palette appear by choosing whether to display large swatches, small
swatches, or tiny swatches and the color 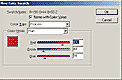 name
(see image to right for example of large swatches palette). If you display
the color names, you can choose to display small palette rows, so you
can see more colors in the same amount of palette space. Plus, the palette
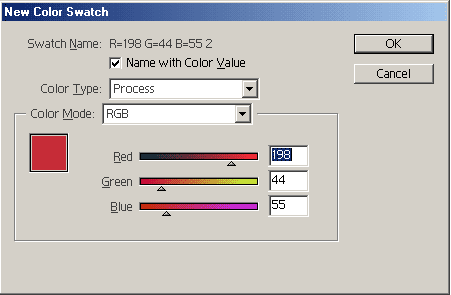
now includes standard RGB and CMYK colors by default, giving you more
options for applying color quickly. InDesign 1.5 color names provide
more useful information as well. When you create a new color, its name
(see image to right for example of large swatches palette). If you display
the color names, you can choose to display small palette rows, so you
can see more colors in the same amount of palette space. Plus, the palette
now includes standard RGB and CMYK colors by default, giving you more
options for applying color quickly. InDesign 1.5 color names provide
more useful information as well. When you create a new color, its 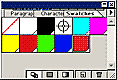 default
name is made up of the LAB, CMYK, or RGB color components used to define
it (see image to left for New Color Swatch dialog box). If you edit
the color--say, increasing the amount of yellow in a CMYK color--the
color's name is automatically updated to reflect the change. You can
always assign your own names to colors instead. And there are other
enhancements. Imported spot colors can be edited, so it's easy to convert
them to process. You can drag and drop color swatches anywhere, making
it easier to apply colors as you work in a document. You can create
new colors as you define or edit character and paragraph styles simply
by double-clicking the swatch icon on the character color panel, and
you can now apply tints to paragraph rules. The gradient tool now applies
the last-used gradient by default, and a new reverse gradient button
makes it easy to invert a gradient that's been applied to an object
or objects. default
name is made up of the LAB, CMYK, or RGB color components used to define
it (see image to left for New Color Swatch dialog box). If you edit
the color--say, increasing the amount of yellow in a CMYK color--the
color's name is automatically updated to reflect the change. You can
always assign your own names to colors instead. And there are other
enhancements. Imported spot colors can be edited, so it's easy to convert
them to process. You can drag and drop color swatches anywhere, making
it easier to apply colors as you work in a document. You can create
new colors as you define or edit character and paragraph styles simply
by double-clicking the swatch icon on the character color panel, and
you can now apply tints to paragraph rules. The gradient tool now applies
the last-used gradient by default, and a new reverse gradient button
makes it easy to invert a gradient that's been applied to an object
or objects.
Enhanced Text Wrap: You can now
automatically set text wrap boundaries for any imported  graphic
that has a preview proxy, including EPS and PDF files. To create a text
wrap boundary, InDesign looks first for an embedded path, such as a
clipping path. If that's not available, then it looks for an alpha channel.
If neither is available, it uses automatic edge detection to define
a path for the wrap. You can also specify which method InDesign uses,
and even specify which embedded path or alpha channel to use, if more
than one is available. This feature expands the range of graphics you
can quickly incorporate into layouts with complex text wraps. See image
to right for examples of text wrap and the dialog box. graphic
that has a preview proxy, including EPS and PDF files. To create a text
wrap boundary, InDesign looks first for an embedded path, such as a
clipping path. If that's not available, then it looks for an alpha channel.
If neither is available, it uses automatic edge detection to define
a path for the wrap. You can also specify which method InDesign uses,
and even specify which embedded path or alpha channel to use, if more
than one is available. This feature expands the range of graphics you
can quickly incorporate into layouts with complex text wraps. See image
to right for examples of text wrap and the dialog box.
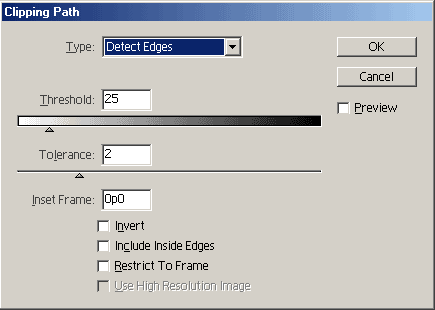
Clipping Paths: With InDesign 1.5,
you have a range of options for generating clipping paths. You  can
perform automatic edge detection on imported graphics that don't have
a clipping path or alpha channel stored with them. Or, you can use the
path or alpha channel in imported graphics to define the mask. When
a graphic contains multiple alpha channels or paths, you can choose
which one to use as a clipping path. Alpha channels tend to produce
the highest quality masks, though automatic edge detection can also
produce good results. See image to left for clipping path dialog box. can
perform automatic edge detection on imported graphics that don't have
a clipping path or alpha channel stored with them. Or, you can use the
path or alpha channel in imported graphics to define the mask. When
a graphic contains multiple alpha channels or paths, you can choose
which one to use as a clipping path. Alpha channels tend to produce
the highest quality masks, though automatic edge detection can also
produce good results. See image to left for clipping path dialog box.
III. Productivity Tools
Eye Dropper Tool: The eyedropper
tool is for sampling attributes and quickly applying them to other selected
objects. You can copy the character, paragraph, fill, and stroke attributes
assigned to different text, as well as the fill and stroke of drawn
objects. You can even sample colors in imported graphics and then save
those colors as swatches for ongoing use. This is a must have tool.
It is easy to use and a time-saver.
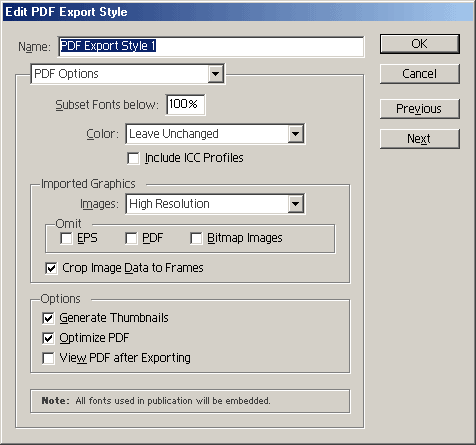
Print and PDF Export Styles: You
can easily automate printed and PDF output jobs by saving all output
settings as either a printer or PDF export style. Using output styles,
similar to using character  and
paragraph styles, is a fast, reliable way to apply settings consistently
to jobs that require accurate settings for many options in the print
or export PDF dialog boxes. You can export and import output styles,
making it easy to back them up or to make them available to your service
providers, clients, or others in your workgroup. See image to left for
example of dialog box for PDF export styles. and
paragraph styles, is a fast, reliable way to apply settings consistently
to jobs that require accurate settings for many options in the print
or export PDF dialog boxes. You can export and import output styles,
making it easy to back them up or to make them available to your service
providers, clients, or others in your workgroup. See image to left for
example of dialog box for PDF export styles.
Expanded Scripting Support: One
of the most powerful features in Adobe InDesign is its strong scripting
support. A script is a series of commands that tell InDesign to do something,
such as find and replace images or run through a list of final production
tasks. It can be simple, affecting only a single selected object in
an open document, or complex, affecting multiple objects in a batch
of documents stored in a folder. It can even invoke other programs that
also support scripting. Scripts work quickly and efficiently because
they interact directly with the program, rather than working through
the program's interface (as macros do.). And they can automate a wide
variety of tasks you want to perform. InDesign 1.5 expands the scripting
support introduced in version 1.0. Now you can write scripts that automate
PDF preparation and export. You could, for example, use a script to
turn dozens of inDesign documents in a folder into PDFs using a particular
combination of PDF settings. InDesign supports two widely used scripting
languages--AppleScript for scripting on the Mac OS and Microsoft Visual
Basic or Visual Basic for Applications (VBA) for scripting in Windows--so
you can write scripts for either platform. The InDesign Scripting Guide,
which is included on the InDesign CD, covers the InDesign scripting
interface in detail.
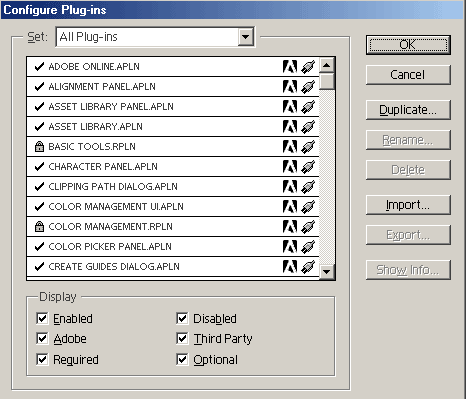
Configure Plug-ins Command: InDesign's
standard feature set is actually a collection of plug-ins, or modular
software components, connected to a small core application. This modular
architecture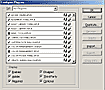 makes it easy to add or remove features. With this new version of the
program, there is a Configure Plug-in command to help you manage the
plug-ins. You can: (1) create custom plug-in sets for different tasks
or workgroups; (2) get detailed information about installed plug-ins;
(3) isolate plug-ins when troubleshooting problems; (4) decrease InDesign's
use of system resources by turning off plug-ins you don't use every
day; (5) and organize plug-ins from third-party manufactures. See image
to right for example of Configure Plug-ins dialog box.
makes it easy to add or remove features. With this new version of the
program, there is a Configure Plug-in command to help you manage the
plug-ins. You can: (1) create custom plug-in sets for different tasks
or workgroups; (2) get detailed information about installed plug-ins;
(3) isolate plug-ins when troubleshooting problems; (4) decrease InDesign's
use of system resources by turning off plug-ins you don't use every
day; (5) and organize plug-ins from third-party manufactures. See image
to right for example of Configure Plug-ins dialog box.
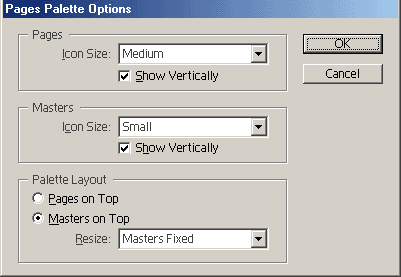
Binding Spine and Other Page-Handling Improvements:
The Pages palette presents a number of improvements to help you view
and manage large documents. The palette now displays the binding spine
for each spread, so you can see at a glance where it falls in a complex
layout. You can then set the ruler origin at the binding spine to more
easily manage how objects relate to the spine.  In
addition, you can customize how the Pages palette displays page icons.
A new palette options dialog box lets you choose from four different
icon sizes, and for maximum flexibility you can specify icon sizes for
pages and masters independently. You can also choose whether the masters
section or the pages section appears at the top of the palette, as well
as how the masters and pages sections of the palette act when the palette
is resized: you can fix the size of either section, or both can be resized
proportionally. There are also new options for working with masters.
Master prefixes can now include up to 4 characters, giving you more
choices when naming them. In addition to applying local overrides to
master elements that appear on regular pages, you can now detach the
object from the master altogether. That way, you can prevent the object
on the local page from being affected by the changes you make to the
master page. See image to left for example of Pages Palette Options
dialog box. In
addition, you can customize how the Pages palette displays page icons.
A new palette options dialog box lets you choose from four different
icon sizes, and for maximum flexibility you can specify icon sizes for
pages and masters independently. You can also choose whether the masters
section or the pages section appears at the top of the palette, as well
as how the masters and pages sections of the palette act when the palette
is resized: you can fix the size of either section, or both can be resized
proportionally. There are also new options for working with masters.
Master prefixes can now include up to 4 characters, giving you more
choices when naming them. In addition to applying local overrides to
master elements that appear on regular pages, you can now detach the
object from the master altogether. That way, you can prevent the object
on the local page from being affected by the changes you make to the
master page. See image to left for example of Pages Palette Options
dialog box.
New Editorial Features: The program
has a variety of new features that help you plan for and work with text
more efficiently:
- Specify column, frame, or page breaks by
inserting a special character--this character gives you
significantly more control over how threaded text flow from frame
to frame.
- Automatically create jump lines--you
can automatically maintain the jump line of stories that
 continue from or to other pages. For example, you could include a
line that says "Continued on page 12." When you create jump
lines, you're actually inserting a jump line page number that updates
to reflect changes to where the story is jumping to and where it's
jumping from.
continue from or to other pages. For example, you could include a
line that says "Continued on page 12." When you create jump
lines, you're actually inserting a jump line page number that updates
to reflect changes to where the story is jumping to and where it's
jumping from.
- Work with new, easier to use tab options--the
program streamlines how you add certain types of tabs. You can, for
example, position a right-aligned tab exactly on the right indent
in one quick step.
- Fill threaded text frames with placeholder
text to rough out a layout--in the earliest stages of layout
development, you can get an immediate sense of how a spread will look
by choosing a single command that fills threaded text frames with
placeholder text. This makes it easy for designers to work on layout
possibilities while a story's content is being developed.
- Quickly copyfit text by using keyboard
shortcuts to increase or decrease work space kerning--you
can now select a single line of text with a new keyboard shortcut,
and then tighten or loosen the word spacing of the selected text with
new shortcuts that apply kerning only to the spaces preceding each
word in the selected text.
- Instantly change the case of selected text
without retyping it--this case change command is great
for changing the case of selected text without retyping it. It only
works with 1-byte Roman text, though.
- Select a single line of text for quick
copyfitting or to fix local spacing problems--This new
option makes it possible to shrink or expand selected text to fit
a given space, without affecting the legibility of individual words.
Streamlined Production Features:
Numerous enhancements across the product save you time and help you
work more efficiently. For example, you can apply new built-in line
styles made up of combinations of thin and thick lines; the patterns
scale as you change the line weight. There's a new option for replacing
the content of a selected frame when you place a new object, and dozens
of new keyboard shortcuts, including ones for pasting a copy of an object
to the same location and scaling an object incrementally.
IV. Precision and Control Tools
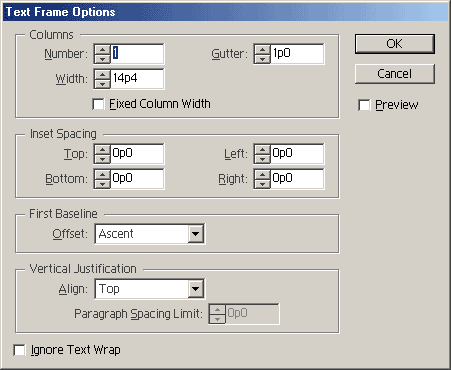
Vertical Text Justification: InDesign
offers new options for vertically justifying or aligning the lines of
text in a frame. When you justify text vertically, InDesign evenly spaces
the lines of text regardless of leading and paragraph spacing values
(vertical justification is only available for  rectangular
text frames). This option works well for instantly arranging a pull
quote, or for fitting text to a fixed space. When you align text vertically,
you can choose whether InDesign aligns to the top, center, or bottom
of the frame--but it always maintains the paragraph's leading and spacing
values. Vertical alignment helps keep text consistent from column to
column or frame to frame. See image to left for example of Text Frame
Options. rectangular
text frames). This option works well for instantly arranging a pull
quote, or for fitting text to a fixed space. When you align text vertically,
you can choose whether InDesign aligns to the top, center, or bottom
of the frame--but it always maintains the paragraph's leading and spacing
values. Vertical alignment helps keep text consistent from column to
column or frame to frame. See image to left for example of Text Frame
Options.
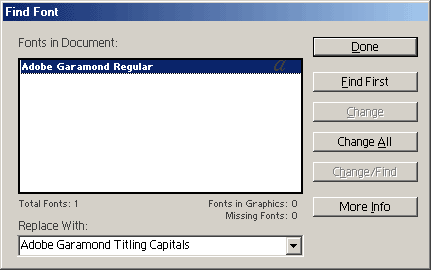
Font Management: InDesign 1.0 helped
you manage fonts with its built-in preflighting and packaging controls,
but version 1.5 now adds the next level of support with the Find Font
command, which creates a list of all of the fonts in your file and even
saves that list as a separate text file, which you can hand off to your
provider. With the Find Font command, you can identify all of  the
fonts used in a document, even in placed EPS and PDF files. Plus, you
can search for fonts by name and replace fonts in the layout (though
not in imported graphics). You can also jump to the precise location
of a font. If a font is used only in the actual layout, it's listed
once in the dialog box. However, if a font appears in imported graphics,
it's listed for each graphic. See graphic on right for view of Find
Font dialog box. the
fonts used in a document, even in placed EPS and PDF files. Plus, you
can search for fonts by name and replace fonts in the layout (though
not in imported graphics). You can also jump to the precise location
of a font. If a font is used only in the actual layout, it's listed
once in the dialog box. However, if a font appears in imported graphics,
it's listed for each graphic. See graphic on right for view of Find
Font dialog box.
New Object Distribution Options:
With InDesign 1.5, the distribution options available in the Align palette
have been expanded. You can now insert equal space between the facing
edges of selected objects to distribute them within the boundaries of
a selection. In addition, you can specify a numerical value, which inserts
consistent spacing between objects and even expands the boundaries of
the selection, as necessary.
Built-in Trapping: The program
delivers a new built-in trapping engine for trapping text, InDesign-draw
objects, and imported bitmaps on the host computer. This trapping engine
is based on the 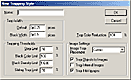 same
Adobe PostScript 3 technology that Adobe in-RIP trapping provides licensed
PostScript 3 imagesetters. These new capabilities supplement the in-RIP
trapping support available in version 1.0 and ensure that you can use
the hightest-quality trapping technology to print traps to any PostScript
Level 2 and higher RIP. When you select the new Application Built-in
option, InDesign automatically traps abutting colors throughout your
document, even those in imported bitmaps. Each color intersection is
evaluated to determine the neutral densities of the adjacent colors.
You can specify neutral density values that correspond to those of the
inks you use. You can also define page zones to specify the areas of
the document that you want to trap. Then, InDesign uses these parameters
to create the trap. When an object overlaps different background colors,
InDesign considers each overlap separately in order to achieve optimal
results. See image to left for dialog box. same
Adobe PostScript 3 technology that Adobe in-RIP trapping provides licensed
PostScript 3 imagesetters. These new capabilities supplement the in-RIP
trapping support available in version 1.0 and ensure that you can use
the hightest-quality trapping technology to print traps to any PostScript
Level 2 and higher RIP. When you select the new Application Built-in
option, InDesign automatically traps abutting colors throughout your
document, even those in imported bitmaps. Each color intersection is
evaluated to determine the neutral densities of the adjacent colors.
You can specify neutral density values that correspond to those of the
inks you use. You can also define page zones to specify the areas of
the document that you want to trap. Then, InDesign uses these parameters
to create the trap. When an object overlaps different background colors,
InDesign considers each overlap separately in order to achieve optimal
results. See image to left for dialog box.
Improved Image Display Options:
The program makes it easier to balance image display speed and quality
by offering new options that control the resolution at which each image
displays on screen. You can now set image display options globally and
then override them for any individual image. This control can improve
performance. For example, graying out one or two images while continuing
to display other images on a spread may save significant system resources.
InDesign provides the following display options:
- Full Resolution--displays images
at the resolution at which they were saved, as long as RAM permits;
- Optimized for Memory--downsamples
images until the downsampled versions reach a minimum resolution of
72 dpi or fit into 15 percent of the RAM available (whichever happens
first). Images that fit into 15 percent of RAM are cached for instant
display;
- Fully Optimized--downsamples
images until the downsampled versions reach a minimum resolution of
36 dpi or fit into 15 percent of the RAM available (whichever happens
first). Images that fit 15 percent of RAM are cached for instant display;
and
- Gray Out--displays gray
boxes instead of images. This option is fastest but only allows you
to see image size and placement.
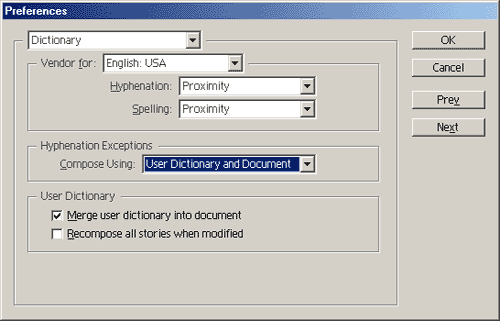
Portable Hyphenation--With InDesign
1.5 custom hyphenation dictionaries are more powerful than ever because
you can embed hyphenation exceptions in design files. This capability
helps to prevent recomposition from occurring when a file is opened
and edited on a different system. You can easily hand off files to another
designer or a production person to work on, or give them to a service
 provider to make final preparations, without worrying about problems.
The Dictionary panel of the Preferences dialog box provides options
for whether user dictionaries are merged into a document (default) and
whether the user dictionary, the document-specific exceptions, or both
are used to compose the document. You can also set a flag that forces
affected stories to recompose when the user dictionary is edited, so
line endings always stay up to standards. For even more control, you
can choose whether edits you make to a user dictionary are stored only
in a particular document or in the external user dictionary. This lets
you prevent document-specific hyphenation exceptions from being used
in other documents. See image to right for view of dialog box.
provider to make final preparations, without worrying about problems.
The Dictionary panel of the Preferences dialog box provides options
for whether user dictionaries are merged into a document (default) and
whether the user dictionary, the document-specific exceptions, or both
are used to compose the document. You can also set a flag that forces
affected stories to recompose when the user dictionary is edited, so
line endings always stay up to standards. For even more control, you
can choose whether edits you make to a user dictionary are stored only
in a particular document or in the external user dictionary. This lets
you prevent document-specific hyphenation exceptions from being used
in other documents. See image to right for view of dialog box.
Wish List: Although Adobe quickly
released this new version with an amazing array of new and advanced
features, there are still important items we would like to see. This
does not indicated that InDesign 1.5 is not a great program, but that
reviewer's never seem to be satisfied. Here is my wish list:
- More robust text editor;
- History palette;
- Support for non-postscript printers.
- Built-in tools for generating indexes, footnotes, and table of contents.
|
 Advanced
Beginners, Intermediate or Advanced Users. Anyone familiar
with other Adobe products will find Adobe InDesign 1.5 easy to learn,
as it shares many of the tools and features you find in Photoshop, PageMaker,
and Illustrator. The program comes with an informative User Guide and
an extensive on-line Help. There are also tutorials on the CD which provide
information and step-by-step instructions about the features of the program.
Excellent books on the software are available from Peachpit Press and
Macmillan, and the Adobe Web site offers additional information and tips
and tricks. Check out the following for tutorials on InDesign: http://www.adobe.com/products/tips/indesign.html
Advanced
Beginners, Intermediate or Advanced Users. Anyone familiar
with other Adobe products will find Adobe InDesign 1.5 easy to learn,
as it shares many of the tools and features you find in Photoshop, PageMaker,
and Illustrator. The program comes with an informative User Guide and
an extensive on-line Help. There are also tutorials on the CD which provide
information and step-by-step instructions about the features of the program.
Excellent books on the software are available from Peachpit Press and
Macmillan, and the Adobe Web site offers additional information and tips
and tricks. Check out the following for tutorials on InDesign: http://www.adobe.com/products/tips/indesign.html
 InDesign
1.5, by Adobe Corporation, is the newest version of their
high-end page layout program created for graphic designers, production
artists, and prepress professionals who want to design on the desktop
but have the ability to print on a commercial offset press or a desktop
printer. You can use the program to produce magazine spreads, brochures,
flyers, CD covers, catalogs, and advertisements. Adobe introduced the
first version in September
InDesign
1.5, by Adobe Corporation, is the newest version of their
high-end page layout program created for graphic designers, production
artists, and prepress professionals who want to design on the desktop
but have the ability to print on a commercial offset press or a desktop
printer. You can use the program to produce magazine spreads, brochures,
flyers, CD covers, catalogs, and advertisements. Adobe introduced the
first version in September  1999
as an alternative to QuarkXPress. Many reviewers (as well as this one)
thought the program was an excellent start in integrating page layout,
prepress, and drawing tools, but other users felt that Adobe had left
out important features. Thus Adobe has quickly released the new version
(which includes a slew of new features) and addresses about 90% of the
omissions mentioned by various users. This new release tightens the
integration between InDesign and Adobe's other publishing programs with
its new design tools and productivity enhancements such as text on a
path, a new eyedropper tool, and printer styles. InDesign 1.5 still
lets you open QuarkXPress documents; even use QuarkXPress keyboard shortcuts.
Since it looks like Adobe Illustrator and Adobe Photoshop, sharing many
of the same tools, palettes, and commands, it is easy to learn and use
if you are already familiar with Adobe products. The program is now
compatible with Windows 2000 and Mac OS 9. This review will emphasize
the new features of Adobe InDesign 1.5. For a discussion of the initial
software and a general look at how the program works, please see our
review of
1999
as an alternative to QuarkXPress. Many reviewers (as well as this one)
thought the program was an excellent start in integrating page layout,
prepress, and drawing tools, but other users felt that Adobe had left
out important features. Thus Adobe has quickly released the new version
(which includes a slew of new features) and addresses about 90% of the
omissions mentioned by various users. This new release tightens the
integration between InDesign and Adobe's other publishing programs with
its new design tools and productivity enhancements such as text on a
path, a new eyedropper tool, and printer styles. InDesign 1.5 still
lets you open QuarkXPress documents; even use QuarkXPress keyboard shortcuts.
Since it looks like Adobe Illustrator and Adobe Photoshop, sharing many
of the same tools, palettes, and commands, it is easy to learn and use
if you are already familiar with Adobe products. The program is now
compatible with Windows 2000 and Mac OS 9. This review will emphasize
the new features of Adobe InDesign 1.5. For a discussion of the initial
software and a general look at how the program works, please see our
review of  What's
New in InDesign 1.5. Below is a list of the new and enhanced
features in Adobe InDesign 1.5.
What's
New in InDesign 1.5. Below is a list of the new and enhanced
features in Adobe InDesign 1.5.