AutoEye 1.0

"Enhance Your Images With Just One Click"

Click on a thumbnail to enlarge it. Use your browser's "BACK" button to return to this review when done.
     
Type of Product
   

AutoEye 1.0 is a new image enhancement program developed by Auto F/X Corporation. This easy-to-use program uses a patented I.V.I.T. technology (Intelligent Visual Imaging Technologies) to reclaim color and detail that is lost in the transition from film or prints to digital. AutoEye can perfect your images without you having to learn complex correction concepts and processes such as adjustment curves, levels, cast removal, contrast and histograms. The image to the right shows a before and after photo using a simple preset. The program, autoeye though, has robust features and fully supports Photoshop actions, and you can batch process files through Photoshop. There is an Automatic mode with a "one click" styled interface or the more powerful Manual mode which features a large preview and intuitive controls. AutoEye can be used as both a plug-in and as a stand alone application. The stand alone version gives you a high level of ease as you can just drop images on the the desktop icon and process them. AutoEye works in most image editors that support plug-ins, including Adobe Photoshop 3.0, 4.0 & 5.0, CorelDraw 8.0, Corel PhotoPaint 8.0, JASC Paint Shop Pro 5.0, Fractal Design Painter 5.0 and Adobe Photo Deluxe 2.0. There is a Windows and a Macintosh version. Price: $99.00. For information on other Auto F/X products, see our review of Photo/Graphic Edges 4.0 and their Web site: http://www.autofx.com

     
User Level
   
Beginning, Intermediate, and Advanced users. The program is so easy to use that it would bedavid perfect for someone just starting out with image enhancement. The image to the right shows a before and after photo using a basic preset and just took a few seconds. Yet professional designers and photographers will find that the program can help them maintain a better quality of image with its advanced color rebuilding algorithms.
     
Features
   

AutoEye is very easy to use.
Connects directly to digital cameras and scanners for fast and easy use.
Automatically enhances image details.
Reclaims lost colors and details.
Balances colors and removes casts.
Sharpens and enhances contrast.
Improves CMYK color reproduction.
Batch process images in Photoshop.
Drag and drop capable application.
Supports Photoshop actions.
User defined automatic presets.
Plug-in version works in most image editing applications.

     
Review    
   

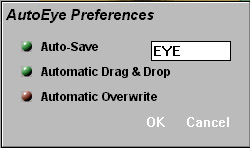
Installation: The installation is easy and very fast. You have the choice of installing just the application, just the plug-in, or the typical installation which installs both the application and the plug-in version.

Stand Alone Application: The stand alone version is drag and drop aware and can open many popular image formats. You can either launch the program and load in an image when you click Manual or Automatic or you can drag and drop images on AutoEye and have them automatically processed. Under the Help menu there is a Preferences window that helps you configure the drag and drop features, such as:

  1. AutoSave--When this option is toggled, AutoEye will write out a new enhanced file to thepreferences same directory but will add to the file name the text you enter in the text field. A file called Picture would be saved as MyPicture if you typed in "My" into the text field and activated the AutoSave button.
  2. Automatic Drag and Drop--During normal drag and drop operations AutoEye prompts you to choose Manual or Automatic mode. If Automatic Drag and Drop is active, then all drag and drop operations default to the automatic mode so you are not prompted to choose a mode.
  3. Automatic Overwrite--This option automatically writes the enhanced image over the old image in the same file versus saving another file.

initial screenInitial Starting Screen: You get the same starting screen when you first launch AutoEye as either a plug-in or a stand-alone application. You will be presented with a screen that lets you choose to either apply automatic enhancements or manually enhance your image.

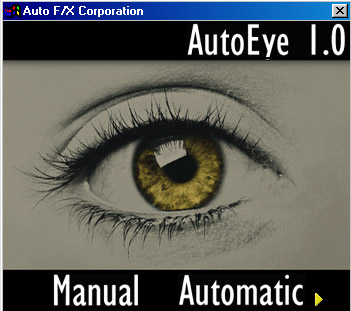
Using the Automatic Mode: The automatic mode allows you to quickly enhance images with justautomatic mode one click. You just simply click on the words Automatic on the starting screen and the image is enhanced. The settings that are used are derived from the pop-down menu next to the word Automatic. Settings can be added to this menu by going to the Manual mode and saving presets. Then these presets will be shown under the Automatic menu. This is a great way to quickly setup some default settings that are calibrated to the type of images you typically work with.

Using the Manual Mode: The Manual mode is used when you want to see a preview of your image and correct it manually using adjustment sliders. There is an active preview window, with sliders to the left. You have access to zooming and panning tools
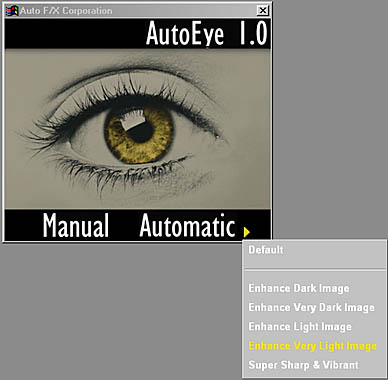
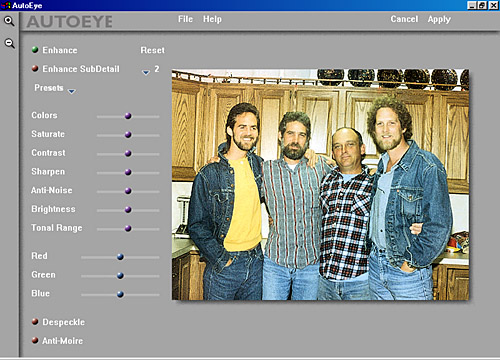
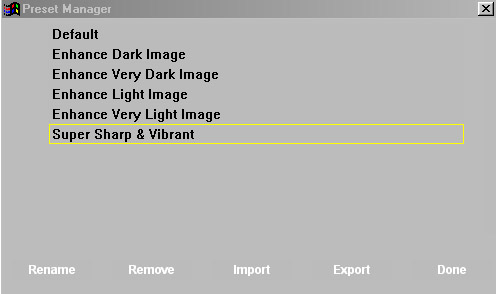
 for closer inspection of your interfaceimages. The image you see in the preview window is the enhanced image, but you can see what the original looks like in comparison to it by holding down the Shift key. The preview window will then show the original image. Another handy option is the ability to pause the preview windows from updating after each slider. This is useful if you want to adjust multiple sliders and do not want to wait for each slider to update before adjusting anything else. You just hold down the Control key, move the sliders you want, and the preview will only update when you lift the key.

Color Modes: AutoEye works equally well in either an RGB color space or CMYK color space.

Using Actions: AutoEye is actions aware and works with Photoshop 4 and higher actions palettes. You can script your own image settings using actions, so running AutoEye can be a very seamless operation. If you are working in a production oriented environment, and you need to do batch processing, AutoEye's support for actions can be of benefit.

Presets: You can save and recall your preferred settings as presets. This is a quick and easy way to apply various settings and configurations to your images. The presets that you save will be preset optionsname presetavailable under the Load Preset option and they will also show up under the Automatic pop-down menu on the initial screen. There is a Preset Editor that allows you to rename selected presets in the list, remove presets, or export the selected preset to disk. You can also import presets into the Preset Editor.

Selective Adjustments to Images: With AutoEye, it is possible to select portions of an image in your image editing application and apply enhancements just to that portion. You can even feather a selection and apply AutoEye settings to the feathered selection so the adjustments are gradually faded into the image.

Enhancements: AutoEye 1.0 provides the following enhancements:

  1. Color Correction--Corrects cast colors found in many digital files and ensures the color balance in the image is maintained consistently throughout the entire range of colors. The I.V.I.T. actually reclaims lost color in images.
  2. Contrast--Adjusts an image's highlights, shadows, and mid-tones for sharper tonal variance. Flat images will have a richer contrast that guards against burning highlights or blowing out details in lighter areas of the image.
  3. Sharpness--Enhances images to bring back lost detail and to sharpen the quality of the visual to closer match the original non-digital image.
  4. Saturation--Increases the vibrancy and enriches the color gamut of the digital file. Saturation controls are subtle and work in combination with other color correction controls to give a more natural saturation to the colors in the image.
  5. Anti-Noise--Removes noise introduced into an image by sharpening and increasing the contrast values.
  6. Brightness--Selectively adjusts the relative lightness or darkness values within an image. Photos shot in low light conditions can benefit from an increase in the overall brightness values. Unlike global brightness controls found in many image editing applications, AutoEye works to protect an image's tonal range when it alters the brightness component of an image.
  7. Tonal Range--Adjusts the visual gamma of the image to increase or decrease the tonal values. This control makes flat images appear richer in tonal depth and images with too much depth are lightened to be more balanced.
  8. Moire Pattern Removal--Works to remove moire patterns produced when scanning printed images from newspapers, magazines and fine art prints.
  9. Despeckle--Attempts to remove small imperfections in the image caused by dust or dirt on the original slide or scanned material.


Personal Comments    
   
When I received AutoEye for review and first started using the program, I thought, "This program is too simple. It won't do anything." The more I played with it, the more I came to appreciate it. It's intuitive interface makes the program a snap to learn and use. All of the samples for this review were done with basic presets that took a matter of seconds. Yet you can go in and manually tweak the images to your heart's content if you like. One great advantage to this program, is that it can be used as a stand alone application or a plug-in, so individuals without Photoshop or other expensive image editing programs do not have to spend additional money to use it. I liked the ability to see the original within the program by using the Shift key, and also the ability to use the Control key for multiple changes without waiting for the preview update after each one. Another great feature is the ability to adjust the whole image or just a selection. I used the program on various images and then went in and tried to do the same kind of adjustments in Photoshop. It took twice as long and the results were not always as good. The program is excellent for blending various adjustments to produce a subtle and refined output. I would highly recommend this program for anyone interested in image editing.
     
System Requirements    
   

Windows:
Windows 95/98/NT 4.0
System RAM: 32 MB minimum (64 MB recommended)
Storage Space: 100 MB or more in disk space on your startup drive (for swap disk space)

Macintosh:
Any Power Macintosh Machine
System RAM: 32 MB minimum (64 MB recommended)
Storage Space: 10 MB or more
System Software: Mac OS 7.1 or higher


Graphics: DeMorgan WebSpice 1,000,000 Page Design Edition
Web Page Editor: Macromedia Dreamweaver 2.0

Scanner: Hewlett Packard ScanJet 6250C Professional Series